🎉 Paint Your World Bright!
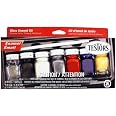
The Testors Enamel Paint Set, 9132X, features a collection of six fluorescent colors, a thinner, and a brush, all designed for use on a variety of surfaces including wood, metal, and canvas. With a fast-drying formula that cures in 48 hours, this set is perfect for both indoor and outdoor projects, making it an essential tool for artists and DIY enthusiasts alike.
| Brand | Testors |
| Color | Fluorescent Orange, Green, Red, Blue, Yellow, Pink |
| Finish Type | Gloss |
| Size | 1.75 Fl Oz (Pack of 1) |
| Item Volume | 4 Fluid Ounces |
| Special Feature | Fast-Drying |
| Unit Count | 1.75 Fl Oz |
| Paint Type | Enamel,Testors Enamel,Acrylic |
| Specific Uses For Product | Interior/Exterior |
| Surface Recommendation | Canvas,Ceramic,Leather,Metal,Paper,Plastic,Wood |
| Indoor/Outdoor Usage | Outdoor, Indoor |
| Item Form | Gel |
| Included Components | 1 paint brush, thinner, and tray |
| Age Range (Description) | 12 Up,12 Years & Up |
| Is Waterproof | False |
| Model Name | _ |
| Package Information | Bottle |
| Color Code | 9132X |
| Full Cure Time | 48 Hours |
| Coverage | Full |
| Water Resistance Level | Water Resistant |
| UPC | 885329320172 075611913209 |
| Global Trade Identification Number | 00075611913209 |
| Manufacturer | Testors Home |
| Part Number | 9132X |
| Item Weight | 10.2 ounces |
| Product Dimensions | 8.25 x 6.75 x 4.5 inches |
| Item model number | 9132X |
| Is Discontinued By Manufacturer | No |
| Finish | Gloss |
| Material | Plastic |
| Item Package Quantity | 1 |
| Special Features | Fast-Drying |
| Batteries Included? | No |
| Batteries Required? | No |
| Warranty Description | Warranty |
R**7
Nice colors
Nice colors. Typical paint. No issues with the product.
D**D
Great for painting sights!
I've been painting my sights for years, I've used another product and this paint as well. This paint does a great job but but you need to prepare properly.1: For maximum effect you will need some regular white gloss enamel Testors model paint. No, this is not in the kit so you will need to pick some up. You will also need several toothpicks (or a fine artist type camel hair brush - do not use a synthetic bristles brushes as they are stiff and tend to leave fine 'grooves' in the paint and you want smooth paint coverage - do not use the brush in the kit. Yes, this is nerdish nit-picking but you put a lot of money into your gun so do it right with good materials).2: Clean, clean, clean .... the sight surface where the paint will be applied. Remove all dirt, dust, grime, and oils or other substances from the area to be painted. Then use some clear rubbing alcohol and a q-tip to thoroughly scrub the area where the paint will be applied. Ensure area is completely dry. Don't run your fingers over the area to be painted as your skin has oils on it and may leave some and the paint will not bond to an oily surface even though it might coat. HAVE PATIENCE AND TAKE YOUR TIME, DON'T RUSH, STEADY HANDS. MAKE SURE ITS 100% CLEAN.3: Prepare the paint. When you get this kit, unless you mix it completely it is going to look 'thinner' than you need and not as brilliant as it can be. This is because a lot of the pigment settles out of the paint when its been sitting on the shelves or in storage for a while. So, open the bottle of the color you will be using, use the kit supplied brush handle to stir around the bottom of the bottle some then drop a couple of BB's in the bottle and replace the cap then shake vigorously for about a minute. The BB's help get the rest of the pigment into solution by agitating.4: Assuming you have done any masking that needs to be done (not always necessary if you are very careful, but it doesn't hurt 'cause sometimes accidents happen, and you might need it if you are going to get very detailed), making sure everything is clean and dry - you will now apply the white paint first using a tooth pick or fine camel hair 'artist' paint brush. Do no blob the paint on, dip the toothpick (or brush) in the paint and get rid of any drops or large quantities of paint on the tooth pick (or brush). Do not put a thick layer of paint on the sight, you want to build up thinner layers. Let it dry completely over night then, apply the second thin layer of white then let that dry over night. If you did this correctly you should have a nice even smooth layer of white on the sight area with none of the underlying sight color (e.g. the anodizing or bare metal) color showing. If you need another layer apply it and let dry over night. Once you put the white paint on do not touch it with your bare skin or anything else even after its dry and don't let it get dirty. HAVE PATIENCE AND TAKE YOUR TIME AND DO NOT RUSH IT AND DO IT RIGHT!5: When the white is ready (completely dried) its time to apply the fluorescent color you have chosen. Follow the same directions for applying the fluorescent color color as you did for applying the white. Remember to let dry overnight. Build up thinner layers.If you did all this correctly you will have a nice looking very visible sight, and the paint job will last you for a longggg time if you take care of it.The amount of visibility 'brilliance' depends on a few factors: Yes light is needed, this is not glow in the dark paint. Your eyesight condition and/or lighting conditions may affect the visibility more with certain colors. A good all around color to use is the fluorescent (very slight greenish) yellowish color in the kit, some people though will do better with the fluorescent orange. But to help select a good paint color for you first timers make a test swatch on a piece of white paper with the colors and take the paper outside in bright sunlight and hold the paper at arms length and see which is more highly visible for you in bright sun light, then repeat in dim room light - the color that shows the best visibility for you in both those conditions will be the color you want to use. But remember when selecting the color that darker colors may not be as highly 'quickly' visible against darker targets, but with the (very slight greenish) yellowish color even against lighter colors and bright conditions it tends to be still more quickly visible to most people because of the very slight greenish tint which is why its the best to use for most people. But it is different for different people.Do not put cleaning solutions or oils on the paint. Do not abuse the paint by letting it get scratched or chipped. If the painted sight gets dirty wipe it clean gently with a soft moistened cloth, wiping the paint with your fingers can leave skin oils which will attack the paint over time causing it to lose some of its fluorescent visibility quality over time.
R**S
Highly recommended for painting handgun sights
I purchased this set for repainting pistol sights. For this purpose it worked perfectly. I read through some of the reviews stating that the paint was watery, and it is NOT true. They did not prep the paint correctly. One or two reviewers specifically noted that these enamel paints need to be shaken vigorously for at least 30 seconds before use so they are no longer settled, and properly mixed. Once the paint is mixed it is thick enough to set into pistol sights with simple prep.Some reviewers also suggested that this paint is good when used ON TOP of the white paint supplied with most cheap pistol sights supplied from the factory. This is incorrect. My experience has been the enamel paint works best when applied on a clean, unpainted surface.My prep was as follows - use the supplied brush and dab the paint thinner in the holes of the pistols sights to loosen the factory paint. Then, using a hardened steel pick, begin scraping and digging out the factory paint until very little remains. Dab some more thinner on it and then wipe clean. With a clean dry surface, apply your enamel paint to the pistol sight with the metal pick in very small quantities until the hole is flush. Let the paint sit for 2-3 hours before applying additional coats, and let sit 12 hours after final coat to cure the paint before shooting.I used the fluorescent yellow on my rear sights and the fluorescent orange on my front sights, and the results were excellent. No need to buy $80-$100 night sights and a HUGE improvement over the terrible factory sights on most handguns.I highly recommend this paint set for gun sights!
T**N
Pretty good
Needs a couple coats but works really well. The colors are vibrant and dries quickly.
M**I
satisfied w/ product, delivery & service
satisfied w/ product and delivery & service
D**E
Not the Testers paint I remember
I purchased the 9132x paint set for some hobbying touch up. This paint is rather thin and requires several coats and the colors didn't dry as vivid as they appear in the jar. Certainly not the testers of yesteryear but I guess nothing is as it was these days.
P**S
Quality product
These paints are as described by seller. All the colors I needed were included. I would buy this paint again.
D**R
Why get any other brand
Results are awesome get it!
ترست بايلوت
منذ 3 أسابيع
منذ شهر