💖 Elevate Your Nail Game: Salon Quality, DIY Convenience!
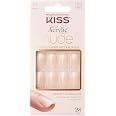
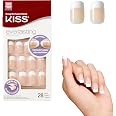
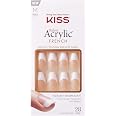
KISSSalon Acrylic Press On Nails in 'Cashmere' offer a quick and easy solution for achieving a professional-looking French manicure at home. With 28 nails in various sizes, a 2g glue, a mini file, and a manicure stick, this complete kit features Flexi Fit technology for comfort and acrylic-infused strength for durability, ensuring a seamless and stunning finish that lasts up to 7 days.
R**N
Everybody: "Your nails look amazing!" Me: "Duh, girl. Bye."
If all you need is the short version of this review, here ya go:This is, by far, the best looking set of press-ons I have ever worn. PERIOD.If you'd like to read some tips and hacks I've included for the longevity and care of your press-on nail sets, or if you're reading this during work hours and want to burn thru some time on the clock, feel free to dive into the much longer version of this review below. You're welcome!So without further ado, let's get to it:CUSTOMIZATIONS:1. To up the longevity: I adhered these with solid nail gel. The nail bed of these Kiss press-ons is transparent enough for LED/UV to penetrate and fully cure the solid nail gel underneath. I spot cure to initially hold them in place, then I will cure for a full 90 seconds for LED (twice that for UV). I cure my thumbs separately. Until somebody invents a curing lamp that has two little internal "thumb boxes" on the far right and left that are lined with LED's going down the right and left sides, I will always cure my thumbs first. If someone ever invented a curing lamp like that ^, I'd be willing to pay stupid money for it. Just sayin'.Sorry! I digress...okay back to these customizations:2. Next, I add a layer of base coat for the tacky layer followed by a coat of builder gel for strength and/or to build apexes. These press-ons do not have pre-built apexes. The great thing about press-ons is that you can make them your own by adding gel colors, chrome powders, nail art, charms, etc. When adding additional product to press ons, I start with a base coat for it's inhibition layer, but I DO NOT BUFF THE SURFACE first! After a week or so of wear, this allows the base coat, builder gel, and topcoat to eventually peel off as a whole piece taking the gel color, stickers, charms, etc. with it. That layer of base coat+builder gel+top coat will serve to protect the press-ons underneath and keep them pristine. The set will end up staying in such good condition that it can be re-applied multiple times.3. Lastly, I add a top coat for that shiny, finished look that only a good top coat can give (I highly recommend KUPA Gelfinity Top Coat to make your nails look super juicy! That stuff is my all time fav - she has that thick consistency that makes you go, "ooooooo...yasss, honeee"). The French on this set of Kiss press-ons look to be printed as opposed to painted, so even if you prefer not to add a top coat, the white on this French shouldn't chip. However, I always recommend adding a top coat to any and all sets, if anything, to protect the press-ons underneath. I also add a layer of top coat on the underneath side of the nail tips only. This step really helps to keep them clean.>>>Note about other adhesives for press-on nails:<<<1. Kiss Nail Glue: If you end up going the solid gel route, DON'T THROW AWAY the tube of Kiss nail glue that comes with this set! Save it to use for adhering opaque press-on sets that LED/UV can't penetrate. Don't underestimate this stuff. Kiss glue is one of the best adhesives on the market for press-ons. While it's worth saving, it does have a shelf life. Try using it within 6 months-ish because eventually, it will dry up and solidify in the tube.2. Adhesive Glue Tabs (not included in this set): I only use these when I want short-term wear as they have the least amount of staying power. HACK: You CAN increase the wear time of adhesive glue tabs by heating them during application! Always prep your nails first then place the glue tabs in the center of your nail beds. Before removing the protective top film, CAREFULLY heat each nail with a hair dryer. (NOTE: At the risk of soundin like your momma, be careful not to burn yourself during this step! The glue just needs to be warmed enough to become more pliable/gooey. Your hair dryer does not need to look like some orange glowing rocket engine for this to work!) Next, peel off the top film and apply the nail at a 45 degree angle pushing the glue down towards the cuticle. Add pressure and hold for 30 secs as the glue starts to harden (glue tabs don't need LED/UV to cure). The added pressure will cause the heated glue to spread out and cover the entire nail bed lessening the chance for lifting. No lifting = longer wear.Okay. I'm done, except for this last word of warning:Try to avoid injury from all those stabs of jealous side eye when you stroll up sportin this fabsolutely snatched set of kitten mittens.Now get out there and slay.
M**Y
I will never use another brand!!!
I am KISS's biggest fan. I have been using their press ons for many years and am always impressed with the quality and durability.The acrylic french set are a bit thicker than their normal design press ons in my opinion, but they look great on and just like what you get done for $60+ at a salon! They come with many sizes so you can find the right fit for your nails. I have used this set as is and have also painted over it with regular nail polish before (the photo of the red nails are actually this set painted with regular polish!).I follow the application instructions and these nails consistently last 10-14 days for me:1. Nail prep: you don't need to do anything over the top here, but pushing back your cuticles (and trimming them if you want) will help give you a clean surface for application. I don't usually scuff the surface of my nails at all, but that is recommended to help the nails adhere (just a little scruff goes a long way!)2. Choose your nails: Finding the right fit for your nail is SO IMPORTANT to the durability! A nail that is too small or too big will pop off earlier. Sometimes that means I need to file down the edges of a nail that is slightly too large (two of my fingers are very close to the same size but the sets only come with 1 of each size) but it is always worth the extra few seconds to get a good fit. I always go through and layout all 10 nails in order that I will use to make sure I have the best fit possible, and if I need to adjust anything I can do that before I begin to apply.3. Prep your nails part 2: AFTER you have done all the trying on for size and other prep (incl. scuffing if you choose to do that), I use an alcohol wipe to clean off the surface of my nails to make sure they're as oil-free as possible. I then wait a few seconds for that to dry and take care to not touch the surface of my nail again. These alcohol wipes are usually included with the imPress nails (Kiss sister brand with glue sticker tabs instead of glue) but aren't included with the glue-only sets for some reason (but you can get a bulk pack for <$10 on amazon) or DIY it with rubbing alcohol and a cotton ball at home).4. Apply: I usually start from my pinky and work in. I usually leave my index and thumb for last. I am right handed so I do left pinky, left ring, left middle, right pinky, right ring, right middle, right index, right thumb, left index, left thumb. I don't think it really matters, but that gives me the best control. I use the glue provided and apply a dot to the center of my natural nail. Then I press down the press on at a slight angle to make sure the glue spreads out under the nail completely (but try not to use so much glue that it spills over the side!). Then PRESS AND HOLD while the glue dries - I usually aim for at least 10-15 seconds per nail, but I think 30-60 seconds is recommended. 15 seconds can feel like a long time when applying but this is SO IMPORTANT!!5. Clean up anything you want: there is usually a small tab in the middle of the nail from production - it's not really noticeable but I usually file it down a bit just to completely smooth it out for the salon-quality. This is more prevalent on almond shaped nails, less on oval and square. When I file, I do try to hold the nail down as I file just to help the glue hold on. I have also used many KISS nails that are longer than I prefer, so after I apply I clip them with normal nail clippers and then file down (the edges can be sharper if you clip them!). I would recommend getting a salon-quality file if you choose to do this. You CAN file the nails into a new shape with the file provided, but it is MUCH easier with a bigger and stronger file.
ترست بايلوت
منذ شهر
منذ 5 أيام