We remain fully operational. Our teams are working around the clock to ensure your deliveries continue safely.

قم بتنزيل التطبيق


معلومات عنا
حقوق الطبع والنشر © 2024 Desertcart Holdings Limited
قم بتنزيل التطبيق

🚪 Unlock effortless control—your garage’s new best friend!
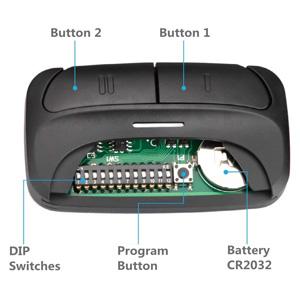
The Acvoce Universal 2-Button Garage Door Opener Remote is a compact, lightweight replacement remote compatible with over 10 major garage door brands including Chamberlain, LiftMaster, and Craftsman. Featuring dual-button control, it can operate two devices independently and supports both learn-button and DIP switch programming methods. It comes with a pre-installed lithium battery and a visor clip for on-the-go convenience, making it a reliable, ready-to-use solution for modernizing your garage access.


| ASIN | B08RSDQKM9 |
| Batteries | 1 Lithium Metal batteries required. (included) |
| Best Sellers Rank | #22,055 in Tools & Home Improvement ( See Top 100 in Tools & Home Improvement ) #108 in Garage Door Keypads & Remotes |
| Customer Reviews | 4.1 4.1 out of 5 stars (5,335) |
| Date First Available | December 31, 2020 |
| Item Weight | 1.44 ounces |
| Item model number | 749607459209 |
| Manufacturer | Acvoce |
| Product Dimensions | 3.23 x 1.73 x 0.71 inches |
B**N
This keypad is working great for me!
This numeric keypad works very well for my 30+ year old Craftsman garage door opener with 9 dip switch code setting and 390MHz transceiver. I was a bit dubious about purchasing it because it looked just like one I purchased previously from a different supplier that went into a "buzzing" mode frequently when I tried to use it, after pressing a key, and then became completely unresponsive. This even occurred when I was initially setting it up! I found that taking the battery out for a few hours would generally get it working again for a while, but the lack of dependability was unacceptable so I returned it for a refund. This new one has consistently worked fine, no buzzing at all. It was easy to set up. I wonder if the previous one was just plain defective, or if this new one has different/improved electronics and/or programming. I did find it a bit odd that when I initially took it out of the box, the battery was already in it and connected! Anyway, it works! I like this one very much, even better than the OEM keypad I have on a newer opener. The lighted keypad and audio feedback for key presses are very helpful. It is also good to have the keypad information inside the keypad cover. The next question is... how long will this keypad last? I have only been using it for about a week. I will do an update to this review if it fails after an unreasonably short time. Right now, I am very happy with it!
N**E
Here is how I programed them.
These work great. I highly recommend them. They work on my old garage door opener as well as the new one next to it. I’m embarrassed to say how many different interpretations of the instructions I tried before I guessed correctly how to program them. The term “learn-button” refers to the program or learn-button on the door operating motor. The term “program-button” refers to button 5 on the remote-control and is next to the row of DIP switches. Identify the doors to be operated as door I and II. While programing the remote-control for door I, use button I. While programing the remote-control for door II, use button II. Repeating the setup procedure for each door will allow a single remote-control to operate one or two different types of doors. For each door opener, identify its brand and the type of learn-button, located on the motor. Use the table in step 3 of the manufacturer's User Manual to determine the number of times that you will need to press the remote-control button I or II when programming the remote-control. Remove the remote-control battery cover and locate the program-button (button 5). Then do these steps within one minute to program the remote: 1. Press and hold the program-button on the remote-control until the blue light on the remote-control turns on, then release the program-button. 2. On the remote press the I or II button (corresponding to the door you are programming) the number of times indicated in the table in step 3 of the manufacturer's User Manual. Allow the blue light to flicker after each press of the button before pressing again. 3. Press the program-button on the remote to store the setting in the remote. The blue light will extinguish. 4. Press the motor learn-button. It will light up. 5. Press the I or I button (corresponding to the door you are programming) one last time. The light on the motor learn-button will extinguish. Example 1: 1. Press and hold the program-button on the remote until the blue light comes on. 2. Since the motor is a Chamberlain and has a yellow learn-button, press the I button on the remote 8 times, allowing the blue light to flicker after each press. 3. Press the program-button on the remote to store the setting in the remote. The blue light will extinguish. 4. Press the motor learn-button. It will light up. 5. Press the I button on the remote. The motor learn-button will extinguish. 6. Test the remote control. Example 2: 1. Press and hold the program-button on the remote until the blue light comes on. 2. Since the motor is a Chamberlain and has a purple learn-button, press the II button on the remote 3 times, allowing the blue light to flicker after each press. 3. Press the program-button on the remote to store the setting in the remote. The blue light will extinguish. 4. Press the motor learn-button. It will light up. 5. Press the II button on the remote. The motor learn-button will extinguish. 6. Test the remote control.
S**S
Works well but very cheap construction
I have two garages that over the years ended up with different brands of opener. This "universal" opener is compatible with both of them and works well once I could get the buttons paired. The pairing process is laid out in the instruction manual clearly enough, but depending on your opener it can be fiddly to get working. In order to set a button you have to put it in pair mode, then press the button a number of times to tell it which brand/frequency to use. There is a table in the instruction pamphlet that lays out the different combinations. For my genie opener, the process was easy and straightforward. For my chamberlain opener it took some trial and error to figure out the correct version, and when I found the correct one, it took 19 button presses to set the mode. I had to retry like 10-15 times before I could get it paired correctly. It works well once programmed, but I worry I'll to have repair once the coincell batter dies. The only other critique is the metal clip to mount on the visor is cheap and small, so instead of clipping snuggly to the visor it's instead kind of bent and sticking out. For what it is and how cheap it is, I'm plenty happy, but this isn't a super high quality product.
K**O
Me funciono Perfecto para mi puerta
G**Z
No digo que sea mal producto... en mi caso no funcionó, las instrucciones muy confusas.
ترست بايلوت
منذ 5 أيام
منذ 3 أيام