Some deliveries may take a little longer than usual due to regional shipping conditions.

قم بتنزيل التطبيق


معلومات عنا
حقوق الطبع والنشر © 2024 Desertcart Holdings Limited
قم بتنزيل التطبيق
🌡️ Take control of your climate—because precision is the new power move.
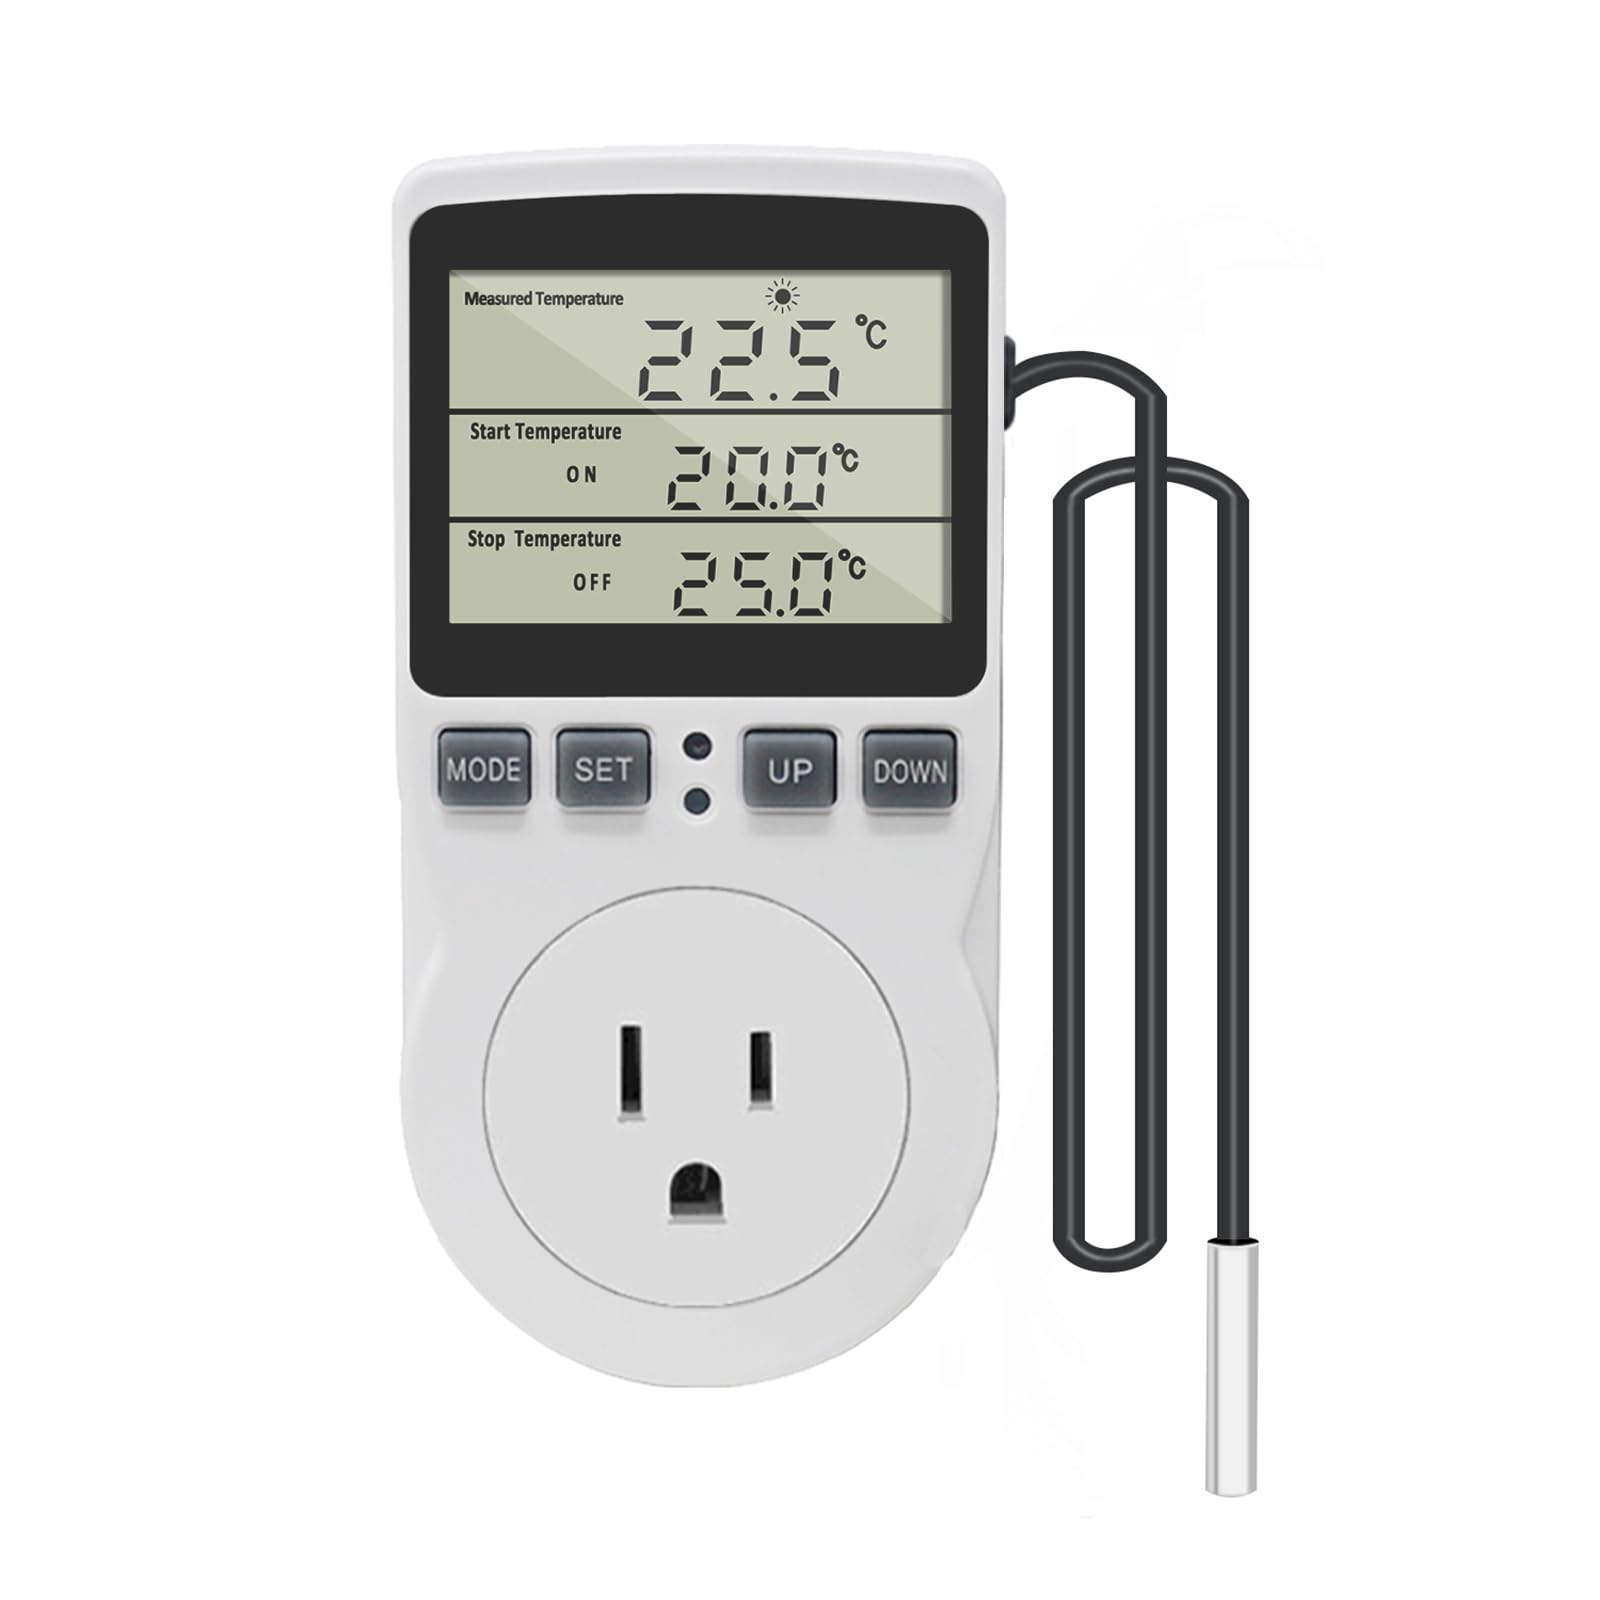
The KETOTEK Digital Thermostat Outlet Plug is a versatile 120V/15A temperature controller designed for precise heating and cooling automation. Featuring ±1℃/±2℉ accuracy, a wide temperature range (-40℃ to 120℃), and programmable timer modes, it supports both Celsius and Fahrenheit displays. Its plug-and-play design, fire-resistant build, and memory retention make it ideal for applications from greenhouses to home heating, delivering reliable, customizable climate control with minimal setup.


| ASIN | B0957NYW37 |
| Batteries Included? | No |
| Batteries Required? | No |
| Best Sellers Rank | #25,328 in Tools & Home Improvement ( See Top 100 in Tools & Home Improvement ) #7 in Temperature Controllers #74 in Household Thermostats |
| Customer Reviews | 4.5 4.5 out of 5 stars (824) |
| Date First Available | July 8, 2017 |
| Included Components | 1*Thermostat Plug Outlet; 1*Manual |
| Item Weight | 7.2 ounces |
| Item model number | KT3100 |
| Manufacturer | KETOTEK |
| Mounting Type | Wall Mount |
| Operating Temperature | 248 Degrees Fahrenheit |
| Part Number | KT3100-US |
| Power Source | AC |
| Product Dimensions | 2.28 x 1.54 x 4.72 inches |
| Special Features | Temperature Display |
| Style | Non-backlit Style |
| Usage | Heating |
J**K
Specification issues between what you can see on Amazon vs. what's in the user guide.
I gave this item a 5 star review because it did work for my need but the specs you can see on Amazon don't match those in the user guide that comes with the unit. Looking at the item on Amazon it appears that the unit will control appliances up to 120VAC/15A. I needed it to control the temperature in an old freezer over Christmas that still works but the thermostat is dead. So, I bypassed the freezer thermostat and intended to use this device to turn the freezer power on at 40F and off at 34F so it would basically be a refrigerator. Reading the user guide while setting it up I saw the the unit is mainly designed to control a resistive load <14A, like a heater element, and should not be used for controlling inductive loads >2A/240W. Anything with an AC motor is an inductive load (fans, refrigerators, freezers, etc.). My freezer would technically exceed the 2A inductive load but I was out of time and had to use it anyway. It worked perfectly for over two weeds and is still working fine though not in use as the moment. Oddly, the user guide says the unit is "widely used in heating, refrigeration..." so that is confusing since refrigeration usage appears to violate the 2A inductive load spec. As an electronics engineer I have many years of experience with AC and DC relays. In most cases, relays do better switching AC loads with some inductance than DC loads since any inductance in a circuit causes an arc when disconnecting the load and when switching AC loads the arc is extinguished when the voltage polarity changes within a few milliseconds. That doesn't happen with a DC load so the contacts on relays designed for switching DC loads are typically much beefier to handle the arcs. Other than the spec confusion, this is a great little unit!
A**Y
This has worked great for our heater application
Working great so far. using it to control a Ceramic heater for my well pit. It have multiple settings and ways to control what you need for your application as well, not just on or off.
T**S
Great air temp probe
Bought this to regulate the temperature of a towel warmer i made. It has been great. Easy to use, with a very long temperature probe wire. It is accurate in the high low temp setting and easy to change when necessary. Nice thing about the probe is it measure air temp, without having to actually attach to anything, (metal to metal).
G**N
Where is the on / off switch for the thermostat itself?
Seems to work well. Only thing it needs is a simple on / off switch. I am using it for a shop for a portable space heater, and when i'm not in the shop, I don't want the heat on. I cannot find a simple way to turn it on / off without just unplugging the heater from the temp controller.
J**B
Good product with intuitive programming
I read the previous reviews about instructions, so I went in knowing not to bother, and expecting a headache. I found I didn’t need instructions at all, it was very intuitive. The thermometer itself is on a long wire, so you have the heater far away from you and still measure the air close to you. Great product that saves money as I only need to heat up one room as opposed to the whole house.
H**E
Appear really solid design, work well
Like this so much, I bought 2 more. My other internet-connected thermostats are forgetting their settings so these, which appear to be solid and dont forget, will take over preventing a freeze in my winter fig-house
J**S
Exactly as described very nice!! 👍 👍
This thing could not be better I’m using it for a deep freezer live well set up. It has preformed flawlessly! Very easy set up, intuitive and a bright screen I’m extremely pleased with this product.
R**R
Great product. Lousy instructions.
I got this product the other day and read the instructions and started playing with it. The instructions appear to be good but what you don't know is that they leave out a critical detail that you need, which precludes the use of the 4 timing functions. I was -> <- THIS close to returning it. That's why I gave this 3 stars. I went to lots of trouble to figure out how to use this device, to the extent of reading a bunch of reviews on Amazon and Ali Express and experimenting a good bit. And, I'll tell you exactly how it works. The product has a temperature control mode which can do heating or cooling. The instructions say up to 15 A resistive (like a heating element or lamp) and only 2 A inductive (anything with a motor like a refrigerator, freezer, air conditioner, or fan). 2 A inductive (in the USA) is only 240 W. This is NOT enough power to run a window air conditioner. It is enough to run a small refrigerator, freezer, or a pretty good fan. The unit appears to remember settings over a short term power failure. I have not tested it for long term power failures. If the device isn't behaving like you think it should, press the lower dark spot between the buttons which is a reset button. Here are my descriptions of what the buttons do: MODE - short press - Switch modes if there's not timing cycle engaged. If you are programming some digits, MODE ends the programming, or you can wait for a timeout. MODE - long press - This is what the manual doesn't tell you. This will engage or disengage a timing cycle after you've set the digits. SET - short press - Engage setting mode (settable digits flash). Switch digits to set. SET - long press - If in temperature control mode, change from Fahrenheit to Celsius and back. Here's how to use each mode. Use MODE to get into each mode if there's not a timing cycle engaged. If a timing cycle is engaged, you must disengage it to change modes. Do not initially plug in your heater or cooler or fan or turn it on. The outlet may go ON as soon as you enter temperature control mode. A blue LED above the reset button lights up when the outlet is ON. Temperature Control Mode - active if you see 3 temperatures in either degrees F or degrees C and a heating or cooling icon. If the start temperature is lower than the stop temperature, you are in heating mode. The heating icon will show up. In heating mode, the outlet may go ON immediately if the measured temperature is below the stop temperature. The measured temperature does not have to be between the start temperature and the stop temperature for the outlet to go ON. If the start temperature is higher than the stop temperature, you are in cooling mode. The cooling icon will show up. In cooling mode, the outlet may go ON immediately if the measured temperature is above the stop temperature. The measured temperature does not have to be between the start temperature and the stop temperature for the outlet to go ON. To set the unit press MODE until the three temperature readings appear. Press and hold SET if necessary to change from Fahrenheit to Celsius and back. If I say press something, that means press and release. Press SET. Some digits should start blinking. Press, or press and hold UP or DOWN to set the digits. Press SET to go to the next set of digits. Set them the same way. Press the MODE button to end setting or wait for a timeout. Place the temperature sensor where it can measure the temperature of the space or object or liquid you're interested in. I DON'T know if the sensor is waterproof. To set heating mode, set the start temperature below the stop temperature. The outlet may immediately go ON if heating is required. Plug in and turn on your heater. If the heater has its own thermostat, set it to maximum temperature or continuous ON. To set cooling mode, set the start temperature above the stop temperature. The outlet may immediately go ON if cooling is required. Plug in and turn on your cooler or fan. If the cooler or fan has its own thermostat, set it to minimum temperature or continuous ON. The unit either runs in heating or cooling mode. It does not switch modes automatically. The unit should maintain the desired temperature range by cycling the heater, cooler, or fan on and off. If you want to force the outlet to go off manually, you can enter a timing mode without engaging it. The unit has 4 timing modes. Press MODE to get into each mode if there's not a timing cycle engaged. If a timing cycle is engaged, you must disengage it to change modes. The timing modes do not do time of day or day of week. They are only time intervals. F01 Cycling Timer is the first timing mode. The unit turns the outlet on for the time specified in ON and off for the time specified in OFF then repeats. Press SET. Some digits should start blinking. Press, or press and hold UP or DOWN to set the digits. Press SET to go to the next set of digits. Set them the same way. Press the mode button to end setting or wait for a timeout. Set the ON time and OFF time as desired. Then, which the manual leaves out, you must engage the mode. Press and hold MODE to engage the timer. The outlet should turn ON and the ON timer should start counting down 1 minute at a time. Note that the ON and OFF timers do not show the set point while running. They show the current countdown. When the ON time reaches zero, the outlet should turn off and the OFF timer should start counting down. When the OFF timer reaches zero, the cycle should repeat. If you wish to disengage timer mode, press and hold MODE. You will then be able to switch to other modes again. I have not tested the remaining modes, but here's what the manual says they do (paraphrased): F02 Count Down ON - output turns ON after the countdown ends. F03 Count Down OFF - output turns ON UNTIL the countdown ends. F04 CD ON CD OFF - output turns ON after the ON countdown ends, then the output turns OFF after the OFF countdown ends. Hopefully, this will help you use the device to the fullest. If you have read this review, and now you know how to use the device, I do recommend the device itself. It seems to work well. I have only tested it briefly, and have not done long term testing. Ron
T**M
I like that it seems accurate, it's easy to adjust, but I didn't see a manual with it and I don't understand quite yet how the other modes work, but very ideal if I can program a cooling setpoint and heating setpoint! I have this connected to 120v fans mounted on my register upstairs. Upstairs used to be 5-6°C warmer then the main floor, now this helps me keep it within 2°C
S**H
I bought it and it worked okay but I need model with powered up cord.
ترست بايلوت
منذ شهرين
منذ شهر