🎮 Level Up Your Game with Precision Control!
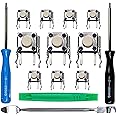
The ElecGear 4x Replacement Joystick (EL1 ALPS 10K) is a high-quality analog stick module designed for PlayStation 4 controllers. It features advanced 10KΩ potentiometers for precise control and includes essential tools for DIY repairs, making it the perfect solution for gamers experiencing joystick drift or other performance issues.
| Brand | ElecGear |
| Series | ElecGear 4X Replacement Joystick |
| Item model number | EL1-ALPS-10K |
| Hardware Platform | playstation 4 |
| Item Weight | 2.08 ounces |
| Package Dimensions | 3.7 x 1.34 x 1.22 inches |
| Color | EL1 ALPS 10K for PS4 |
| Power Source | Battery Powered |
| Manufacturer | ElecGear |
| ASIN | B09KVG7DGY |
| Country of Origin | China |
| Is Discontinued By Manufacturer | No |
| Date First Available | December 22, 2021 |
A**N
Better than stock ds3
dropped right into the A1/A2 dualshock3... Just gotta bend some pins. Feels better than stock imo. Stock sticks tend to lock and have a bump in the tension, these are just slightly smoother.. may just be new, hard to tell for sure but the pad feels new again and I've got a couple spares now.They're teal tho and don't get the wrong idea these are not the green 4pin hall-o pots.
J**S
Great rpdouct
I was worried as I just had replaced the analogs already and got bad ones. But this product feels like oem and it has no drift. Also it fit really snug before soldering, that was a plus for me.
L**R
Great & Legit
The ones I received are wonderful and are definitely genuine.
J**.
Resolved stick drift in both my ps4 controllers, one OEM and one aftermarket
Dropped these into two ps4 controllers, one original and one aftermarket, that were both having a stick drift issue. These replacement joysticks fixed the issue on both controllers with no issues and have held up well since.Found the hardest part is definitely ripping out the old joysticks. Some knowledge of soldering and removal of old solder is required for this. Not sure if I would have been able to get this done without my solder wick and solder pump.Easiest way wound up being separating the potentiometers from the joystick before removing each piece individually. I added a little bit of solder to each connection since the old solder wouldn’t wick at first, then used solder wick to pull off as much solder off of each connection as possible. Then, I used my iron to heat pins on alternating sides of each potentiometer and wiggled them out as I did this, then did something similar for the rest of the joystick with the attached button. I then used my solder pump to clear out each pin hole of solder. From here, dropping in and soldering the new joysticks was hassle free.
ترست بايلوت
منذ شهر
منذ شهرين