


Laser 5540 Tyre Valve Tool Set 3pc
Product ID: 50493062
🔧3-piece precision toolset
⏱️30-min valve replacement
🛠️robust & ergonomic design
Desertcart purchases this item on your behalf and handles shipping, customs, and support to OMAN.
🚗 Fix your flat fast — the pro’s secret weapon for tyre valve mastery!
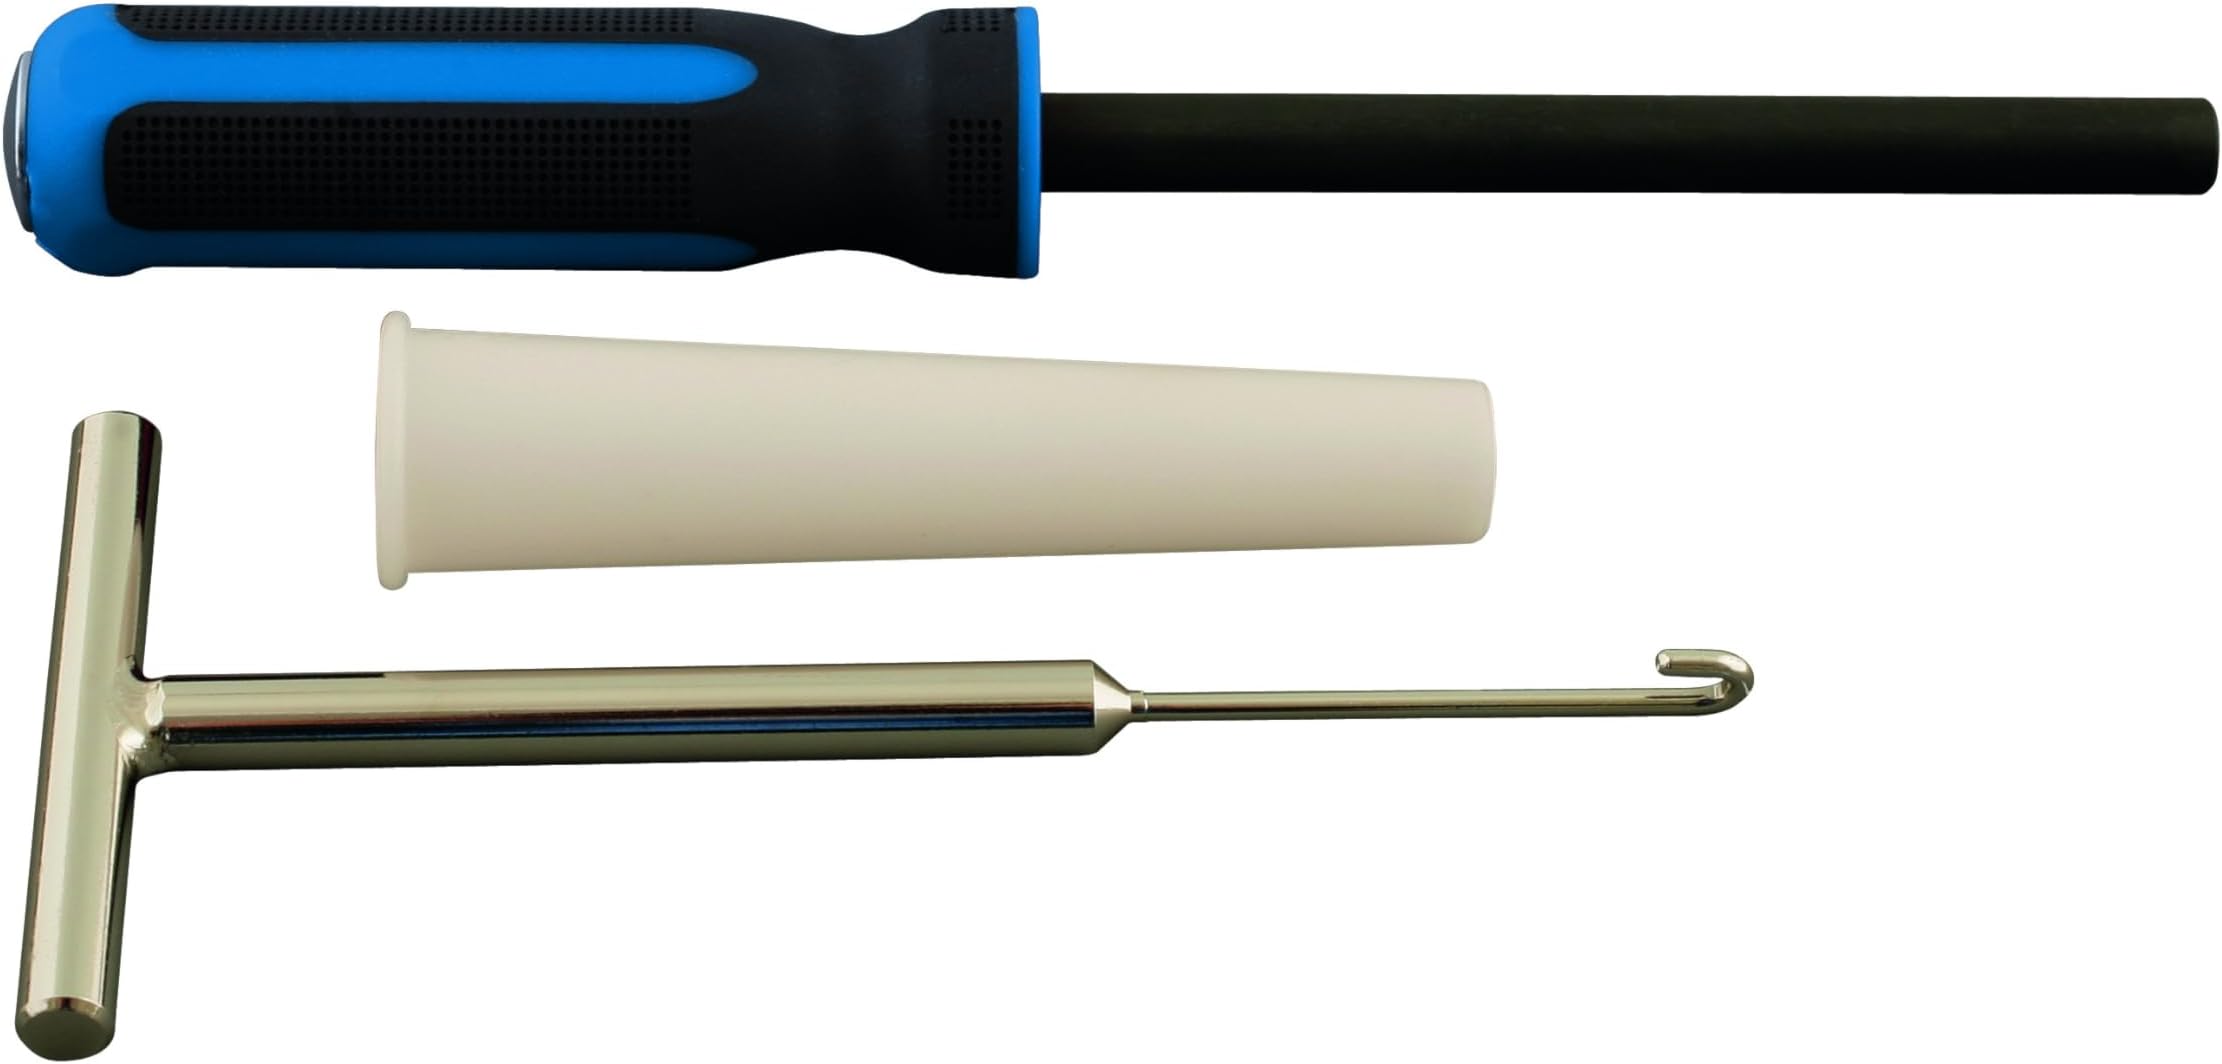
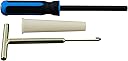
The Laser 5540 Tyre Valve Tool Set is a premium 3-piece kit designed for quick, efficient replacement of leaking tyre valves without removing the wheel. Featuring a valve hook, screw tool, and tapered tube, it enables professional-grade valve swaps in under 30 minutes. Built robustly for durability and ease of use, this set is perfect for cars, vans, motorcycles, and agricultural vehicles (excluding TPMS tyres), helping you avoid expensive garage visits and downtime.


| ASIN | B00BP7WFS2 |
| Best Sellers Rank | 8,235 in Automotive ( See Top 100 in Automotive ) 39 in Tyre Valve Tools |
| Brand | Laser |
| Customer Reviews | 4.6 4.6 out of 5 stars (435) |
| Date First Available | 28 Feb. 2013 |
| Item Weight | 450 g |
| Item model number | 5540 |
| Manufacturer | Tool Connection (EU) |
| Manufacturer part number | LAS5540 |
| Model | 5540 |
| Product Dimensions | 3.3 x 15 x 34.3 cm; 450 g |
G**E
Much easier than expected (must use silicone grease or washing up liquid to lubricate)
My pack of valve stems arrived before this tool and I. Rather stupid/impatiently tried the tool-less (just blunt screwdriver and a bit of cyclone grease) method i watched on a youTube tutorial Vid. I could see that it was possible to do this way but not with the wheel still on the vehicle and involves a lot of swearing grunting and some blood when i poked my hand with the screwdriver and I ruined one valve stem by eventually getting it in but pucturing it as i did so which was a real 'hooray. I did it!, followed by Boo, I fecked up!!!' when i tried to inflate it, moment :), I took the wheel with the flat off so i could drive using the spare and then hopefully replaced the valve stem when this tool arrived yesterday. Had I have waited I could have done this easily with no tears and the wheel still on the Van. I didn't use the hook/puller tool because the previous stem had sheered off completely when i was too vigorous with inspecting the crack in it so i will have a little piece of rubber bung bouncing around inside the tubeless tyre so be careful but you are supposed to (and it worked on independent the video I watched about this tool) push the stem to one side and push the little hook through the split/crack so you can hook it out in conjunction with the valve puller tool, Important tip warm the stem in your hand and squeeze it about a bit to make it more malleable and it will seem impossible to push through if you don't use some lube; Either silicone grease or some washing up liquid. Once I realised this it went through the tube which compresses the bung on the new valve stem so you can get it through the hole. Push the new valve stem with the puller/pusher tool through to the end (downwards on a flat surface so as to not go right through) of the tube/ applicator then just put it over the hole in your wheel rim and push. It popped i very easily, In-fact I pushed too hard and it went right in but still firmly attached to the tool so i just pulled it back more gently and it seated and blew up fine/ The pusher/puller tool is substantial and well made which helps grip the valve and push trough the compression tube easily and you could give it a hand with a whack of a hammer if needed. Overall the tools are well made easy to use (don't forget the Lube, as my wife once said:). Its now in my car with a handful of spare stems and although it could be years or forever until needed again.it more than paid for itself in the first use compared with taking it to a tyre centre. If you have slow deflation issues the it can often be the valve stems letting a bit of air out where a bit if grit .scratch rust or weathering is letting air past the bung/stem (put soapy water around them and look for bubbles) and this can be cured or reduced with the puller tool by deflating the tyre about 80 percent and the gently rotating the stem using the puller/pusher tool little which can form a better seal, If this makes no difference you can replace the stem and then if this doesn't work you have a slow puncture or a leak via the wheel rim = tyre shop unless you own tyre removal tools! hope some of this long way of saying it works and gets 5 stars is of help to some. Love Peace and Happy Motoring!
M**C
Works Perfectly
Excellent bit of kit which works like a dream. If only using it as a one-off, which I was, it is a little pricy for what it is, but the time saved in not having to remove the wheel or break the tyre seal made it worth it. I found that some WD40 sprayed on the valve being replaced was pulled made it come out very easy and without any damage. Likewise a little WD40 on the valve going in did not only make the insertion easier, it was probably essential. The insertion tube needs to form a tight fit to the hole. I wanted to fit some bluetooth TPMS sensors, but my existing tyre valves were too long, so I used this tool to replace the valves with shorter valve stems, all four tyres , job done in less than 30 minutes.
A**R
Did the job but not out of the box
The product is well made, if you can get similar cheaper then do so, they all work the same. For my fiesta 15in alloys the tube is too big and sits on top of the hole, tried many times and failed, because of the gap the valve expanded before reaching the hole. Sanded the tube slightly but not so much that it would seat and leave no gap, doing so would compromise the thickness and lead to splitting. The valve popped in quite easily after the little modification, no need for hammer even though the end of the handle has a metal disc and would implyt it.
M**.
Well made and effective once you have the knack.
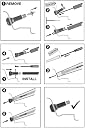
Although this arrived in retail packaging, there aren't full instructions. People seem to have varying experiences and opinions of this tool. I have no doubt that you must use proper tyre fitting paste to lubricate the vale before trying to fit it. For example, Kart Tyre Paste Soap 1KG Tube for All Wheels / Tyres / Rims and a mallet will really help. So, the t-handled hook is for extracting the failed valve, push the hook in by the side of the valve stem, then turn it to hook over the inside end of the valve and pull. Possibly quite hard... Make sure the valve hole in the rim is clean and undamaged. Take the valve cap off your new valve, and screw it fully into the blue handled tool. Anoint the valve base with tyre paste, place the conical plastic guide in line with the valve hole in the rim and push the valve down to the end of it, just in contact with the rim. Now use a smart tap from the mallet to pop the valve out of the end of the guide and *right through* the hole in the rim. Then just use the blue handled tool as a puller to pull the valve outwards from the rim until the first part of the base pops through. Unscrew the tool, give the valve a wiggle to check that it is seated properly, inflate the tyre, pop the valve cap back on. Job done. But if you try without a suitable lubricant, it won't go well.
C**J
Fantastically useful tools for replacing car tyre valves at home.
Laser 5540 tyre valve tool kit. I needed to remove an old tyre valve that had perished and had blown-off the brass end bit that you attach an air hose to. The set of tools arrived promptly but without any instructions, fortunately there is a good example of how to use the tools on You Tube ( https://www.youtube.com/watch?v=YaMZ2TT6L1Q ). The T shaped hooked device worked a treat and pulled out the old valve with no bother, however inserting the new valve was initially impossible. The hole into which the new valve was to be inserted (in an alloy wheel) had two diameters, it consisted of a larger hole at the outside of the rim which stepped down to a smaller hole and the new valve needed to fit through the smaller hole. (A steel wheel will just have a single diameter hole as the metal is quite thin but an alloy wheel is made of much thicker material as it is a weaker metal so it has a valve hole with a step in it. My remarks all apply to fitting a valve to an alloy wheel, a steel wheel should be much simpler.) The tapered plastic tube (down which the new valve was to be pushed) did not fit into the larger hole in the wheel rim so when the valve exited the bottom of the plastic tube it immediately expanded from its squeezed-down state and would not push through the second smaller-part of the hole. The solution was to file down the external surface of the plastic tapered tube at its narrow end so that it fitted tightly inside the larger hole (bang the tube down so that it abuts snugly against the shoulder of the smaller part of the hole ( so that the rubber valve cannot expand as it exits the tapered tube). You may also need to file the bottom face of the tube to put a slant on it in order to abut snugly against the whole circumference of the smaller hole without any gap that would allow the compressed valve-base to expand. It also helps if you take the wheel and chamfer the step (in the valve hole) from the larger hole to the smaller hole, you can do this with a countersink drill, just take off the sharp edge of the step (just a smidgen) in order to remove any obstacle to the entry of the new valve. I put the tapered tube in the hole and with some lubrication (using washing-up liquid) and a bang from a rubber mallet the new valve pushed easily into place, job done. So what was initially impossible became very easy after a bit of fine tuning. (Having said that some wheels are more difficult that others, on another reluctant wheel I had to wrap a piece of plastic bag round the bottom of the tapered tube so that the plastic extended right through the hole into the void of the tyre, the plastic acted as a very efficient lubricant and the valve then easily entered the valve hole.) The modified tool kit is very efficient and saves a lot of messing about (i.e. having to break the tyre bead and possibly damaging it in the process) in order to replace the tyre valve. P.S. I also bought from Amazon an Automotive Tyre & Wheel Tyre Valve Puller 300mm which also came in useful when dealing with a second and third valve replacement on other wheels.
K**N
A great gadget to have around
I bought this tool to change the valves on my boat trailer wheels, and within minutes of it arriving - both wheels were done. It really is simple to use. The QR code on the packaging takes you directly to a handy YouTube video which shows exactly how to use it. The first of the old valves was the trickiest to remove because it had almost completely snapped off at the base (which was the reason for ordering this tool), and I was very wary of it breaking off completely and the back part falling inside the tyre. But with careful manoeuvring of the hook supplied, it came out in one piece. The video showed the new valve being lubricated, but didn't show what to use. It looked like washing up liquid to me - so that's what I used. It worked perfectly. I plunged the new valve down the tapered tube and into the steel wheel rim of my small trailer wheel surprisingly easily. I did worry at first that the tapered tube did not fit inside the hole in the wheel rim, but it doesn't need to. Just offer it up to the hole and hold it tightly against the rim as you push the new valve straight into the hole. Perhaps it was the liberal use of washing up liquid - but it worked perfectly. Gently pulling the new valve back ensures that the rim edge clicks into th erases on the valve, creating a perfect seal. This little gadget will save money, and ensure my God-like status with other family members when I solve their valve issues in the future.
B**N
Works well - aided instaltion of replacment valves into trailer wheels.
Works great, with a bit of washing up liquid to aid instalation the valves were inserted into the trailer wheel with a fair amount of force. Highly recomended.
D**5
Well worth getting this tool to replace car Tyre valves!
Looked in to replacing Tyre valves for my son's car as his were split and leaking, I was very dubious to if I could do it as I'm not a car tinkering person. Decided to try it, so bought this tool after seeing a few you tube tutorials and some new valves and voila, all 4 changed in under an hour and mainly due to this tool, made it very very easy and so glad I did get it, well worth the price and still in perfect condition, no bends etc as I saw some reviews for it say (got to make sure you push/pull it straight I guess). Only thing I'd recommend is getting correct/good lubricant, I used a little oil as that's all I had but not sure if that's bad or not, anyhow that's nothing to do with this tool, Highly recommend!
P**4
Outils pour valves
Conforme à la description, semble de bonne qualité. Fonctionne parfaitement, et très simple pour enlever (ou mettre) une valve !!! très satisfait de mon achat.
B**G
Valve stem tool
Love this tool. Change valve stem on tire
S**É
Merveilleux
Un outil merveilleux tout à fonctionner comme prévu un gros 5 minutes Un vrai charme
J**V
So easy
This tool is absolutely awesome
C**.
Parfait.
Parfait.
Trustpilot
3 weeks ago
1 month ago