Desert Online General Trading LLC
Dubai, United Arab Emirates
Desert Online General Trading LLC
Dubai, United Arab Emirates


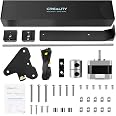
⚙️ Elevate your Ender 3 game—precision and power in perfect harmony!
The Official Creality Ender 3 Dual Z-axis Upgrade Kit transforms your Ender 3/3 Pro/3 V2 printer with a high-precision lead screw, synchronized dual Z-axis motors, and a metal power supply holder. Designed for ultra-smooth, low-noise operation, it drastically improves print stability and bed leveling ease, delivering professional-grade 3D printing performance with reliable after-sales support.


| Manufacturer | Creality 3D |
| Part Number | CA1-PJB |
| Item Weight | 1.83 pounds |
| Package Dimensions | 15.63 x 3.98 x 2.64 inches |
| Item model number | Lead Screw Kit for Ender 3/3 Pro/3 V2 |
| Color | Black |
| Style | Lead Screw Kit for Ender 3/3 Pro/3 V2 |
| Material | Metal, Steel |
| Included Components | Lead Screw and LED Light |
| Batteries Included? | No |
| Batteries Required? | No |
ترست بايلوت
منذ يوم واحد
منذ 5 أيام