
قم بتنزيل التطبيق


معلومات عنا
حقوق الطبع والنشر © 2024 Desertcart Holdings Limited
قم بتنزيل التطبيق


🚀 Unlock the future of IoT with the ultimate NodeMCU Wi-Fi powerhouse!
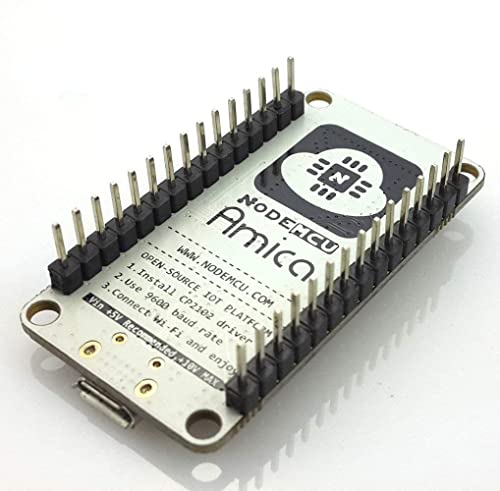
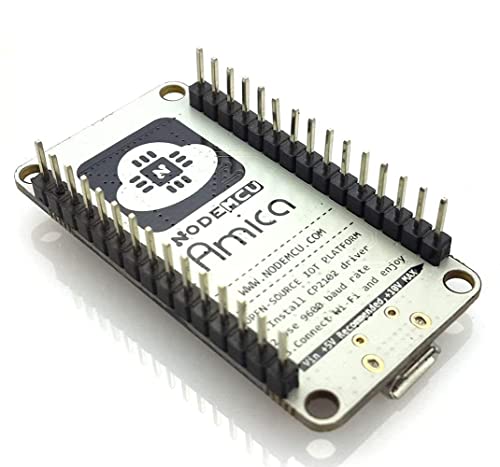
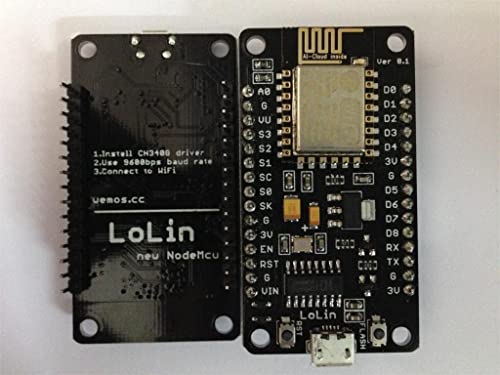
The Lolin NodeMCU ESP8266 CP2102 is a compact, lightweight development board featuring integrated 802.11b Wi-Fi, a CP2102 USB-to-UART bridge for easy programming, and full I/O port support. Designed for seamless compatibility with Arduino IDE and popular IoT frameworks like Mongoose and MicroPython, it empowers professionals and hobbyists alike to build smart, connected projects with minimal setup. Its breadboard-friendly form factor and Blynk app integration make it a top choice for rapid prototyping and remote automation control.
| ASIN | B010O1G1ES |
| Are batteries included? | No |
| Brand | eleduino |
| Compatible Device | Arduino, Personal Computer, Smartphone |
| Connectivity Technology | Wi-Fi |
| Country of Origin | India |
| Customer Reviews | 4.2 4.2 out of 5 stars (2,959) |
| Date First Available | 26 September 2015 |
| Generic Name | Programming, prototyping, projects, hobby, industrial components. |
| Hard Disk Interface | USB |
| Hardware Interface Type | USB |
| Importer | MARKSON TRAD INDIA G.F., PLOT NO 363A 364A KHASRA NO 61/11,, STREET NO.17, ANANDPUR DHAM VILLAGE KRALA, NEW DELHI, 110081 (INDIA) mo.- 7477-070728 |
| Included Components | Lolin NodeMCU ESP8266 CP2102 NodeMCU WIFI Serial Wireless Module |
| Item Dimensions LxWxH | 40 x 40 x 40 Millimeters |
| Item Height | 40 Millimeters |
| Item Weight | 9 g |
| Item Width | 40 Millimeters |
| Item model number | 3-01-0268-1 |
| Manufacturer | Sound Land Corp, Sound Land Corp. No.32.Keji 1st Rd.,Guishan Township,Taoyuan County 33383 Ph- 886-3-396-1958 Taiwan R. O. C. |
| Memory Storage Capacity | 4 MB |
| Memory Technology | LPDDR4 |
| Model number | 3-01-0268-1 |
| Net Quantity | 1 Count |
| Number of Memory Sticks | 1 |
| Number of USB Ports | 1 |
| Number of processors | 1 |
| Operating System | NodeMCU |
| Packer | Sound Land Corp. No.32.Keji 1st Rd.,Guishan Township,Taoyuan County 33383 Ph- 886-3-396-1958 Taiwan R. O. C. |
| Power Source | USB |
| Processor Speed | 8.5 GHz |
| Processor Type | A Series A9 |
| Product Dimensions | 4 x 4 x 4 cm; 9 g |
| Special Feature | Wireless |
| Voltage | 5.5 Volts |
| Wireless Standard | 802.11b |
V**C
Good low cost microcontroller
Works well. I am using it to read input from sensors and display the output. I am using the microcontroller as a server to which my cell phone / laptop can connect to and read the output. It connects to WiFi seamlessly and is not slow to process. All these features at such a low price is impressive!
⚡**⚡
ESP8266- Compact, Light, Featured, Breadboard Friendly Board for IOT & Automation | REVIEW | GUIDES
ESP8266 is very common name now a days. When I saw this board, I was like wow. After researching a lot about which one to order, plain ESP8266 or NODEMCU one, I was on for NodeMCU. But even in case of NodeMCU, there are many different manufacturers implementing the firmware on board e.g. Lolin & Amica. Product title mentions Lolin but display pictures are of Amica. Lots of confusion. But I went on & ordered one from cloudtail seller. To my surprise, my board came in poly packaging having Lolin sticker with Amica board sealed in antistatic packet. :D So it’s a hit or miss kind of thing. Got it two times from cloudtail & both times it was Amica board. So not an issue. ••••••••••••••• INSIDE BOX ••••••••••••••• NodeMCU board inside antistatic packet with hard foam to protect pins. Board Dimensions: L x B x H, 49 x 25 x 13mm (including pins, w/o header pins height is just 4mm) Weight: 8g (wrongly mentioned as 50g in listing) ••••••• PROS ••••••• 1. Breadboard friendly. 2. Pins come soldered & not separate. 3. Neatly made, lightweight and compact board. 4. Arduino compatible & easy to program. 5. CP2102 chip for USB to UART. Old version had CH340 chip. 6. Full Blynk support (Believe me, it will mean a lot to you). 7. 4 screw holes at each corner of the board for easy installation. •••••••• CONS •••••••• 1. Some pins were literally bent on arrival. I had to make them straight using mini plier. Not a big deal, but a hassle. Supplier should take care of it. 2. I got two boards at 2 different times and both had same issue of pin layout not perpendicular to board, rather spread outward by few degrees. I had to make them perpendicular for easy setup on breadboard. (Reducing 1 star for these two cons. Although being breadboard friendly, you can’t install it directly on breadboard unless you straighten up the pins and make them perpendicular to board. This act may damage board even. So risky.) ••••••••••••••••••••••••••••••••••••••••••••• SETTING IT UP WITH ADRUINO IDE ••••••••••••••••••••••••••••••••••••••••••••• 1. Download latest Arduino IDE from official site as per your system configuration. 2. Install software in preferred location. 3. It will also install necessary USB drivers including one for our board i.e. CP2102 USB to UART bridge. 4. Visit ESP8266’s github page (Google it) and copy board manager link from there. (Screenshot attached) 5. Open Arduino IDE. By default Arduino does not come with ESP8266 support. So we need to manually specify link for ESP8266. 6. Go to File → Preferences and paste above ESP8266 board manager link under “Additional Boards Manager URLs”. Click on ok. 7. Now go to Tools → Board → Board Manager & search for esp8266 by ESP8266 community. 8. Click on install. It will download several related board definitions and install them. Once installation is successful, close the window. 9. Now when you will go to Tools → Boards, you will find all of ESP8266 related board listed. •••••••••••••••••••••••••••••••••••••••••••••••• GETTING READY FOR PROGRAMMING •••••••••••••••••••••••••••••••••••••••••••••••• 1. Open Arduino IDE 2. Go to Tools → Boards and choose your board. Here in our case it’s NodeMCU 1.0 (ESP-12E Module) 3. Now in Tools → Port, choose communication port on which board is connected. To find it go to windows device manager & under ports (com & lpt) locate CP210x to UART Bridge. In my case it’s COM3. 4. Specify upload speed in Tools → Upload Speed. 115200 works good in general and with large code sketches also. While 9600 will also work but may fail in some large sketches & is very slow. 5. Leave other options in Tools as such. 6. You are all set now. Code a sketch, upload it to board via Sketch → Upload. 7. While sketch or code is getting uploaded to board, blue LED near Wi-Fi antenna blinks continuously indicating transfer. 8. Enjoy the endless world of ESP8266. ••••••••••••••••••••••••••••••••••••••••••••••••••••••••• BLINK ON BOARD LED (Initial check of board) ••••••••••••••••••••••••••••••••••••••••••••••••••••••••• There’s a program to blink on board led in examples after you add ESP board in previous step. 1. Open Arduino 2. Go to → File → Examples → ESP8266 → Blink 3. Go to → Sketch → Upload (indicator led will blink while it’s being uploaded) 4. Soon after sketch is uploaded, other led near USB port will start blinking as per delay in sketch/code. ••••••••••••••••••••••••••••••••••••••••••••••••••••••••••••••••••••••••••••••••••••••••••••••••••••••••••••••• BLYNK SUPPORT & EXAMPLE TO SWITCH ON/OFF ONBOARD LED USING SMARTPHONE ••••••••••••••••••••••••••••••••••••••••••••••••••••••••••••••••••••••••••••••••••••••••••••••••••••••••••••••• Blynk app is free to use with 1800 free recyclable energy with each account, which is more than sufficient for general projects or unlimited energy if local server is used. Energy is used by each widget you add to project. You can always purchase more energy for bigger projects or recycle used ones. Visit Blynk website and go to “getting started” page. Follow the steps i.e. 1. Install Blynk app from store & register. 2. Create project & get auth token. 3. Download library zip from link provided. 3. Install Blynk library manually by copying unzipped folders to mentioned paths of your sketchbook folder for Arduino IDE. 4. After libraries are installed, another entry with Blynk is created in examples. 5. Open Arduino IDE & Go to → File → Examples → Blynk → Boards_WiFi → ESP8266_Standalone. 6. Enter auth token from email, ssid and password of your Wi-Fi in sketch. 7. Upload sketch to board. 8. Now in app add two buttons to project created above, by clicking on + and selecting button 9. Open each button and specify D0 & D4 pin with 1 → 0. 10. Click on Play button on top. 11. Press buttons & your on-board LEDs will switch on off. 11. Enjoy the endless world of IOT and automation. Control everything from your smartphone via Blynk server or local server. ••••••••••••••••••• FINAL VERDICT ••••••••••••••••••• Initially i was sceptical about purchasing board from this listing after reading reviews. But after receiving I am in no doubt that it’s a wonderful board. It’s compact, neat and works great without any big trouble. You can definitely go for it. With Blynk support for this board, it’s really easy working with any of mobile controlled automation projects without much of coding. P.S. Amica one is better and compact board. While name mentions Lolin, pictures display Amica board. So in case you receive Lolin board and are not satisfied, you can always ask for replacement board under "Product not as displayed" category.
A**A
A very great board
Great, product using it for a rc car, wifi and pins work great, a suggestion for the seller please sell a cable with it too as it will save a lot of time of the customers, the size is very small so it fits in a bread board easily , help for the other costumers and people wanting to buy, buy it with a good quality cable , and it has to be a data cable or the code form your programming device will not transfer
V**A
Good
Ok ok
R**U
Good for learning, bad for interfacing higher(12V!) signals as those detroy it. Works with 3.3V.
Since this is costly board by indian standards, i write cons first: (*)Quality isn't that great. (*)esp 12 module is soldered, so once you program it, i don't know you can use the same board to program other modules or not. (*)CAUTION: 3.3V ONLY. 12V definitely will destroy it. For sure. I learned it the hard way. There is no protection. If you have to use 12V, use optocoupler or add some diodes. (*)There is no level shifter 3.3V/5V/12V (*) No onboard relays/MOSFET/sensors/opto coupler. This is why we use this esp chip, and using this board, we have to add all of them manually.... I haven't tried it yet, but this board claims to provide all of them-->http://www.amazon.in/ESP8266-Black-cloud-features-Board/dp/B0148HKRPS/ref=pd_sim_sbs_23_5?ie=UTF8&dpID=515it1WwXxL&dpSrc=sims&preST=_AC_UL160_SR160%2C160_&refRID=0J8ZE8R9HY1ENKJGMNDN Will try when i get time. I couldn't get this thing to work to drive 5V nMOSFET gate. This will definitely add to cost. Pros: (*) Very easy to work with, just attach micro usb mobile cable, and we are good to go. download ESPLORER java application. Now, download ESP flasher from the link in that application. After that this device can work with LUA scripting language (very easy). Now download samples from the web, this chip esp-12e will act as standalone web server, find out ip address, type it in your browser and you can control all its GPIO pins from web! (*)This devkit is really small (*)Very easy to flash the soldered esp-12 chip with Nodelua/NodeJS. earlier used to be a headache. However, i would recommend to buy it only to learn basics of esp12 and not for real interfacing as 12V destroys this for sure! and we don't want our 800/- to go in drain.
H**A
After 4-5 month review
its such a nice and true product.... i use it regularly from last 4 to 5 month but it still work as 1st time used 😊 such a nice NODE MCU
A**H
IOT Device project with this Nodemcu
It helped me to build a great iot device , with python code integration in it only in ₹305 , it has seemless connection with wifi, it is very good, i faced only one or issue is that it got very little heat over time and if my wifi is turn off some how and then on i need to restart the device and wait to connect again, overall i like the product, also i uploaded many codes in it then also it works, also easy to use and fast code upload, i Loved it
H**J
Defective product
Too bad quality, I am late for checking this product on same days bcz me were not present in home town, then after a week I will check then this item was not working.... I am ordered 2 pic and those products were not working, full waste of money, don't buy, and buy then u check on same day, don't try to late check
H**S
I ordered six of these boards yesterday. They arrived quickly, but two out of six were not working (one not flashable at all, one not able to connect to WiFi). Lots of the soldering is shoddy and connections between components weak or non-existing.
B**O
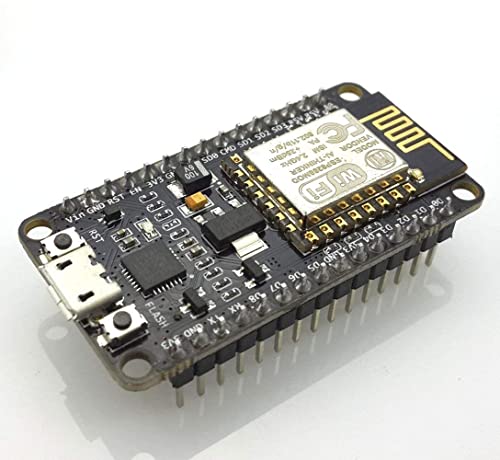
The HiLetgo ESP8266 NodeMCU is a fantastic board for anyone diving into IoT projects. Its compact design packs a punch with built-in Wi-Fi capabilities, making it super easy to connect to networks. The CP2102 chip ensures reliable USB communication, which simplifies programming and debugging. I am using this microcontroller for a DIY WLED project, and it is working as expected. What sets this highly sturdy board apart is its user-friendly nature. Whether you're a beginner or an experienced maker, the NodeMCU's compatibility with the Arduino IDE makes coding a breeze. Plus, the extensive online documentation and community support mean you're never alone when tackling a new project. It's an affordable and versatile option for home automation, sensor networks, and more.
M**F
Best Buy for the money. No problems and works perfect.
A**N
Der NodeMCU basiert auf einem ESP8266 controller mit integriertem Wifi. Die Komponenten sind so günstig, das sich damit perfekt Projekt Rund um das Thema Internet of Thing (IoT) realisieren lassen, ohne gleich den Geldbeutel zu sprengen. Ich nutze ihn aktuell zusammen mit einem Temperatur- und Luftfeuchtigkeit-Sensor zum loggen der Daten in Richtung [.....] Mit dem gesammelt Daten steuere ich im Anschluss die Thermostate in meiner Wohnung. Die Version auf Amazon habe ich damals bestellt, da sie sofort lieferbar war. Beim Chinesen des Vertrauens bekommt man die gleichen Mikrocontroller für ca. 6€, aber mit Lieferzeit von 2-3 Wochen.
J**K
Board received is completely different from standard NodeMcu boards. I was unable to find specs nor the proper pinout for this board. Supposed manufacturer HiLetgo, doesn't list any similar boards on their website.
ترست بايلوت
منذ أسبوعين
منذ 3 أسابيع