We remain fully operational. Our teams are working around the clock to ensure your deliveries continue safely.

قم بتنزيل التطبيق


معلومات عنا
حقوق الطبع والنشر © 2024 Desertcart Holdings Limited
قم بتنزيل التطبيق


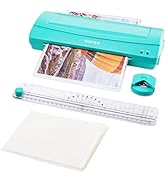
📎 Bind Brilliance, Boost Your Brand!
The TIANSE Binding Machine is a durable, manual comb binder designed for professional-quality booklets. Featuring a 21-hole punch system, it handles up to 12 sheets per punch and binds up to 450 sheets with included 3/8'' comb spines. Lightweight yet sturdy, it supports multiple paper sizes with adjustable guides for precise alignment. Perfect for small offices, home businesses, and DIY pros seeking cost-effective, polished document binding.


| ASIN | B079L4W8MX |
| Best Sellers Rank | #26,271 in Office Products ( See Top 100 in Office Products ) #14 in Binding Machines |
| Brand | TIANSE |
| Color | Bm-1245 |
| Customer Reviews | 4.4 4.4 out of 5 stars (3,118) |
| Date First Available | February 5, 2018 |
| Is Discontinued By Manufacturer | No |
| Item Weight | 8.8 pounds |
| Item model number | BM-1245 |
| Manufacturer | TIANSE |
| Manufacturer Part Number | 1245 |
| Material Type | Metal |
| Number of Items | 1 |
| Product Dimensions | 14.6 x 10.2 x 9.3 inches |
| Sheet Size | A4 |
| Size | 1 handle-Gray L |
P**K
Professional-Looking House Guides Without the Print Shop Price
After getting a quote from Office Depot and Office Max for printing and binding a few house guide booklets for our short-term rental, I realized I could practically buy the equipment for the same cost, and here we are. This 21-hole comb binding machine does exactly what it promises. It punches clean holes through standard letter paper and can handle up to 450 sheets with the right comb. I’ve been using the included 3/8" combs (100-pack starter kit included) to create multi-section house guides that look clean and professional. It’s manual, so don’t expect high-speed production—but for small-batch jobs like welcome binders, menus, or guidebooks, this is perfect. I’ve used it for letter-size and A5 sheets so far with no issue, and I like that it's not just limited to one paper size. The build quality is solid for a home office machine. Setup was easy, and the handle operation feels smooth and controlled. Just make sure to align the paper well before punching for best results. Pros: Affordable alternative to print shop services Clean, consistent hole punching Comes with 100 combs to get you started Works with letter, A4, A5, and smaller paper sizes Great for home office Cons: Manual operation takes a bit of time for large batches Comb binding isn’t as sleek as coil or thermal (but way more convenient) Summary: If you're running a short-term rental, homeschooling, or just want to create professional-looking booklets without recurring costs, this binding machine pays for itself quickly. I’m now making detailed, multi-chapter house guides at home that look just as good as what I was quoted for at the print shop. Rating: ★★★★★ (5 stars) A smart tool for DIY pros, small businesses, and STR hosts alike.
J**R
Just what I needed
This works great. And a good price
Y**1
Easy to use!
I decided to make work books for my nephew and cousins.it was very simple to use and I was able to make kindergarten workbooks in no time.I like it includes everything you need to make the books you just need the paper.it makes a good size book and you can order large rings if you would like to make bigger books.they work with this magazine also.it is sturdy and made of good quality.I am very happy with it and would recommend iy
N**A
Works as advertised. Easy to use.
I like this machine. It is easy to use. I do recommend getting stiff card stock backing sheets and clear covers to give books some stability. I didn’t look when I was buying, but I would now look to see if there was a machine that came with a variety of spine sizes. I had to order some larger size spines. I now have way more spines tan I’ll ever use. I do recommend this machine. It is easy to use and outputs a nice product.
B**3
Good Buy
Durability great it come in really handy for me and my children with their projects
G**A
Easy to use, holds binding combs securely for filling with paper
This binding machine is very easy to use. The handle gives good leverage for punching multiple sheets of paper and cardstock without a problem, and holds the binding combs open without slipping. The tray on the bottom is easy to remove to empty. There's a carry handle on the front so it's easy to move, and the paper size guide is easy to adjust with a screw knob so it holds in place once you tighten it to the spot you need it. It's kind of on the heavy side, so it doesn't slide around when you're using it, but might be too heavy and awkward for a child to try to move.
S**D
It works great
If you aren't needing making a large numbers of binding daily then this is your best choice. It is cheapest on the market (at least when I got it) and it works! It is not easy to cut 15 sheets at once, but probably around 7 at a time. The punchers aren't very sharp I think, so you will be faster and better off doing around 7-8 sheets at s time. On thinner copy paper, you can go up to 12 sheet. The thicker paper is definitely around 7sheets only. The front/back covers that protect back/front I punch as two sheets at a time. It is easy to attach the handle and seriously either for organizing your school prints (textbooks, class notes, documents, etc) or business stuff, this is totally enough. If you need industry strength that needs to be used for hundreds of sheets a day, this may be not strong enough. Otherwise, it is a great addition to your home office or small business office.
R**1
Wanted to work...but doesn't do well at all
I wanted this product to work. I bought all the supplies to make user manuals for a new program. Printed them and started punching. First, the punching takes a bit of time, 12 sheets max. The punch collector on the bottom us useless. After one manual, I had punch tabs all over my desk that resembled a well-known election ballet in Florida. It was a mess! The handle is weak and the machine actually "flexes" when you pull down to punch. Very weak design and flimsy operation. Second, I tried punching 12mil clear sheets. They punched with a little bit of effort but getting them out was nearly impossible. The punches stayed attached to the clear sheet and you physically have to "rip" the cover out from the machine. Trying to get them into the tabs is a feat in and of itself. It takes effort and patience as the machine "holder" that holds the binding open moves around a lot. With the flex of the binding in the machine itself (can't hold the binding open steady at all), it's very difficult to align the holes up for the tabs in the binding. Unfortunately, this machine is more of a headache than it's worth, and the sad part is, I needed it for a project and it took way longer than it should have. It's too used to be returned so it'll have to do but won't get used often, unfortunately. With so many supplies, I think I'll be searching for a sturdier machine. You get what you pay for, I guess.
J**H
Beim Auspacken war ich schon überrascht. Ein ausgesprochen kräftiger Stanzhebel, der abmontiert im Transportkarton lag. Bisher hatte ich nur Geräte mit einem Stanzbügel, der beidseitig mit eher schmalbrüstigen Hebeln verbunden war. Die zweite Überraschung: Eine für diese Preisklasse ungewöhnlich lange Höhe der Bindezahnstangen. Und der Hersteller meint es ernst: Bis zu 450 Seiten könne mit diesem Gerät und dem entsprechenden Binderücken zusammengebracht werden (Bild 1). Vor dem Erstgebrauch muss die fabrikneue Maschine von Öl befreit werden. Dazu sind 9 vorperforierte Stanzstreifen beigelegt, die das Öl aufnehmen sollen. Dabei kann man dann auch schon einmal ein Gefühl bekommen, welche Kraft beim Stanzen notwendig ist. Und Öl wird von den Streifen aufgenommen (Bild 2). 1. Die Einstellung Sie ist relativ einfach, da die Stanzlöcher auf der Maschinenplatte angegeben ist, einschließlich die Bemaßung der drei häufigsten Papiergrößen (DINA4, DINA5, LETTER) (Bild 3). für andere Papiergrößen muss man Probestanzungen vornehmen. Der rote Postionsknopf ist realtive groß und läss sich exakt positionieren. 2. Anzahl der Blätter Normal sollten maximal 12 Blätter verwendet werden, das geht. Aber ich nehme maximal 8 Blätter.Warum? Die Blätter müssen sich in dem Stanzspalt sehr gut bewegen lassen. Insbesondere müssen auch alle Blätter im Verbund liegen, keines darf herausragen. Mit dem hin- und herschieben wird gleichzeitig erreicht, dass alle Blätter wirklich an der Längsachse des Stanzers zum Liegen kommen. Das verhinder ein schiefes Stanzbild . 3. Einfügen in die Spirale Hier sollte man großzügig sein und eher eine Größe zu viel als zu wenig nehmen. Es erleichtert nicht nur das Einfädeln, sondern auch das Blättern ist flüssiger. An der Tabelle kann man sich orientieren (Bild 4). In diesem Fall ist der Stanzhebel auch der Spreizhebel für den Binderücken, wenn man den Hebel in die andere Richtung (von sich weg) drückt. Hier spürt man auch, dass eine Bremse eingebaut ist, die die gewählte Hebelstellung hält. So kann man eine jeweils optimale Spreizung für den Binderücken unterschiedlicher Durchmesser erreichen 4. Verwendung von mehr als 150 Blätter Diesen Punkt erwähne ich extra, da andere Bindemaschinen der gleichen Preisklasse dies nicht immer ermöglichen, deshalb auch die hohen Bindezahnstangen. Damit kann eine Spreizung von knapp 40 mm erreicht werden (Bild 5und 6). 5. Papiereinzug Der Papiereinzug für die Lochstreifen kann unterschiedlich gewählt werden: 3,4 oder 5 mm Einzug (Bild 7). Ist dann von besonderem Nutzen, wenn für das Binden ein nur sehr schmaler linksseitiger Rand existiert. 6. Gebrauchsanweisung hat Postkartengröße, die Schriftgröße ist gerade noch lesbar. Text ist verständlich, Das Hauptbild ist mit den richtigen Fachausdrücken beschriftet (Ausnahme Base= Maschinenplatte). 7. Beigelegte Binderücken Beigelegt sind 100 Binderücken der Größe 10mm Durchmesser (40-60 Blatt). Eine Mischung aus verschiedenen Größen wäre besser gewesen., z.B. Durchmesser:10 , 14, 20, 25 – Anzahl: 20, 20, 15, 15 Stück. Fazit: Solides, gut gebautes Gerät, das für seine Preisklasse zusätzliche Möglichkeiten schafft (Kein Probestanzen, bis 450 Seiten können gebunden werden, etc.). Hat 5 Sterne verdient. Bildergalerie Bild1 Bindezahnstangen von 4 cm Länge, sonst 2 cm Länge Bild 2 Probestanzstreifen zur Aufnahme des Öls , besonders am untersten Streifen sichtbar. Auch Fehlstanzungen sind erkennbar (Reihe 2 und ganz oben). Bild 3 Die auf die Maschinenplatte aufgetragene Zeichnung der Papiergrößen. Bild 4 Tabelle für Anzahl der Bindeblätter und Durchmesser der Binderücken. Bild 5 Binderücken mit 20 mm Durchmesser gespreizt (für 200-230 Blatt) Bild 6 Maximale Spreizung von knapp 40 mm. Bild 7 Papiereinzüge 3 – 4 – 5 mm
H**N
Have used a comb binder in my place of work for years, now at home so needed one here. This machine is very good and easy to set up and use. It says it will take 12 pages but using 80gsm paper i wouldn't put more than 8 sheets in at a time, so a little more time consuming. The comb supplied are great for a small booklet but mine was only 60 pages and struggled to take this amount. Simple remedy will be to buy size 10 or 12 comb binders which are not expensive. Otherwise fab machine which I hope will give me years of use.
D**I
La struttura della rilegatrice è decisamente solida: oltre alla parte inferiore e alla leva in metallo, anche la plastica superiore sembra di buona qualità. Nella confezione sono inclusi 100 dorsi A4 da 10 mm (adatti per rilegare 40-60 fogli) di colore nero, quindi più che sufficienti per prendere confidenza con la macchina. Le istruzioni sono brevi ma in realtà nemmeno ce n'è bisogno, perché l'utilizzo è identico a quello di altre macchine simili ed è semplicissimo: prima si inseriscono i fogli nella feritoia e si tira la leva in avanti per forarli; le indicazioni suggeriscono di usare massimo 12 fogli alla volta, ma io ho preferito limitarmi a 7-8 per essere sicuro di avere un taglio pulito. La carta "bucata" finisce in un cassettino integrato sotto la macchina stessa che si può svuotare facilmente quando si riempie. Dopo la foratura si poggia il dorso vuoto sulla parte superiore, tra i denti di metallo, avendo cura che la "punta" sia verso l'alto, e si spinge indietro la leva. In questo modo il meccanismo apre il dorso e permette di infilare i fogli forati. Al termine si riposiziona la leva al centro e il documento è pronto. Due consigli: 1) se state rilegando parecchi fogli, è quello di inserirne pochi alla volta e di giocare un po' con la posizione della leva a mano a mano che procedete, in modo da avere un po' di margine di manovra. Questo perché, essendo la leva montata solo su un lato, il movimento non è perfettamente omogeneo e i dentini del dorso si aprono ad angoli leggermente diversi. All'atto pratico non ci sono problemi, basta fare un po' di attenzione e dopo la prima rilegatura nemmeno ci si pensa più, perché è davvero intuitivo. 2) Le prime forature è meglio farle su carta da buttare e non sul prezioso documento da rilegare, in modo che eventuali tracce di lubrificante del meccanismo non causino problemi (può sembrare fastidioso ma in realtà è un'ottima cosa che sia ben lubrificato.) Ovviamente si tratta di una macchina per uso domestico o per piccoli uffici. È chiaro che se dovete rilegare decine e decine di documenti ogni giorno conviene orientarsi verso una rilegatrice automatica, ma ad esempio per me, che sono un traduttore, torna molto utile così com'è. Del resto per me ormai Tianse è una garanzia, uso regolarmente anche i loro filamenti per stampante 3D da quasi un anno e anche il supporto clienti è molto disponibile.
M**B
High-quality and amazing support from the seller
P**.
This is a solid little machine. It comes with 3/8" black plastic coils which was fine with me as that is the size I needed. But I agree with all the others who think an assortment of sizes would be useful. Another helpful "combo-include" would be 5 sheets of clear cover sheets. That way you could decide if you wanted/needed those or not. I did not buy any extra and bound my workbooks without. The tray is great for catching all the paper bits. Super easy to set as the thing is practically finished. Attach the handle on the side, and that's it. Here are some helpful tips: For the 3/8" coil size I set my margin at 3mm. Practice what will look best in your coil. Definitely less is more. I found 5-7 sheets work best to punch at a time. I was too hasty a couple of times and the machine "struggled" to get through. But don't stop in the middle of that (the sheets get all tangled up in the machine). Just keep pressing. Also trial the side margin bar. Lining mine up directly on the A4 mark keeps all the holes within the paper with none punching out over the edge. Push your sheets of paper all the way in, making sure everything is even and straight. Otherwise your holes will be crooked. When you go to place the spiral coil, the individual coils should open towards you. My workbook had 18 pages and I was able to feed them all onto the coils in one go. At first I did it in smaller bunches but if you can, one go is the way to go. The stack of paper gives stability and you can insert them over the coil ends. The 3/8' coil is not very big. I think it would be a lot easier to work an 1" coil as you have a lot of room to slide the paper on. Insert your sheets upside down (or from start to end) so that the coil ends are on the back side of your project.
ترست بايلوت
منذ 5 أيام
منذ أسبوعين