Desert Online General Trading LLC
Dubai, United Arab Emirates
Desert Online General Trading LLC
Dubai, United Arab Emirates


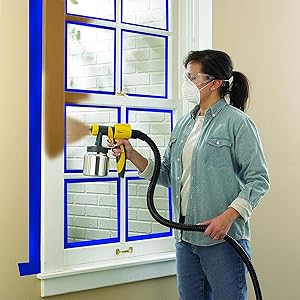
🎯 Nail every project with pro-level precision and zero overspray!
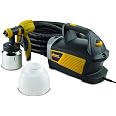
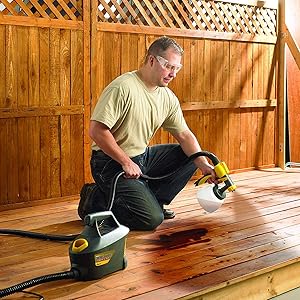
The Wagner Control Spray Max HVLP Paint Sprayer delivers a powerful 510W motor and 20-foot hose for extended reach and reduced fatigue. Featuring adjustable air pressure and material flow controls, it offers three spray patterns (round, horizontal, vertical) for ultimate precision. Compatible with a wide range of materials including thinned latex paints and stains, it ensures a smooth, professional finish with minimal overspray. The package includes metal and plastic paint cups, a cleaning kit, and a user manual, making it a ready-to-use solution for both DIYers and pros.


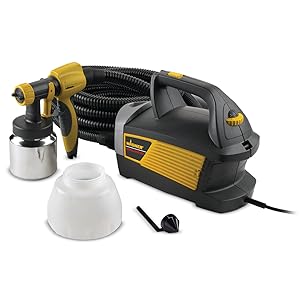

| Brand | Wagner |
| Tank Volume | 1.5 Quarts |
| Color | Yellow/Black |
| Recommended Uses For Product | 20 ft. hose, Adjustable flow control with 3 spray patterns, Superior nozzle, Use with a variety of materials, Variable aire pressure control |
| Material | Metal, Plastic |
| Item Weight | 10 Pounds |
| Product Dimensions | 12"W x 18.5"H |
| Style | HVLP Stain Sprayer |
| Power Source | AC/DC |
| Included Components | 20 ft. Hose, Cleaning Kit, Control Spray Max HVLP Sprayer, Instruction Guide, Metal Cup, Nozzle, Plastic Cup |
| Model Name | Control Spray |
| Maximum Pressure | 2.63 Pound per Square Inch |
| Hose Length | 240 Inches |
| UPC | 172304346044 872182815730 080850317329 100177418544 021112826692 763615760683 716080067405 072080017353 024964194964 051020034193 752913147326 651256045354 191120025209 151902999838 351428773442 803982727404 172302816594 |
| Global Trade Identification Number | 00024964194964, 10024964194961 |
| Manufacturer | Wagner Spraytech |
| Part Number | Control Spray Max |
| Item Weight | 10 pounds |
| Item model number | 0518080 |
| Is Discontinued By Manufacturer | No |
| Size | Control Spray Max |
| Pattern | Painter |
| Shape | shape |
| Voltage | 120 Volts |
| Item Package Quantity | 1 |
| Special Features | special_feature |
| Usage | specific_uses_for_product |
| Batteries Included? | No |
| Batteries Required? | No |
| Warranty Description | 1 Year |
M**S
Great Sprayer for the DIYer
I bought this quite awhile back (a little over a year ago), so I have used this item a lot. I now have a more expensive (10X the cost) HVLP rig, but I have found that this little Wagner gun is so MUCH more VERSATILE and EASIER to use, that I use this one more often than the expensive one. I can spray oil-based paints and primers, as well as water-based products, with hardly any effort. Cleaning up is fast and easy, too. You CAN get a 100% perfect, professional finish IF you take your time, read and re-read the manual, and you practice with it, first. Do not expect to pull it out of the box, fill it, spray with it, and have perfect results. I suggest that you gather lots of cardboard and buy a can (quart or gallon) of cheap paint (the same type as your first project requires (water- or oil-based)). Then, buy the appropriate diluent (read the paint can), the compatible additive (i.e., Penetrol for oil-based paints and Floetrol for water-based paints). While you're at the paint store (or you are on Amazon.com) pick up some medium size (pertaining to particle filtration size, not overall size) disposable paint filters. My two spray painting mantras are, "Practice does make perfect!" and "Paint additives can make ALL THE DIFFERENCE IN THE WORLD between a professional-looking paint job, and just an awful looking paint job!" That's it in a nutshell, but I've written at length about the first time I used this sprayer. If what I learned can help you get great results on your first project, it may be worth the time it takes to read:My first project was not the smartest one to choose as a first project to paint with a spray gun. It was the wainscoting and trim in my dining room. But, it came out so perfect, that even after a year, the glassy, smooth, sprayed surfaces still impresses me so much, I cannot believe I did them! But, back then, I didn't know any better, so I thought I would just start right in with the painting, buying the exact same paint and color (Sherwin Williams Alkyd) the installers had used. I lightly sanded all of the wainscoting and trim, as best I could, to scuff up the surfaces. I also used a liquid deglosser, since sanding detailed trim is thankless, tedious work. But, most of all, I spent a lot of time caulking (using PAINTABLE caulk) areas that had pulled apart from "settling," or that were not properly caulked by the installers in the first place. I let the caulk dry thoroughly. Actually, it was all the cracks and crevices in the joined edges of the woodwork caused by improper (or complete lack of) caulking, and some due to settling, that had caused the need to paint the trim and wainscotting.Next, I started in with the viscosity tests. I used paint thinner first, but then I read up on additives. So, I switched to using a combination of paint thinner and Penetrol (by Flood, purchased at Lowes). I can't recall the exact ratio of paint thinner to Penetrol I ended up using, but I think it would be safe to say about half and half. Of course, paint thinner was what my product called for as a thinning agent. Paint additives, like Floetrol and Penetrol, help produce a smooth, glassy finish. The additives can help make up for a multitude of sins! For example, if you did not properly adjust your air/paint flow, you could end up with a painted surface that has an orange peel texture (a common problem). If it's not too bad, the additives themselves can make that problem completely disappear! But, that's not too surprising, because one of their purposes is to reduce, or eliminate, brush marks!Once I had all of my paint thinner and Penetrol added in order to achieve an acceptable viscosity test, I was alarmed at how much I had diluted the paint! I had definitely diluted it beyond what the manufacturer had recommended (as stated on the can). Thankfully, I was worried enough that I decided to practice on some cardboard, rather than on the dining room walls, first, as I had planned on doing after reading all of the positive reviews here, thinking I could just spray the walls and get great results! And, although it didn't take long before I was able to get a nice, smooth coating on the cardboard, I am really thankful I did! I would have been scraping and sanding walls, for sure! I also stood the cardboard up vertically, like the surface I would be spraying (vertical surfaces are much harder to spray without getting drips and runs), so I could get a feel for how much paint I could apply before getting runs. It wasn't very much! I had to keep the gun moving relatively quickly. But, by then, I had to send my husband back to Sherwin-Williams for another can of paint, just to be sure I would have enough paint!Before getting to the viscosity tests, though, I had basically turned my dining room into a giant spray booth, but without an explosion-proof fan mounted in the window! I covered the windows, ceiling, and upper walls with plastic, masking off all of the edges. I also taped plastic over the two doorways, masking around all of the edges of EVERYTHING. I used thick plastic drop cloths on the floor, but I goofed by not taping them down as securely as I should have. So, I had to stop and do some clean-up and remedial taping when I saw that the air coming out of the nozzle was blowing up the edges of the plastic! Naturally, I used a respirator, and was covered head-to-toe in disposable painting attire. The air was thick with paint mist when I did paint. But, I expected that in the enclosed space. I put on a total of four coats, as I thought with all of the diluting, they would be thin coats. They were, but I wouldn't say that was a bad thing! I don't own a mill gauge (something I just recently learned about!), so I couldn't tell you how thick each coat was, but they were thick enough to cover bare wood without being transparent enough to see the wood grain show through, but not so thick that it would cause runs or drips. I always sprayed a small piece of cardboard, leaving it in the dining room, but near the opening, so I could easily check when the paint was dry enough to recoat, without touching the trim or walls themselves. It dried much quicker than I had anticipated, given all of the dilution. I did get a couple of runs, but I just sanded them off when the paint had dried enough to produce a powder when sanded, and not rub or rip. Of course, I sprayed these areas again.Even with the massive amount of prep work required (most of it would have still been required if I was brushing-on the paint, such as all of the caulking), the amount of time It took to spray, clean-up, dry, spray, clean-up, etc., was only a fraction of that time that would have been required for me to brush on all of the coats! The results were, as I said, spectacular. Today, the wainscoting and trim still look as fantastic as they did the day II had finished painting them. I was worried the dilution of the paint would have affected the wear or appearance of the surfaces, but it did not. So, I would never be afraid to dilute paint more than stated by the manufacturer on the can. Not being a paint professional, I do not know how they arrive at those figures, but for myself, I would always dilute the product according to what is recommended in the sprayer manual (using viscosity cup and timing the flow), and not what is stated on the can.But, I always read the can of the product I am using, because it tells me what to use in order to thin the product (the diluent). For oil-based PRIMERS, I use only the recommended diluent or solvent, and I omit the additive (Penetrol). To date, I have not used water-based PRIMERS, but I would probably only use distilled water for the diluent (unless the can stated to use another type of diluent, that isn't water). A shellac-based PRIMER would probably call for denatured alcohol as the diluent. Again, always defer to the can/manufacturer for the diluent to use, but defer to the sprayer manual for the proper dilution rate (using the viscosity cup). For water-based paints, I use a mixture of one part distilled water and one part Floetrol (50-50) to dilute the paint. I also use a medium filter for all paints and primers, and it is the last thing I do before I spray paint. Disposable filters are cheap, so I use a fresh, new filter when I fill or refill my sprayer cup. If I fill the cup three times during a project, I've used three filters. I always gather some cardboard to use to warm-up on, and, most importantly, to help me fine-tune the settings on the sprayer, so that I achieve the best finish possible. If your paint is properly diluted, and your spray is properly adjusted, I just don't think you will be ever be unhappy with the results. Thoroughly cleaning up your equipment as soon as you are finished painting is also extremely important. If you have a tiny, dried, speck of paint in the nozzle, you will not get good results. I have found those really thick pipe cleaners (oh, excuse me, I mean CHENILLE STEMS) are invaluable as an aid to cleaning out the inside of the slanted plastic tube that is inserted into the paint cup.Some other tips I've learned include spray painting early in the morning, when there is less likely to be a breeze, if I am painting something outside. Avoid spraying in direct sunlight, too. Finally, if there is a result that is not to your liking, Google it to find a solution to the problem. I have learned so much from doing this, and watching Youtube videos, too. If all else fails, call the manufacturer because there is always a small chance you could have a defective part that needs to be replaced.Dilute and practice with your cheap practice paint. If you can achieve a great finish on your cardboard (make sure the cardboard has a smooth surface to begin with, too!) using your cheap paint, you will surely be able to get an amazing finish with your higher quality paints and finishes.
M**Y
Works great, saves paint.
If you're thinking about buying this is probably because you've never owned a paint sprayer before and wonder if it will make your life easier than painting with a brush. Answer- yes.There aren't really any serious drawbacks, even in the cleanup (think of what you have to do with brushes). It works well. The experience is, the paint goes on much more thinly than what you might have imagined; you won't cover an area with one pass the way you would with a brush. So you're in effect building up thin layers of paint as you go. As far as arm the motion of applying the paint goes, you'd have to be trying to make a mistake with this thing for things to go wrong. It's really no surprises kind of deal; the air blows, it takes the paint with it, the paint is pretty evenly applied without bubble spatters or suchlike. Back and forth a few times and viola, it's done.Now it's not a flipping airbrush, meaning, it doesn't apply paint with absolutely no trace of spattering whatsoever- you can't do infinite amounts of shading with it, but it doesn't need to be to paint walls, fences, furniture and still have a completely professional outcome. Perhaps that's what people pay 1000 dollars for when they buy better models, then again perhaps even that doesn't buy you that level of fineness. My point is, it's fine for interior / exterior painting and especially painting surfaces where a brush would make it a lot of work. We had a long fence that fit this description and it literally 1/8th the time it would have taken me.I used something called flocontrol which you can get at your big box. It supposedly makes the paint flow more freely. I can't say I needed it (I have never not used it). I just needed things to turn out right the first time and didn't want to take the chance I would have problems. Just reporting the facts of how I used it.Yeah this is going to change painting for me. It's just faster and better and above all else- how could I have left this out- terrifically more sparing of paint than a brush. I would not be surprised to learn you use half the paint or even less paint than you otherwise would have using a brush. The reason is, you stop applying paint layers when it looks right, whereas with a brush the first stroke already delivers too much paint to the area you put the brush down on and then you try to spread that excess around. Somehow this works out to be much more wasteful of paint than one supposes.Yeah go ahead and get it. Fact: I saved 35 bucks my first time using this because of the paint I didn't have to apply. I have a gallon of paint I never opened. I have to imagine it will continue to save me money going forward for the same reason. I expect it to pay for itself and then save me even more money over its lifetime.Be sure to clean it as per the instructions; you can see how it would cease to function if the small passages inside it where paint flows through and gets "atomized" would cease to function with dried paint stuck to them. You have to have a ready supply of flowing water with which to clean this soon after you're done. It puts that requirement on you. Some parts also need to be swished around in a little cup of water. This is not cumbersome or mysterious, and neither is taking it apart and putting it together.All in all a jolly good buy !
ترست بايلوت
منذ أسبوع
منذ يوم واحد