🌍 Go Green, Go Anywhere! Unleash the power of the sun on your next adventure!
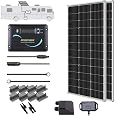
The Renogy 200 Watts 12 Volts Monocrystalline RV Solar Panel Kit is designed for outdoor enthusiasts, providing a robust 800Wh daily output with high solar cell efficiency. Its durable construction and smart charge controller ensure reliable performance for RVs, boats, and off-grid systems, making it the perfect companion for eco-conscious travelers.


| Maximum Voltage | 12 Volts |
| Maximum Power | 200 Watts |
| Connector Type | MC4 |
| Amperage Capacity | 30 Amps |
| Standby Power Shutoff | High Efficiency |
| Item Weight | 14.1 Pounds |
| Item Dimensions L x W x H | 41.8"L x 20.9"W x 1.4"H |
| Material Type | UV-resistant ABS Plastic; |
D**K
Dry-campers delight; a well documented, small and easy set up solar system
Very pleased with the quality of the product and installation documentation. The panels and charge controller are simply great quality. From the reviews I read before buying, Renogy stands behind its system and responds to troubleshooting customers - a big plus over competition in my purchase decision.A DIYer, I wired the Wanderer Charge Controller into the bedroom of our travel trailer to have immediate access to the system status (and to keep it dry), plus two ammeters; one to monitor solar charge rate to a battery bank and one to monitor our power draw from the same battery bank. That gives us the ability to see the automated doings of the Wanderer, which is really a superb quality charge controller.The system package came with everything necessary, except in-line fuses, to get hooked up to our battery bank (four deep cycle 12-volt flooded cell marine batteries with about 300 amp hour storage capacity) and to run the power cable leads about 8 feet away from the trailer. I purchased an additional 50 feet of power cable (on Amazon - Unlimited Solar's - Solar PV Cable Set with 2 x 50FT MC4 Wire Exntensions - 10 AWG) to be able to place the panels away from shade we might park the trailer in. The MC4 connectors are what Renogy uses and are compatible with other vendor MC4 extensions.For now we are laying the panels on the ground; I will build an adjustable stand for future camping trips. So far everything works great, panels have been in 7 hours of sun per day on two camping trips and kept us charged up for daily 12-volt use (lights, water pump, an electronic ignition propane fridge with a constant 12 watt/0.8 amp draw, propane furnace ignition and fan, CO2 detector).We have shifted our lights to LED's (lower power draw bulbs), but I expect this setup would keep up with higher incandescent bulb's power draw in camping spots with ideal panel exposure. I also plan to have a 200 watt AC inverter in the mix and expect that will be adequately supplied by the system.We really like camping away from campgrounds, in BLM deserts and National Forests, so this is a great set up for us. I will recommend to friends!
S**N
This works very well after you get it installed!
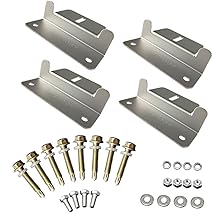
This was a relatively easy install from me since my travel trailer was prewired for solar. I did have to build some brackets to mount the panels on the roof. The panels generate plenty of electricity to offset my refrigerator usage. Very happy with this product and the battery minder that goes with it.
H**K
Nice kit for a camper van
I'm happy with the installation kit and function of this package. More than adequate for my camper van. No issues.
P**L
Good set up
I give it four stars because it is almost complete. No inline fuse or disconnect switch. I can't speak for the controller because I am running their dc to dc with mppt. Everything seems solid and is functioning as it should.
J**K
Awesome value, quality product
Everything went together very well with no issues. The power cables are great quality and the connectors are super easy to use. The one thing I wish they would do different is color code the cables because it’s hard to remember which is positive and negative once they are threaded through the camper. The included screws did not work that well for the top of my RV and I had to buy lag bolts instead of using the supplied ones.
G**T
Unbeatable Value
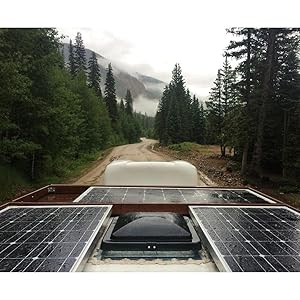
These are infinitely better than expensive grid tie arrays. Easy install just plug and play. Ive actually got 700 watts up in series-parallel. My roof pitch faces east and west so I have 3 to catch the morning sun and 4 to catch the afternoon sun. Working great the voltage is about maxed out around noon in the summer but I think the mppt keeps it low enough. Got it hooked up to a 400ah battery. Powers a 6000btu window ac all day or a 500 watt space heater for several hours a day in winter. Also have a charging station and wifi it runs. Electric bill is $100 less per month. The mppt is really great. It will charge even on the cloudiest days. Very handy during 2 power outages already. For the money the value is unbeatable.
J**N
Great product, be careful about the recommended products that appear at purchase
Installed this system on my Toy Hauler RV. It is keeping the two batteries charged very nicely. We can watch a movie at night, and the batteries are fully charged by the next evening. I suspect we could watch a couple of movies, but I haven't done this yet. We use LED light bulbs throughout the RV to reduce consumption. I wish more people would go solar and use their generators less. Solar won't power the microwave or air conditioner, but it powers everything else.Some people complain about the controller, but I think it does fine. The complaint is that it doesn't have a meter to show voltage or current. In my opinion, you only want this in the beginning to see how efficient your system is. The controller has LEDs that show when it is charging and when it is in maintenance charge mode (batteries full). I have an inexpensive volt meter that plugs into the 12 volt outlet. Good enough for me.Do not buy the huge fuse holder and 100A fuses that appear as "Items other people bought with this." The correct fuses are 15A and 30A, and you can use standard automotive fuse holders. There is an inexpensive meter that appears when you purchase this, and I recommend that you fully read the instructions and develop a plan before buying it. This meter can only tell you what is happening at the point of installation. For example, some people install this between the panels and the controller (shows panel output), between the controller and the batteries (shows controller output), or between the batteries and the load (shows what the appliances are actually using from the battery). In my opinion, the last application is the only one I care about on an ongoing basis, and the installation for this application is independent of the solar install.Also, take the time to look up the recommended roof attachment procedures for your type of roof. I have an EPM roof, so I looked at the manufacturer videos for attaching a fan to an EPM roof and used those as a guide. I was surprised to learn that butyl tape is the first line of defense and the self-leveling caulk was the second line of defense. If the roof leaks, dry rot will likely follow, and that can be expensive at best or ruin the RV.Some people commented that the connectors are difficult to separate, but there is an inexpensive tool you can buy at checkout to make this easy.The instructions say to hook up the solar panels last or cover them so they don't produce a charge until after they are connected to the controller. I cut cardboard covers from the shipping box and taped them to the panels. This allowed me to lay out everything before the final attachment.
ترست بايلوت
منذ شهر
منذ شهرين