Desertcart purchases this item on your behalf and handles shipping, customs, and support to OMAN.
🛠️ Move Fast, Work Smart: The Ultimate Mobile Planer Stand for the Modern Workshop
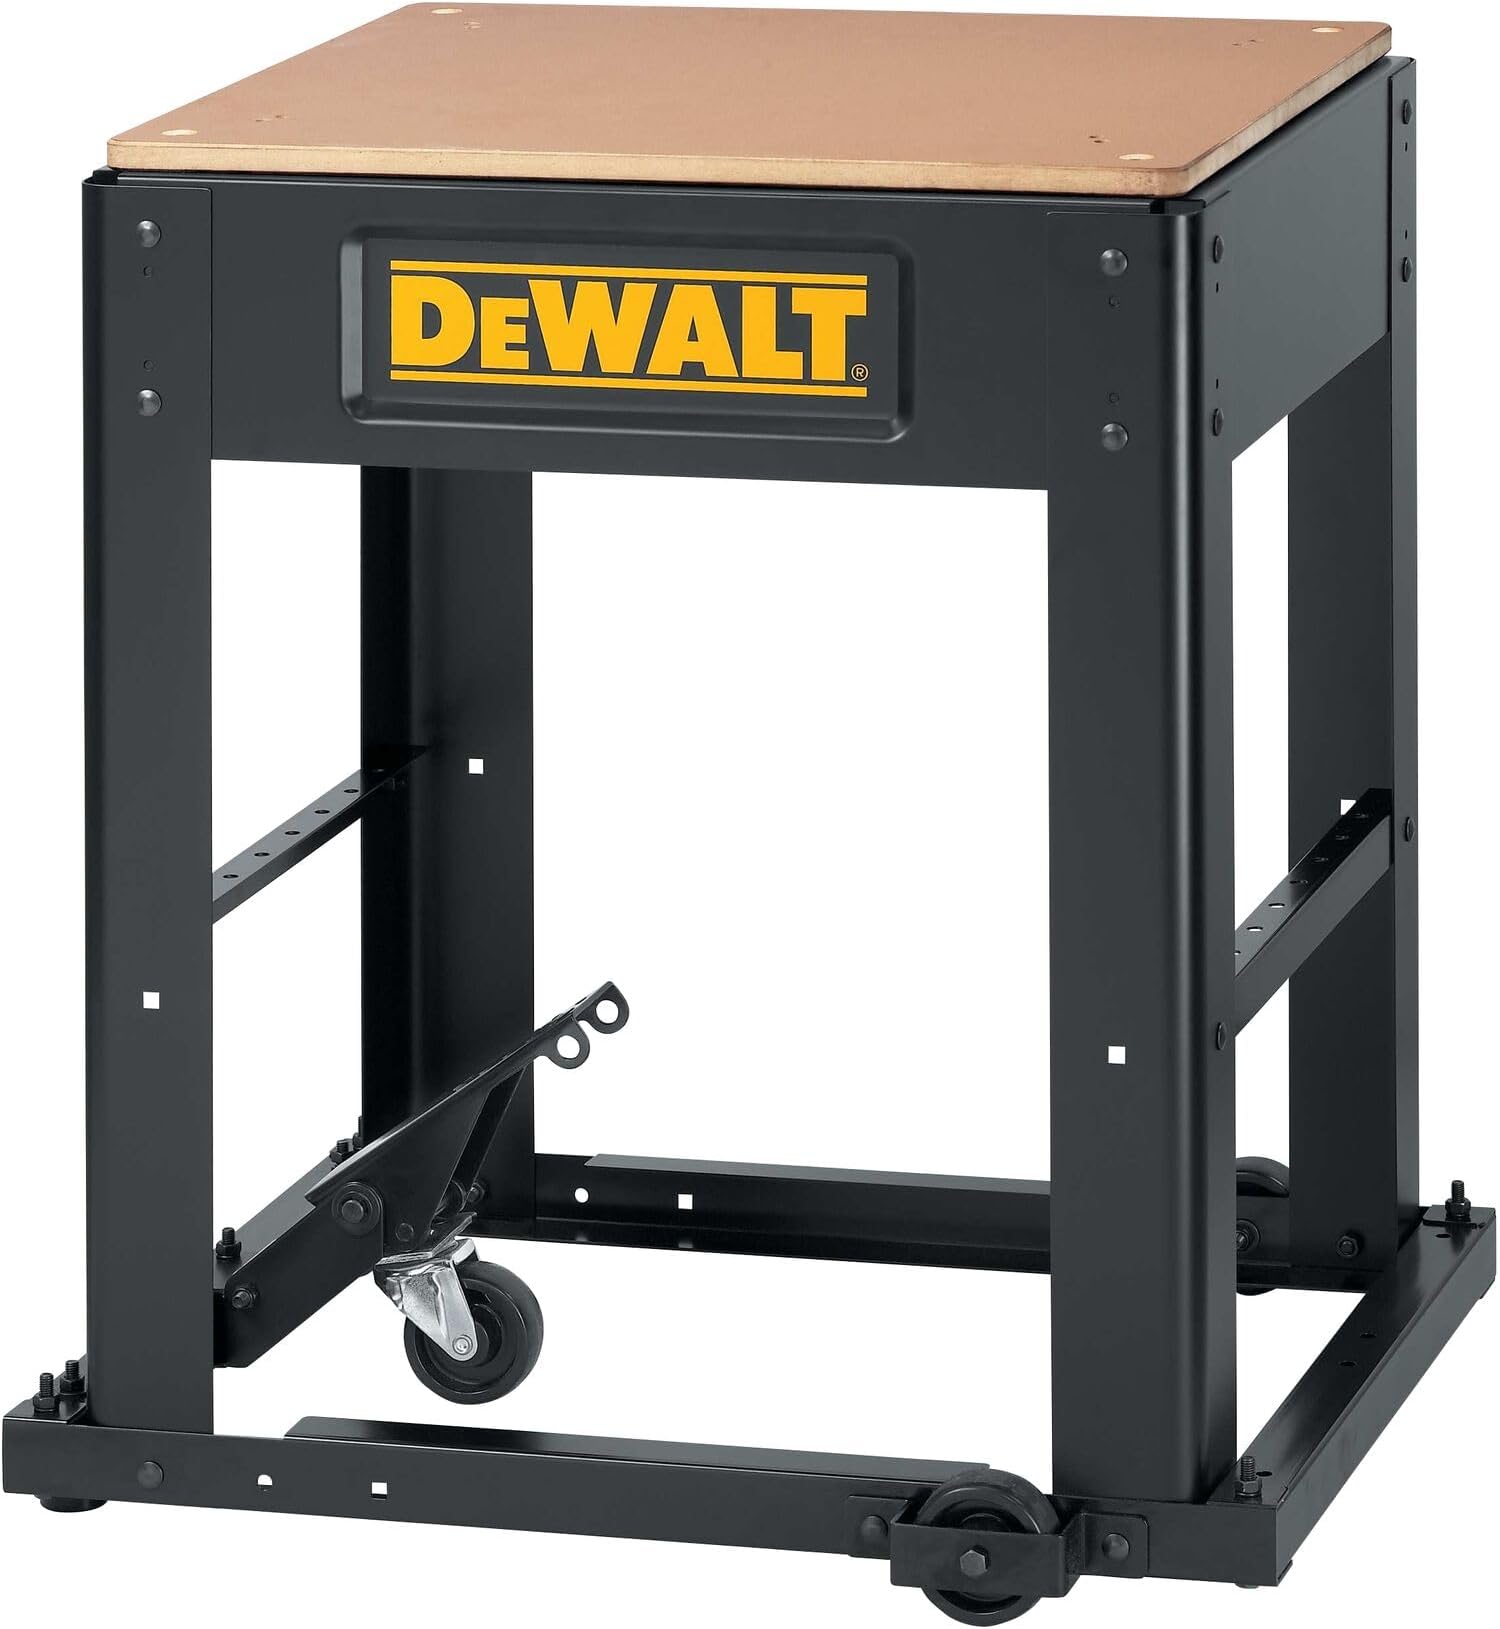
The DEWALT DW7350 Planer Stand combines rugged heavy-gauge steel construction with a lockable mobile base, delivering unmatched stability and portability for your planer. Its predrilled MDF top ensures easy installation and universal compatibility, while the foot-pedal caster system offers quick transitions between stationary work and effortless movement. Perfect for professionals seeking a durable, space-efficient, and versatile planer support solution.


| Base Type | Mobile |
| Brand | DEWALT |
| Color | Black, Yellow |
| Finish Type | Brushed |
| Item Dimensions | 30 x 24.5 x 6 inches |
| Item Shape | Rectangular |
| Item Weight | 56 pounds |
| Item dimensions L x W x H | 30 x 24.5 x 6 inches |
| Material | Blend |
A**R
Well-designed, easy to assemble, and very sturdy
I wanted this stand for a small but heavy low-speed grinder, rather than a planer, and it is very good for this use, allowing me to move it out of the way in my small shop. The height is good for sharpening small tools, where visibility and control are very important. The box in which it was delivered was well-designed to protect the components and everything arrived in perfect condition. This very sturdy stand was easily assembled, using the instructions. The parts were easy to identify from the exploded diagram. The small parts were packaged separately by sub-section of the stand, removing any likely ambiguities. Many of the reviews criticized the instructions, which warned me to take them very literally, and work slowly. As a result, I had no trouble putting it together, except for the very last small carriage bolt, which did not go into the square hole designed for it. There was not a fully-formed square boss under the bolt head, and it was mostly round. Clearly some kind of manufacturing defect. Altogether, it took 90 minutes of very methodical assembly to complete the stand. It is sturdy with the caster retracted, and rolls easily when the caster is down. It is a little awkward to raise or lower the caster when installed inboard, but if installed outboard, it would be a tripping hazard. I contacted DeWalt and they promised to send a replacement, although there some question about whether I should have contacted Amazon first. I don't know their arrangement with Amazon, but this would have been unusual, as most manufacturers say to contact them before contacting the retailer or returning the item. I would not expect a retailer to stock every replacement part for every item they sell.
D**N
great stand, poor instructions
This is very solidly built, with pre-drilled holes for bolting down dewalt planers. The stand is easy to move around yet sits solidly in place when lift wheel is lowered. The assembly instructions a worthless...when you begin to start assembly follow directions on a YouTube video and things will go together smoothly.
F**T
Great, but assembly instructions are a little vague in places
This is a very sturdy frame on casters that is designed (and perfect for) the DeWalt series of thickness planers. The packaging was terrific - in particular the hardware (carriage bolts, lock and flat washers, nuts, and and screws are provided in separate packages associated with each stage of the assembly. The large structure pieces are clearly identified. For the most part assembly is straightforward requiring only a ratchet with 13mm socket (long would be better), a 13mm open-end wrench and a Philips head (they call it cross-head) screwdriver. My only issue is that I found the instructions a bit vague when describing (a) the alternative mounting options (inboard or outboard) for the movable caster wheel and (b) the installation of the rubber leveling feet. For the caster wheel it wasn't clear to me how the brake pedal was to be positioned and for the leveling feet no mention is made of the need to double-nut them so that (as the users manual states) two (of the three) nuts can be loosened in order to adjust the feet. These are small nits, I know, but it did take me some time to puzzle through when a few more words in the instructions would have been welcome.
M**K
Excellent value, sturdy, and easy to assemble! Great for any "lunchbox" planer.
I could have assembled it blindfolded (almost)- not really of course, but whatever problems with assembly this had before like misaligned holes, etc., are gone. The only criticism I would have is to have a better pictorial assembly diagram, like lego or Ikea. This lends itself to that nicely- showing the nyloc nuts on the wheels and the leveling feet exploded- most will not know to put a nut on top and one on the bottom of the tube, and lock washer under the top one. I didn't bother reading- just looked at the picture and start at the bottom and worked my way up just like an erector set. Put the base together, put in the legs, aprons, wheels, feet, swivel caster, tighten all that, add stretchers, shelf and top. The end aprons live under the side ones, fyi. The hardware is all sorted out in bags telling you where they all go- very nice! Well packed- big piece of styro holds everything- beat up by Fedex, but in excellent shape nevertheless. I built mine on a table, loose, until the stretchers and braces were all in, then squared the base, and tightened all the nuts. Then set on the floor and set the shelf and top, then the planer. I put the swivel caster outboard- especially with a shelf in the way. Be sure to flip the pedal up out of the way when it's parked for planing, or you might nick your ankle! I tried using inboard swivels before with a Delta mobile base, and it doesn't lift enough, and is hard to use. Tools: 13mm socket, 13mm combo wrench, and a #3 phillips screwdriver. Or cheat with an impact driver and deepwell 13mm. Don't overtighten the mobile base bolts or the top screws and bolts. Btw- the holes on the pedal are there when you have two swivels on larger bases and can run a rod thru them so you can operate both casters- I saw someone comment on that earlier. A great value, as metal stand like this can sell for $150 and mobile base for another $60-70. All parts lined up nicely- there are some sharp edges on the backs of the metal pieces, so be careful. Nice shelf, (not shown in this listing)- not sure what I'll put there that won't shake off during planing, but nice and sturdy. and nice piece of finished particle board for the planer. Metal appears to be powdercoated. Now that beastly 90 lb. planer of mine (DW735) is on wheels! It is rock solid when the swivel caster is retracted. Nice job DW!
J**E
Great Stand...Contestant For Worst Manual Ever
This stand is great, once you put it together. Getting there, on the other hand, is another matter. I'm not sure what's going on with this unit, but it's late 2013 and many of the problems that have been widely reported with assembly since at least a couple years ago are still present. Basically, the manual is junk...it won't make a bit of sense and if you follow it, you'll fail. Don't ask me why Dewalt changed the procedure and packaging and hasn't bothered to update the manual in over two years. Just don't even follow it, seriously...the screws are wrong, the procedures incomplete, the wording incomprehensible and there's a poor excuse for a diagram/picture. The stand does come together, and well at that, but it's a journey that manual won't help you a bit on. You won't have to physically modify anything to get there, either, as some have said in the past. The problem is with the base of the stand, everything else is fairly straight forward and would come together as you expect. If you buy this stand, head to Dewalt.com and look up the DW7350. Go to the FAQ section and click the link, "How do I put this $%&!# thing together?" Here you'll find a PDF with pictures of the base when fully assembled. Then, google "Dewalt 7350 exploded" and one of the first links should be for Dewalt's service center, where you can find replacement parts for this unit. On that page, there's a link for a PDF and there you'll find an exploded view (actually a parts list) of how it's supposed to come together. Some tricks? All four bolts in the bag "Base" actually do go to the assemble the base. The manual will have you put two of them elsewhere and it won't work out. Also, the four medium size screws look the same, but are slightly different...even though the parts diagram has them as the same part number. Near as I could tell, the two with the lock washer are used to attach the pivoting wheel and the two with the plastic inserts are used for the non-pivoting wheels. (You'll definitely need the 13mm socket and box wrench for this one.) Also, I found the top a bit tricky to get on because the holes didn't line up well. I found it useful to place the unit on it's side, press down the top/legs and then actually screw the counter sunk bolts into the top table, allowing it to fit through the mounting holes a bit easier. It took me four hours to figure this dang thing out. For that, it loses a star. It probably should be three stars, but the table is really well built and I suppose there's a muted sense of accomplishment once you complete the build. It's a robust stand, holds my DW745 planer perfectly (and could other bench tools too) and it wheels around smoothly. I like that they added a shelf so below the planer isn't wasted space. Overall, it's worth the effort and price...but bring your patience when you put it together.
D**Y
So easy a blind guy could do it
Despite it’s mobility, the stand is very sturdy. Even when moving heavy loads it is very stable. and for one exception, explain belowed, it was very easy to assemble. After reading several reviews that stated the instructions for the stand were nothing more than an exploded view and a list of parts I was concerned about my ability to assemble it. You see, I am legally blind to the point that under most circumstances, I can’t see much of anything. On top of that, my girlfriend who Usually aids me in assembling things like this hates that type of instructions. Having said all of that, I’m here to tell you that this thing went together slick as snot. I didn’t use the instructions for the entire build with the exception of mounting the static casters. They mount in a kind of funky way that I didn’t expect or could figure out on my own. Fortunately, with only those few parts remaining, my girlfriend was able to figure out what went where. This is where I took exception from the instructions. They show four (4) partially threaded bolts, part N, that are supposed to be used to bolt the machine to the MDS top surface. I use two of those partially threaded bolts to mount the static casters, because I didn’t like the idea of using fully threaded bolt as an axle for my casters. I wanted my casters to roll on the smooth grip section of the partially threaded bolt. especially with an excess of 150 pounds being supported by said casters. One last thing. The retractable caster out of the box looks kind of floppy. Don’t worry, when it’s installed properly it works just like it’s supposed to. All in all, it took me about three hours to lay everything out, figure everything out and put it all together. so I feel like the average DIYer should have no problem assembling this mobile stand.
R**1
Bad instructions - what else is new?
That is, I like it AFTER it's assembled. I swear the people who write these instructions from DeWalt are not good task analyzers. Or they just don't give a flying fox about their customers. I've done task analysis (instruction manuals) with detailed diagrams for 35 years. It's just not that hard to design a set of instructions thoughtfully and carefully, and, most of all - ACCURATELY. NOW STAY TUNED for the PROS; at the end of this little diatribe, as well as the single-most important piece of advice about DeWalt instructions. Here's just a few of the adventures I encountered. First, DeWalt must own stock in a plastic factory somewhere, because there is a LOT of plastic packaging here. Totally unnecessary, and absolutely damaging to the environment in several different ways. Second, they need to learn that if there's a special condition to an assembly step, it needs to go BEFORE the assembly step and not after you get it done! Third, the parts that are manufactured have holes that are not used. Didn't bother me because I've put DeWalt stuff together before but for a beginner or someone who tries to follow instructions, it's a problem. Fourth, the exploded diagram of the assembly is wrong. There are parts that show no holes where there are holes. Fifth, the diagram isn't shaded properly or lined properly to show if a flange goes up or down, etc. Sixth, the shelf that was in my box isn't a shelf. It's 3/4 of a shelf that goes fully from side to side, but leaves about 3-3/4 of empty space in the back and the front of it. I'll make my own out of plywood so I can utilize the entire space if I want to. Seventh, again having to do with assembly. The legs have to be assembled in a certain orientation so the locking bumps go at the top. But the diagram doesn't show that, and the instructions don't say that. They do say to utilize them later in the instructions, but if you put the legs in upside down, you'll redo them. Eighth, the top does not cover the entire space of the frame. No big deal in terms of function, but those exposed ledges are a great place for dust to collect. Ninth, the instructions themselves. The top is melamine and the user may want to protect it until the very end. So DeWalt decides to put the instruction manual in that plastic bag, where it might not be seen until the very end. I'm experienced in these things, so I saw it because I inspect every single part before I ever begin to assemble, because 70% or more of the things I buy need to be finished or altered in some way or another. Tenth, this stand needs locking casters on all four corners. In a tight shop, driving it like a forklift might be a little difficult. **** PROS **** And now, the good stuff. AFTER the assembly, this thing, while a little short, is a very solid unit that should work well for it's intended function. The parts are machined well (if not very good in terms of initial shapes and you ignore the holes that are there for no reason) and the hardware is quality stuff rather than crappy aluminum. The end result is a durable and very solid stand. Oh, the most important piece of advice I mentioned at the outset: Don't, EVER, follow DeWalt instructions. Look at the diagrams, remembering they are only 80% accurate. Search on YouTube, and use your own mechanical ability. It's a great stand and after a time it's one of those things that you just kinda forget you're using; it becomes automatic. I would definitely buy it again.
M**S
Fantastic as a 3D printer stand.
I am not using this stand for its intended purpose, I'm using it as a stand to hold my BambuLabs P1S 3D printer. I had been looking all over for a heavy and sturdy stand for my 3D printer, but also something that had a small footprint so that it wouldn't take up any more space than necessary. I took a gamble and ordered this, despite it not being for 3D printers, and it's absolutely perfect. Takes up very little space, has a shelf to hold extra filament and tools, and most importantly it does not move a millimeter when printing. The P1S printer creates a lot of vibration and motion when it prints, and yet this stand does not wobble or vibrate at all. If you are looking for a rock solid stand for your 3D printer, this is what you want.
G**P
Terrific Stand .... A+
This item is a terrific accessory to your planer. It will individualise the planer as a unit and allow for easy maneuverability. Solid unit. Also consider the entry and exit flat metal extention attachments, a seperate purchase. Will complete the entire package and is well worth it.
J**É
Buena compra no se arrepentirá
Súper funcional y práctica un complemento indispensable
G**S
Rock solid & bomb proof - Follow a YouTube Video for setup
As the headline suggests, rock solid piece of kit. I ignored the manual and had a YouTube video running on the TV which guided me through putting it together. Checkout Jenny from the shop's video on how to assemble this thing. Also, I had clamps to help squeeze/expand holes into alignment (as pictured). There's no way of doing this manually while attempting to drive the bolts in. This is rarely available in the UK. I got it with free US import at £151 (July 2023), so hold out for the best price. Highly recommended, my planer is finally secure and much safer to use.
S**T
Very sturdy and well engineered - Recommended
The Planer does exactly what it is meant to. The stand is sturdy and easy to move. The Planer (DW735) bolts right to the stand via the pre-drilled holes. Assembly is straight forward with easy to follow instructions. Takes about 30 minutes to assemble. The stand is so good, I bought a second one for my Jointer. Recommended
S**F
Solid well built table
Solid sturdy product perfect for my DeWalt Thicknesser that bolted straight on. Easy to maneuver and a great addition to my workshop.
Trustpilot
2 weeks ago
1 week ago