Desertcart purchases this item on your behalf and handles shipping, customs, and support to OMAN.
⚡ Upgrade your 3D printing game with precision and ease!
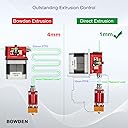
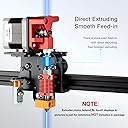
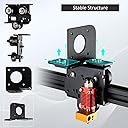
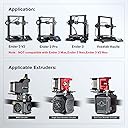
The UniTak3D Ender 3 Direct Drive Upgrade Conversion Bracket transforms your Ender 3 V2, Pro, or Voxelab Aquila 3D printer by replacing the Bowden setup with a direct drive system. This upgrade enhances extrusion control, especially for flexible filaments like TPU, while maintaining printer stability through a balanced split bracket design. Installation is straightforward with no firmware or wiring changes required, and it preserves your printer’s original build volume. Note: extruder and hotend are not included, and it’s incompatible with Neo series and Titan extruders.


| Brand | UniTak3D |
| Color | Black |
| Compatible Devices | Laptop |
| Customer Reviews | 4.3 out of 5 stars 2,163 Reviews |
| Item Weight | 0.18 kg |
| Material | Aluminum |
| Product Dimensions | 2.6"D x 4.1"W x 6.57"H |
K**Y
Great Modification -- A Must!
This inexpensive modification on an Ender3 is a must! Absolutely changes the extrusion problems with the original Bowden.
D**O
Exactly as promised
It looks great on my Voxellab (knockoff Ender 3). It took me a day to put together but that’s because I was upgrading the arm at the same time and I didn’t use the instructions. The PTFE tube was a bit of a nightmare to work with but it worked out in the end.
W**N
Fits Perfect but I wish the top bracket was a little different
First, using the stock setup on an Ender 3 everything fit perfectly and the printer worked well. I actually had to return the first one I got because two of the holes in the bottom bracket were not threaded. But the second one was perfect. I added a Hero Me setup to my Ender 3 and that is where I had some issues. The positioning of the top plate is constrained to two positions. One for a single gear extruder and the other for a dual gear extruder. Probably for most setups this is sufficient. However, for my Hero Me setup I needed a position in-between the two. I think the design of the top bracket would be improved if instead of holes there was a channel. Then you could line it up however you want. Also, the top bracket is designed so that the motor either sits on or hovers slightly above the screws and it doesn't seem super stable. I ended up designing my own top bracket with a channel and better support for the motor, it is posted on Printables. Even with the improvements that could be made to the top bracket I think this is an excellent product and well worth the cost. The instructions were good and they provided wire, tools, extra screws and cable wraps.
B**Y
Good but need to watch video and prepare the brackets
Product is good but need to watch the video to understand all the steps. the only issue is that the bracket is painted and threads have paint in them. I recommend running a screw before the installation otherwise you will have a hard time to install everything.
J**R
Works great
Works good
D**R
Good design, sort of. A royal pain to install.
Simply put, the design could use a little massaging. The bolts that hold the upper bracket to the lower do not allow you any room for an allen wrench to set the depth of the tension bolt on the extruder. . I used one of their dual gear extruders and didn't go 100% with their documenttaion as it didn't work. Do NOT fully seat the tension bolt, just have it in there deep enough you can get the allen key in to tighten the mounting bolt in the corner, THEN using needle nose pliers CAREFULLY adjust the tension bolt by grabbing the bolt head (screw head whatever). ***UPDATE*** After some extensive use I am finding issues with the extruder. Simply put the extruder bolt that holds the gear in likes to tighten itself over time causing the gear to stop turning and extrusion to stop, well extruding. Considering the cost and effort of putting this together, along with a Spider V3 hot end, if I had it to do over again. I would have simply gone full on out and went with a Creality Sprite Pro Kit. Everything is designed to work together, nothing extra to build, just poke it in, load supporting firmware, do your calibrations and be happy with the results. Second issue, yes this works on a Voxelab Aquila, NO it does not work with an Aquila with the 3D printed BL Touch mounts or associated fan shrouds with BL Touch mounts. Solution to this problem, 3D print the eB Fan shroud for Ender 3 / CR10. found on thingiverse, and use the Ender 3 BL Touch / 3D Touch mount kit. Bolts right up and fits tight. The Aquila fan shroud screw and 1 additional screw will secure the mount to the bracket / X axis carriage no sweat. Once installed and combined with a BL Touch / 3D Touch bed leveling sensor and dual Z axis kit, this takes the Aquila and Ender 3 to an entirely new level... Like a MUCH more expensive printer. Just be paitent with the installation process.
S**S
Worth the effort
Positives: fits well, instructions were very clear, and I haven’t had any print issues. I will warn that it wasn’t the easiest upgrade to install. But that is just because of how perfectly you want everything to align. There is a very specific order you need to install everything in. But follow the video and you’ll be fine.
D**Z
Must have for any Ender 3
Do all the necessary firmware updates to get the most out of this mechanical upgrade first and foremost. Once you get it installed (not very difficult, just take your time and follow each step, and don't force anything), this gives new life to your Ender 3. Build quality of the conversion bracket is very well done, no burrs anywhere or scratches, very well balanced. Perfect fit to my existing rig with it's original parts and motor. Getting the cables cleaned up and reattached was a breeze. In terms of functionality, I saw massive improvements to my PLA prints as there was no longer any feed problems and I was able to speed up the printer by nearly double without having to heat up the hot end more than an additional 10 degrees. I saw a serious reduction in clogs and there has been no heat transfer that I've witnessed, however, this hasn't been an issue for me so far.
U**K
Simple aber effektive für Direct Drive Umbauten, aber Vorsicht bei Custom Fan Ducts
Lieferumfang: Geliefert wird der Umbausatz in kleineren Tüten und mit einem (wenn auch in Ameisenschrift) verfassten Beiblatt. Umbau: Für den Umbau wird der X-Gantry (also der Teil, auf dem der Hotend sitzt) ausgetauscht. Also die untere, konzentrische Schraube lösen, das Zugband beiderseits lösen und dann abnehmen. Die neue Grantry im umgekehrten Prozess wieder anbringen... der obere Teil für den Steppermotor, der den Extruder bedient, wird ohne den Steppermotor auf die Gantry gesetzt und dann - entsprechend des Handbuchs und des vorliegenden Extruders - auf die entsprechenden Bohrungen gesetzt und festgezogen. Steppermotor wird mit dem Extruder festgeschraubt. Fertig. Mit etwas Selbstvertrauen und ggf. Erfahrung eine Sache von unter 10 Minuten. Der Umbau ist, wie schon gesagt, ÄUSSERST einfach und dank der Tatsache, dass das Ding aus Metall ist, auch steif und robust. Vorsicht allerdings, wenn man einen selbstgedruckten Fan-Duct (also das Teil, dass das Hotend umgibt und mittels Lüftern mit Luft zum Kühlen versorgt. Dadurch, dass die Schiene, auf dem der Extruder sitzt, etwas übersteht, sind größere Ducts (wie mein "Original"-Satsana) nicht kompatibel. Ich hatte allerdings einen Remix des Satsanas mit zwei Part-Cooling-Fans und musste nichts weiter machen, als den linken Lüfter zu entfernen, was dem Druckbild aber nicht schadet. Da ich zudem ein Dual-Z-System habe, kann ich wenig darüber sagen, ob die Gewichtsverteilung vorteilhaft ist oder nicht, weil beide Seiten der "Querstrebe" von einer Schraube gehalten wird. Die Druckqualität hat sich aber merklich verbessert, daher kann ich das Kit empfehlen.
R**O
Genial para imprimir en TPU
Es fácil de instalar , yo lo hice en una ender 3 v2 y hace que tu impresora cambie por completo sobre todo si imprimes en tpu
B**7
Easy install, cables included
Very easy installation with the provided manual. Works as expected.
M**S
Excelente
Me sirvió la pieza muy bien y es accesible a Vocelab
H**R
Had some challenges with Ender 3 V2.
This was apparently in my case so pretty unique: At the last step you see that the fan holder does not quite fit on the bracket, the holes do not exactly match. But If you are going to file a bit, it fits perfectly. Furthermore, if you have bimetal hotend then you have to take into account recommended 85mm that it should be shorter. I am very positive about the seller and highly recommend it. This item is better than the original directdrive that Creality sells.
Trustpilot
1 month ago
4 days ago