Desert Online General Trading LLC
Dubai, United Arab Emirates
Desert Online General Trading LLC
Dubai, United Arab Emirates


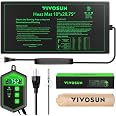
🌿 Grow Your Green Thumb with Confidence!
The VIVOSUN 10"x 20.75" Seedling Heat Mat and Digital Thermostat Combo Set is a UL & MET-certified heating solution designed for optimal seedling germination and indoor gardening. With a temperature range of 68-86℉, advanced far-infrared technology, and a waterproof surface, this durable mat ensures reliable results while being energy efficient at just 20 watts. Perfect for both novice and experienced gardeners, it also serves multiple purposes, including home brewing.


C**R
Reliable, Consistent Heat—Zero Complaints After 3 Seasons
This seedling heat mat with thermostat has been a staple in my indoor gardening setup for the past three seed-starting seasons, and it’s performed flawlessly. It delivers steady, controlled warmth that helps boost germination rates and keeps seedlings happy—no issues, no hassle.Pros:✅ Consistent Heating – Ideal temp range for seed starting✅ Thermostat Works Great – Simple to set and monitor✅ Durable – Still going strong after multiple seasons✅ UL & MET Certified – Safe for indoor and greenhouse useCons:❌ None so far!Final Thoughts:If you're serious about germination success, this combo set is absolutely worth it. Plug it in, set your temp, and let it do its job—it’s reliable season after season.
M**1
Speeds up your germination time considerably. Good quality.
If you are an impatient gardener like me, you will love this thing. It really speeds up the germination time. Some seeds they used to take a week or 10 days germinating about three or four days. it seems to distribute the heat evenly without making it too hot which I guess could be dangerous. It seems to be designed well. The cord thick enough, that I don’t worry about it causing a fire. So far, it looks like it will last and provide the expected reliability for many seasons to come. Good value for the money.
M**E
Some issues at first but it’s been corrected.
Update to my review—I received the new replacement unit today and the new thermostat is working. Amazon and Vivosun quickly resolved my issue and sent a replacement that took only two days to arrive. Thanks to both Companies for taking care of this! I’ve increased my original 3 star review to 5 stars!Testing it out—you set the thermostat to a temperature, I.e. 74 degrees (Fahrenheit) and insert the temperature probe into the soil or growing medium. If the probe is reading less than the desired temperature it will run the heating pad until the medium is heated to the temperature you want it.My new replacement unit shows all this in degrees Fahrenheit, and let’s you program the temperature in Fahrenheit. The first “defective” one only showed it in degrees Celsius and could only be set to temperatures in Celsius before displaying the Fahrenheit Temperature.The new heating pad, like the previous one works, no issues there. Keep I’m mind though it plugs into the thermostat, the thermostat does not set or regulate the temperature of the heating pad. The heating pad will be warmer than the temperature displayed on the thermostat—as the thermostat is only monitoring the temperature of the soil or growing medium. Once it reaches the set temperature it shuts off power to the heating pad.My older review from earlier this week dealing with the defective thermostat:I am in the process of returning the combination seedling heating pad and thermostat because the thermostat doesn’t work. The unit I received did not supply power to the heating pad. I had set up everything as per the instructions and kept an eye on it, noticing that the “heating” light never came on with the pad plugged in. So I took a non contact thermometer and checked the pad temperature—it was room temp and nothing more, then plugged in an outlet tester (in the photos) to check the thermostat plug in for the heating pad and there was nothing. I’m assuming it’s not wired correctly and contacted Vivosun’s support via email. I emailed them Sunday and have not heard anything back yet, so I decided to exchange the item through Amazon—which had a very easy and efficient way of handling the exchange—they are sending me a new one which I hope works correctly and I have to drop the defective one off at my nearest Kohl’s store customer service department to be sent back to Amazon.I’ll have to update this once I get the replacement unit and can better judge the thermostat. The heating pad works very well and I had to manually regulate the temperature to sprout my seeds. It seems very heavy duty for the wattage it works on and should last a few seasons. I know it’s offered separately from the combination set I had ordered.If it had worked right, the thermostat was easy to set to the temperature on and I like how the probe is designed. The only other complaint I had was that you have to set the temperature in Celsius—but it will display the temperature in Fahrenheit. Some conversion work needs to be done if you want to set it at 80 degrees F for tomatoes.Had it worked and controlled the heating pad, had Viviosun contacted me back with their advice on what to do (it’s rumored on Facebook they are not responding to emails possibly because of being located in China and not working due to current events), I would have given this a 5 star review and written how well it works. Hopefully I can post that review once I get a properly working replacement.
C**.
All parts are ( Required ).
I'm sure the functionality is great but as I pointed out the first time, I can't do anything with it until I order the germination dome. I have one all picked out. This one has a better temperature control than the one I have now.
N**K
Good for seed starting
This heat mat has been a game-changer for my seed starting! I am a newbie when it comes to using these so I had to experiment with how long to keep them in and also how to use with the lights I bought. But I finally figured it out after many attempts and sickly looking sprouts. My seeds were dreading going in to the soil until I found these heat mats. The It's a good size, accommodating multiple seed trays, and the temperature is evenly distributed across the surface. The mat is also durable and easy to clean. It's simple to use – just plug it in and place your trays on top. I've noticed a significant improvement in my germination rates since I started using it, and my seedlings are much stronger and healthier. If you're serious about seed starting, this heat mat is a worthwhile investment. It takes the guesswork out of germination and gives your seeds the best possible start. Highly recommend!
P**B
Hot box for glue in my cold workshop.
I am unable to heat my workshop. The winters are quite cold where I live. I was tired of my glue freezing and having to throw it away. I had an old Coleman cooler and I decided to turn it into a warm box. I drilled a hole in the back of the cooler, I put the Heating pad and sensor in the cooler. I placed the sponge in the hole to prevent heat from escaping and I set the thermostat for 50°. I have a piece of wood, three large tubes of loctite glue, and one can of spray paint in the box. it took about two hours to achieve 50°. The temperature in the workshop is 28 degrees. The temperature has remained steady. I'm quite surprised that when I open the lid and close it quickly. It only loses about 2°. Today was my first day. I will leave a new message if this system fails.One week of sub zero temps in Chicago and the lowest temperature reading was 48 degrees F. I have it set for 50 degrees. One issue is that my box had visible condensation in the box. It is fairly air tight. I hope this is a start up issue. The moisture may have come from the wood. If it persists I will add a reusable dehumidifier I bought for a gun safe.All my water bottles froze so I started adding them one at a time to the box so I have something to drink on hand. The warming box is still working great. Humidity was just an issue the first week. No additional moisture now. This winter is really putting me behind on my woodworking schedule.
T**G
Great product
Does what’s it’s suppose to
Trustpilot
2 months ago
1 day ago
3 weeks ago
2 weeks ago