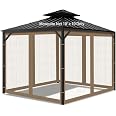
🌞 Shade Your Space, Elevate Your Style!
The BPS 13' x 10' Wall Mount Gazebo is a premium outdoor pergola designed for durability and elegance. Featuring water-resistant and UV-fighting polycarbonate panels, it provides ample shade for various outdoor activities. With easy installation and a versatile design, it seamlessly complements any outdoor setting, making it the perfect addition to your patio, poolside, or shop front.


A**R
10x16.5 foot. Absolutely LOVE!!!
The media could not be loaded. I purchased the 10x16.5 size awning. I took about 2-3 weeks after installation before posting my review because I wanted it to rain a couple times to see if it leaked. We were able to finish this in a weekend. We could have done it in 1 day, but 98 degree and 90% humidity Tennessee heat required numerous breaks. It was not hard to install if you have some assembly skills, a moderate amount of patience and a lot of common sense. This is definitely a two man job when it comes to hanging the braces. The instructions are all pictures. It has its perks but also downfalls because there are no explanations. The t-bars that hold the panels took the longest to figure out how to do them correctly. I am happy to say there are ZERO leaks, even after some really hard rains. My awning is the new overlapping style panels and I believe this is why it is water tight. The part that attaches to our house is directly under the eve, so no water can get back to that area. We actually only used caulking in the fittings for the gutter. I seen a video (in the reviews) of someone else’s (like mine) that leaked like crazy. There is NO WAY theirs is installed correctly. I’m telling you, if you take your time, do it like the instructions say, you will have a water tight, non-leaking awning that gives you a wonderful outdoor living space. We cannot sit under it in the Tennessee heat while the sun is directly overhead, because the panels filter the sun, but it’s still pretty bright… but that’s not why we purchased it. I couldn’t be happier with this purchase. I have a very high back deck and had to have something lightweight and this fit the bill perfectly. If you are not installing to brick/stucco/rock, you will have to purchase screws as it only comes with hardware to mount to that type siding. We used 3” wood screws and it’s very sturdy. We have installed a tv onto the house and spend every night out there! Oh, and all the pieces were there and nothing was missing.
R**.
this review is for the 16x10 Wall Mount Gazebo
this review is for the 16x10 wall mounted GazeboDay1-Cold with light precip.Received packages in good order VIA FedEx. Tarp covered heavy box & stowed PC (Polycarbonate) in shed.Day2-Cold rain/snow overnightGot printed installation manual out and lo-&-behold! Instructions are all pictographs!Did install solo and mounted to wooden structure. Gazebo comes with included hardware to mount to brick or concrete wall. didn't see that coming!Removed rain gutter from house, cleaned up facia, painted and located rafter studs.Day3- Cool and didn't start until mid-day.Identified all the parts to the pictures. it seemed pretty much straight-forward.Mounted wall bracket with 3" lag screws at 16" centers (had to drill mounting holes into 3piece header).Longest pieces (wall-headers, support-header & Gutter) come in 3 pieces. The rafters in 2 and the supports are one piece. The joining method is a bit iffy and flimsy (hence the 2-person icon in instructions. Doing it solo is like handling a wet noodle) and caused bending of soft aluminum connector channels (pictures). Normally you would stagger the seams of the 3 primary pieces, so they don't have the same mating joint location. If for whatever reason it should fail, that is the weak link where it will happen!Sofar only needed assistance once, because I installed the support header backwards (wrong angle on the dangle) which didn't work so well (tried to short-cut it but ended up making more work than if I did it right in 1st place) but got it done with minimal damage. Caulked along facia and top of mounting header to prevent water seepage.Day4 Got early start. Prep and install tape to seal ends of PC (see Pic's).Kudos to Aocie-LLC or whomever packaged the PC. They put a little transparent sticker on the UV treated side cuz, once you take the protective films off both sides it is impossible to tell which side was which! Nice touch!Silicon caulk at 'Z' bar (top & Bottom). Noticed there is nothing to stop the PC from working its way down toward gutter. The support T-bars snug things up but is it enough? time will tell.PC sags are prominent at wall header. Cut some 1-3/4" strips from some 1-1/2" R-MAX foam insulation as temporary fix. Could've used 9 more of the T-bars for the top row too! Will put some caulking up there when weather permits.NOTES*1. DO NOT anchor the 3 support posts until everything is plumb & Square!2. Open cell polycarbonate (PC) has tendency to collect all kinds of things in the cells, that run longwise (top to bottom). I have a greenhouse with 6MM PolyCarb walls and roof. In every publication I've see states it is necessary to seal off the top and bottom of the openings of multi-walled Polycarbonate with a special tape that prevents most moisture and dirt but, more importantly prevents insects from getting in the cells and dying or worse building nests/laying eggs. though, this is not a greenhouse. The principal remains the same. Even the instructions on the protective Plastic film states that.The top edge is sealed with a strip of 1" foil backed tape, but the bottom edge takes a special "dust blocker" tape that allows the PC to breath (per-sei) to help remove any trapped moisture. Got mine from 'greenhousemegastore' web site. Not cheap (about $40 for a 100' roll) but compared to the thousand(s) invested so far.... What do they say? An ounce of prevention!3. I read some reviews complaining about water leakage down the middle seam. that is apparent if you don't seal it. the only suggestion in the instructions is a picture of a tube of caulking!4. Speaking of the printed instructions... The lack of written instructions and part descriptions Erks me to no end. To wit, there is a small dark detail on the installation of the T-bars that resembles 2 funnels. After looking at it for 2 days I finally realized it is showing how to install the T-bars in the PC channels!
B**E
Better than expected
The instructions said it took 3 men but in my case, one determined gay man did it himself. I was able to complete installation over two days. This exceeded expectations. Everything can well packaged and great finish. A few things to note that is not clear in the instructions. See diagram. The top roof panel is inserted in the tip track of the rafters. The bottom panel goes in the bottom track and slides under the top panel to overlap about one foot. The braces in the middle go under the top panel and about the top track bottom. Also note, if you do not have 6 foot clearance at the bottom of the roof, you can leave the bottom of the rafters unattached and then slide in the panels from the side and the attach the screw on the bottom of the rafters.
R**S
Money well spent!
For the price, I wasn't expecting what I got!The parts were well labeled and well made. Assembly was simple and intuitive (important because the instruction manual wasn't always clear or exacting). Precision and fitment of parts and threaded connections were spot on. I didn't have to pull the hammer out to 'persuade' something to fall in place or cross thread a bolt to secure it. The package was surprisingly of good quality and appears strong and durable.I put the awning up by myself in two days, with a minimum amount of tools and effort. Definitely a project for the average DIY handyman.The awning is sturdy and attractive. I couldn't be happier and give this product an unqualified thumb's up!
F**Y
Awesome
Beautiful addition to our porch. Will recommend doing what the other guy did and install PVC pipe to drain on the sides. Did the seal as well like recommended and no leaks.
Trustpilot
2 months ago
2 days ago