🐣 Hatch Your Dreams with Precision!
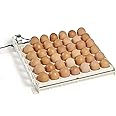
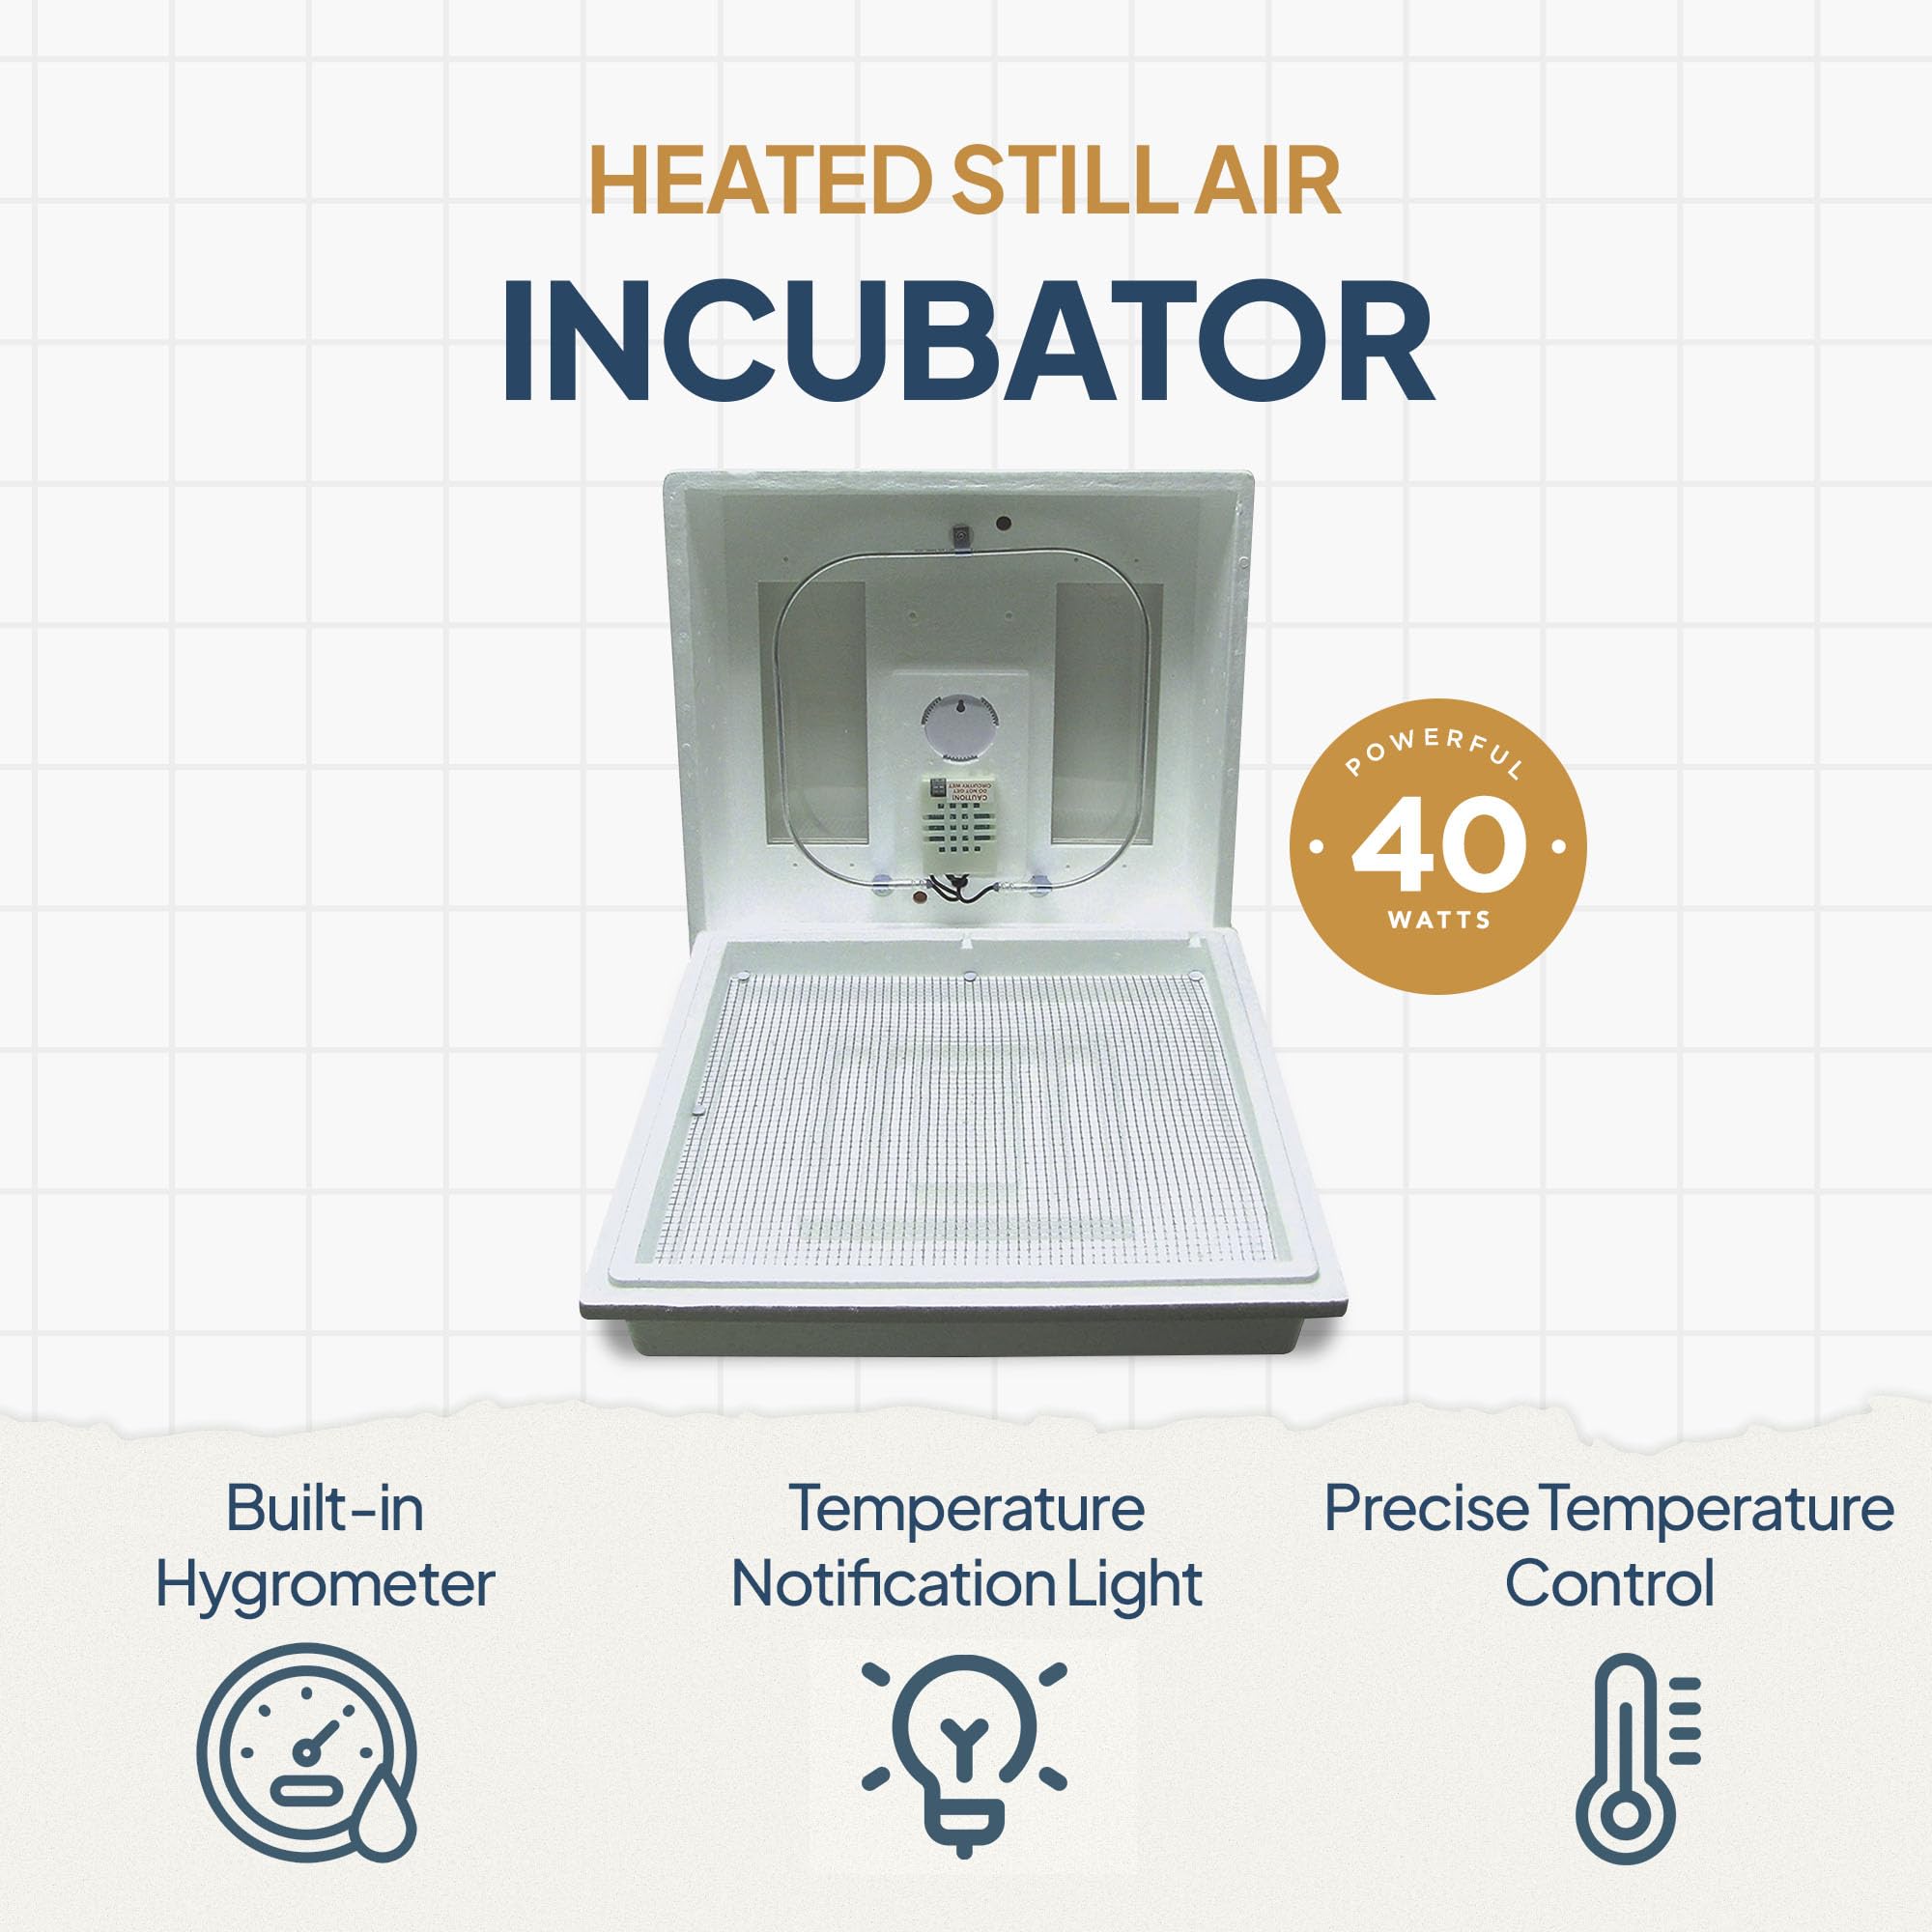
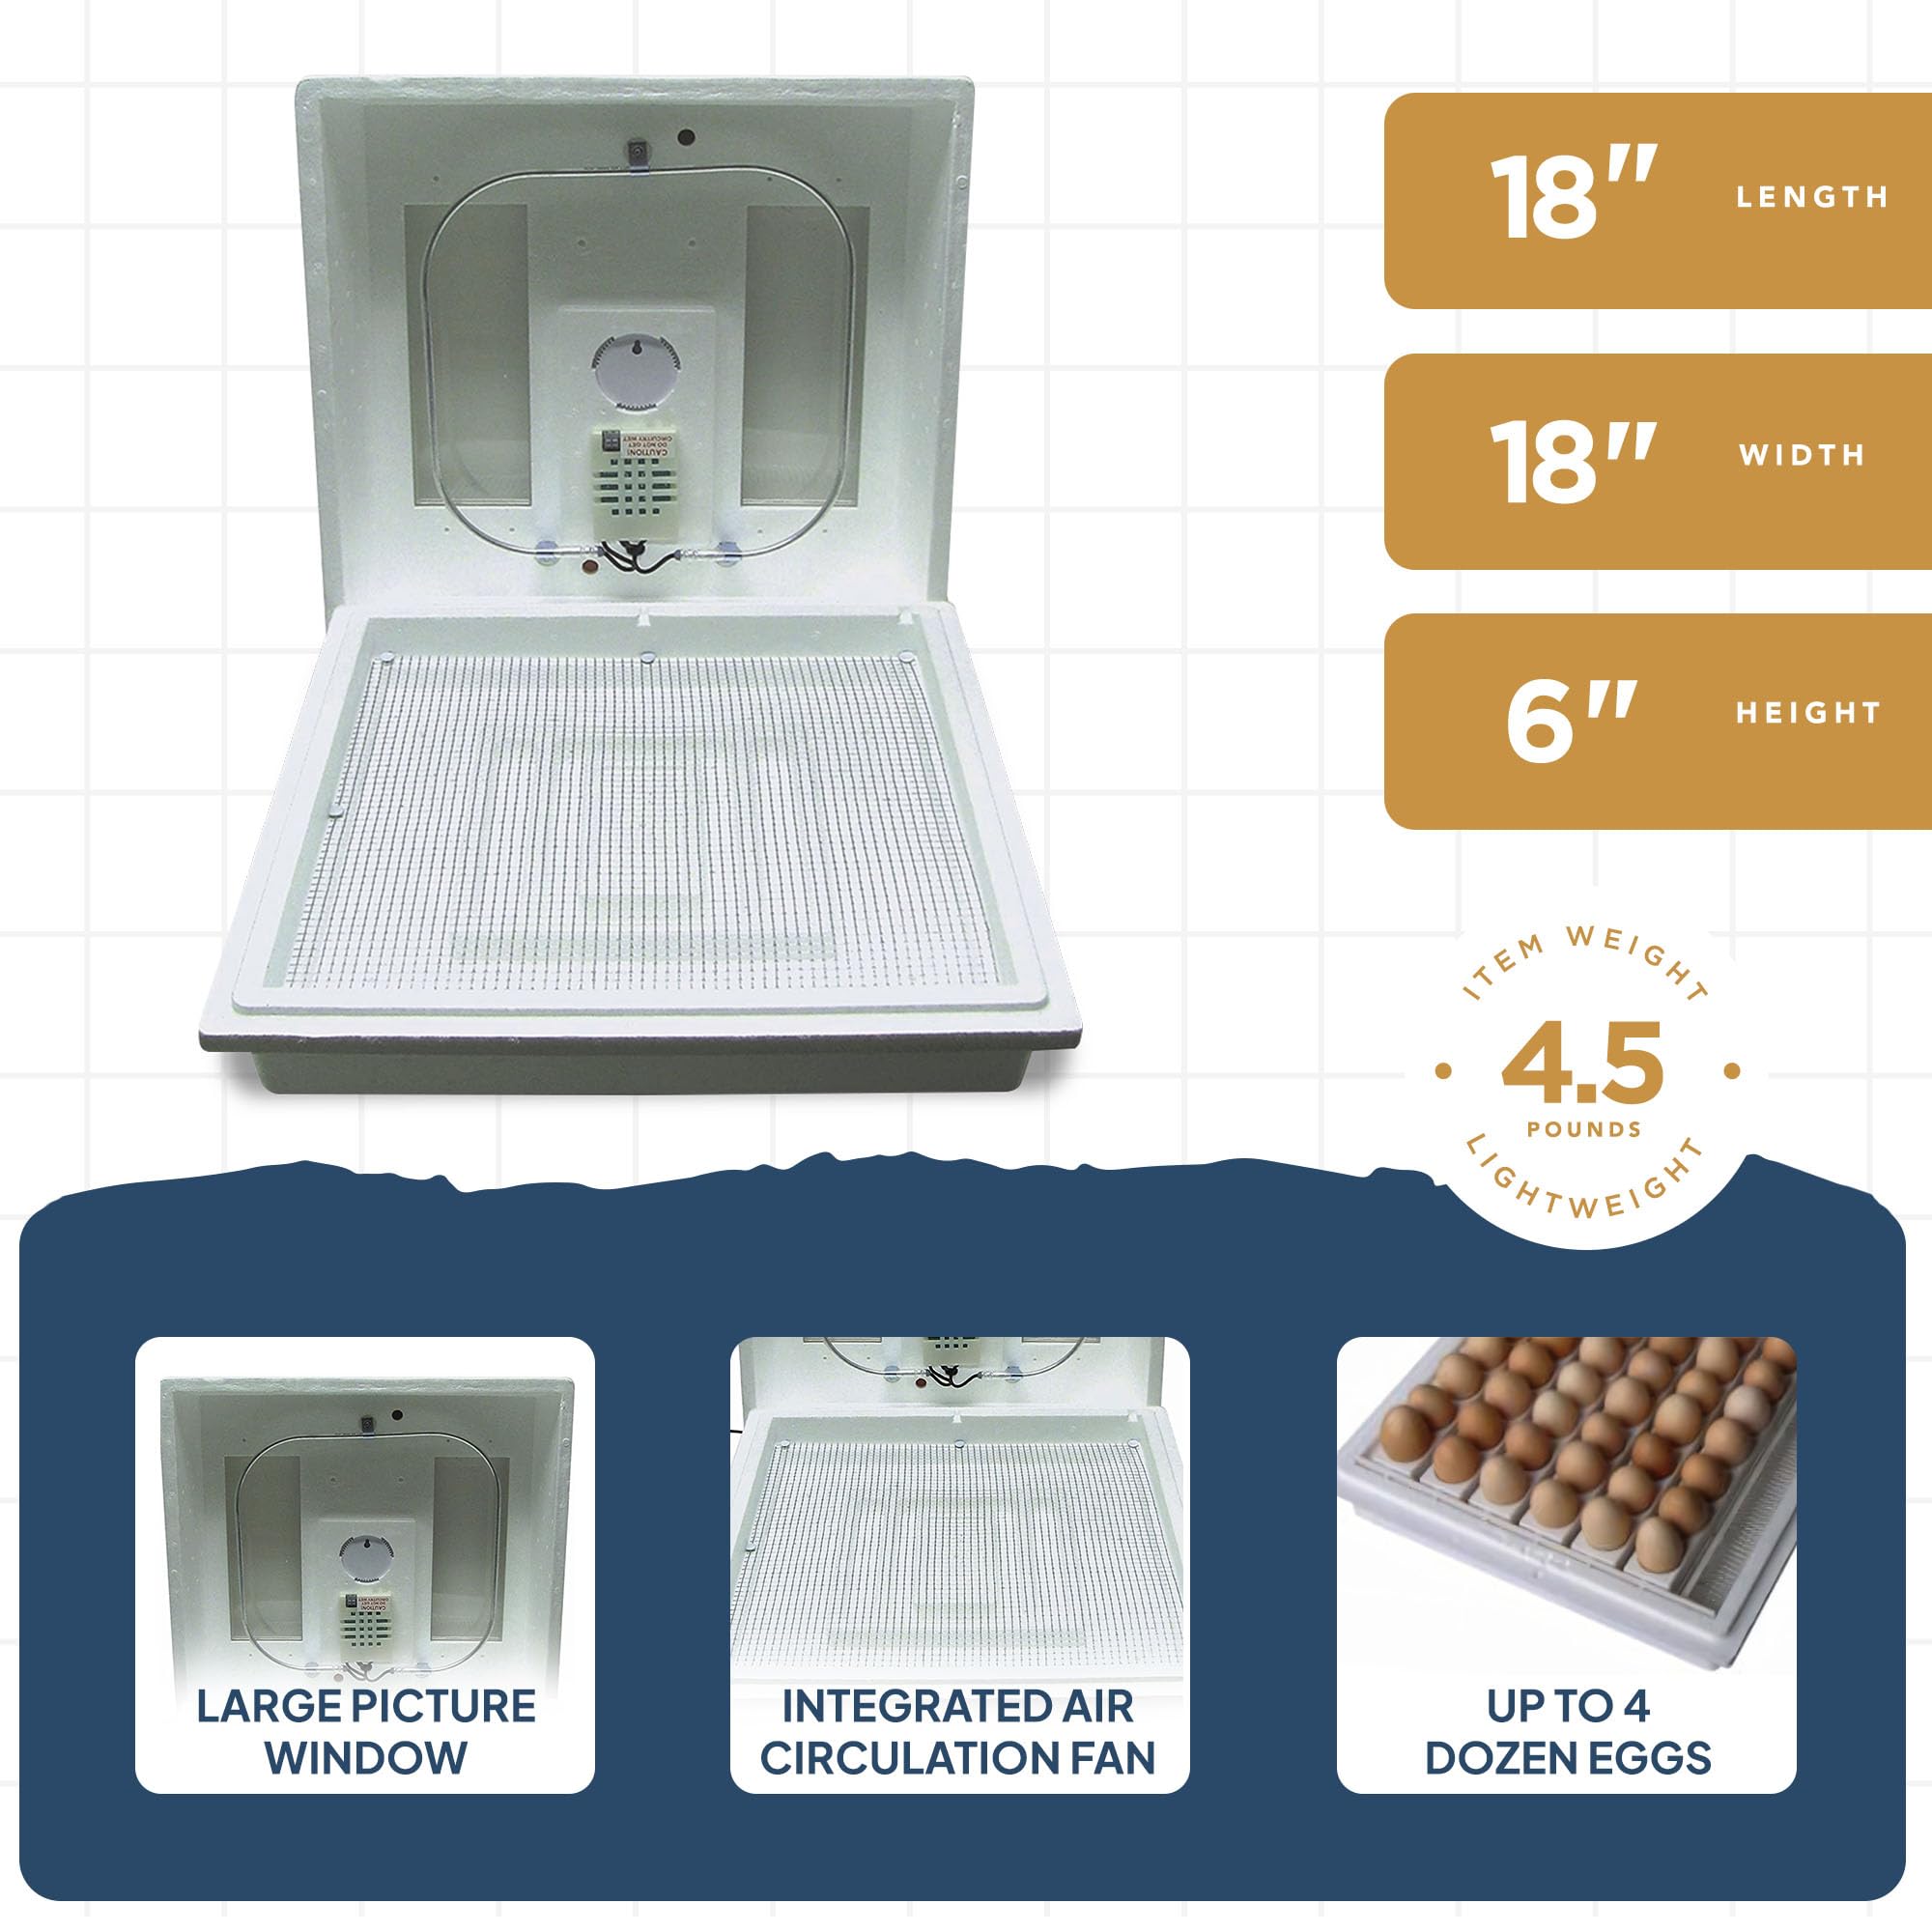
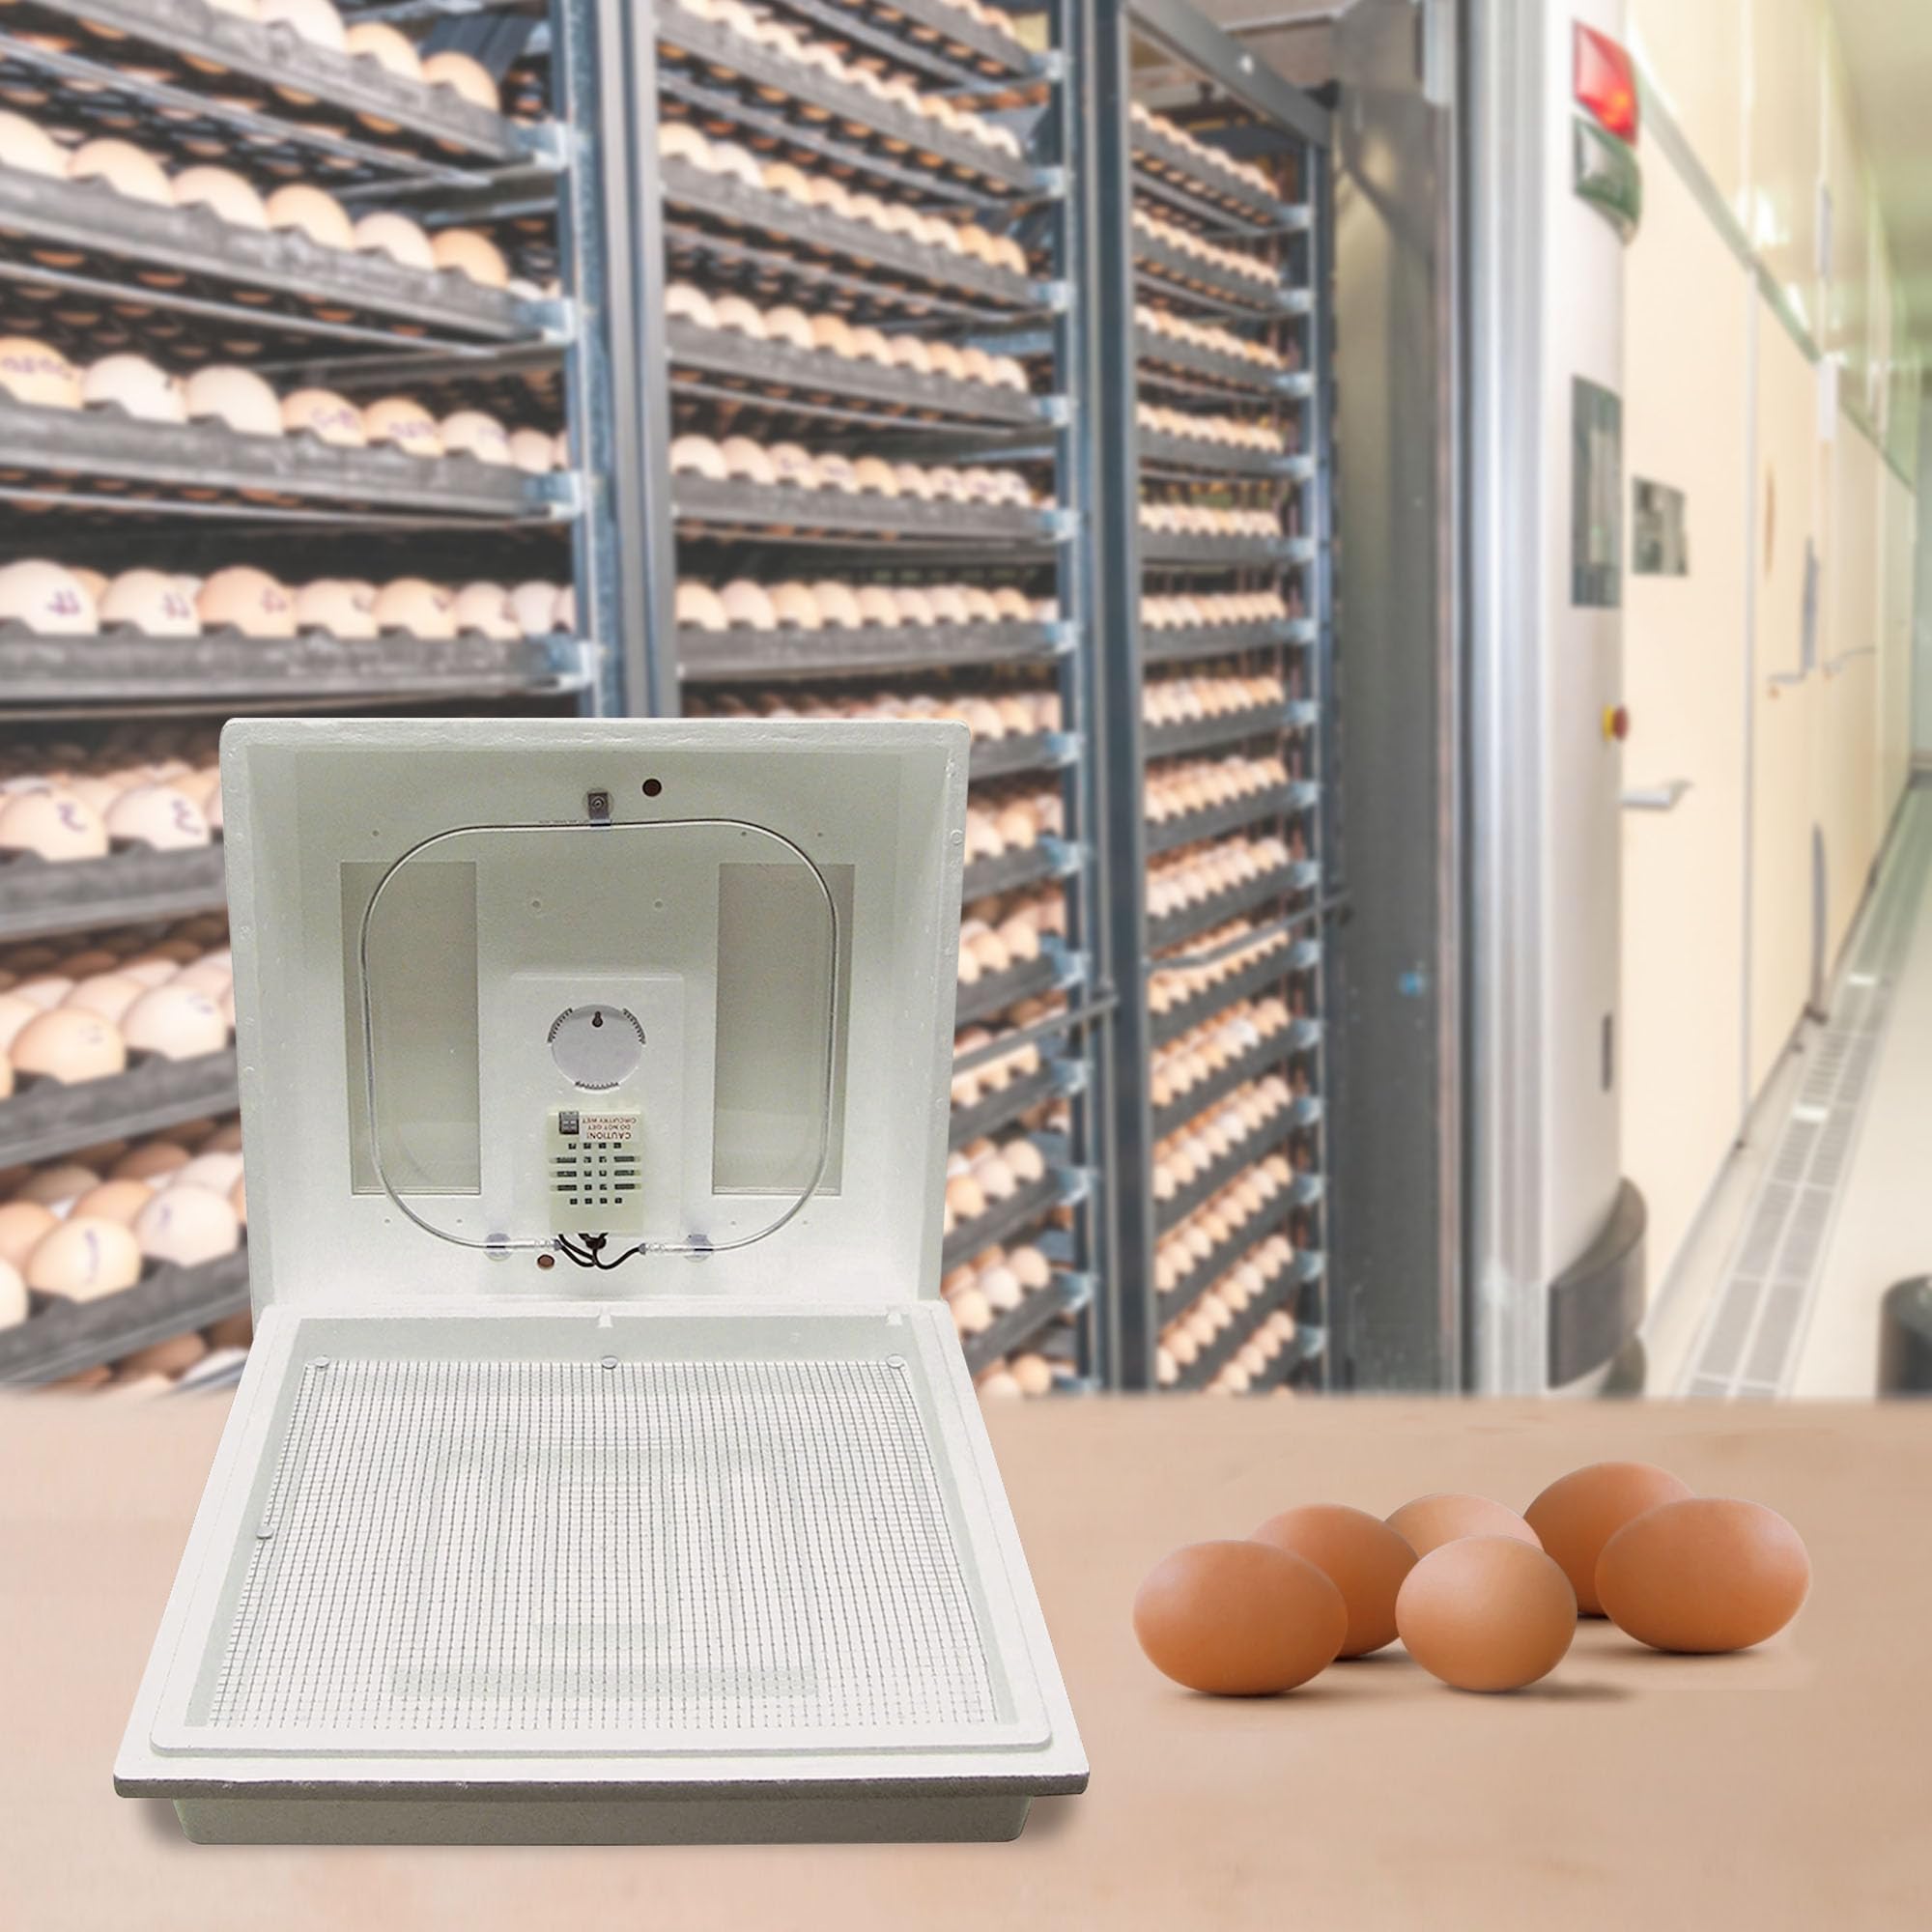
The Farm Innovators 2100 Heated Still Air Incubator is designed to accommodate up to 4 dozen eggs, featuring solid-state circuitry for reliable temperature control, a built-in hygrometer for humidity monitoring, and two large viewing windows for easy observation. With a lightweight design and easy maintenance, this incubator is perfect for both novice and experienced hatchers.


E**Y
The thermometer 🌡 melts so I recommend getting your own.
It was a very nice incubator except for the two pieces stuck together, but the thermometer did melt. It was a very quiet incubator, it had a very effective hatch rate , it is a little tricky to figure out the temp. But the still air incubator 2100 is a very good 👍 incubator to use it hatched a fair amount of ducklings for me 🐥. It heats up very easily and it functioned very well. It looks to be easy to clean can’t wait to use it again.👍❤️
R**.
Buyer beware.
The item arrived on time with a slightly damaged box but incubator was fine. I found the build quality typical of over priced China crap. At first it seemed to work ok as it did heat up. The stench of burnt Styrofoam started to emit from the unit. Unplugged and inspected I found nothing wrong. Plugged back in and let it run for 6 hours. The control panel read a full 10 degrees warmer than a glass thermometer I used to verify. 2 hours later the temp difference was still evident. I set the controller to 110 degrees and with in a few hours it was reading 101 degrees on the thermometer. After 12 hours, I had the temperature set point at 108 to maintain 100 degrees in the box with a flashing warning light of over temperature. Through out the test process, the humidity levels was off by up 7% according to a hydrometer that i have used for years. I may have just gotten a defective unit but this is becoming all to frequent from companies selling overpriced China crap. I will be sending it back for a refund.
J**E
So far so good!!
So for the last 3 years, I've had two different incubators that I've been trying to hatch chicks with. They both were digital, with fans & auto egg turners. I tried everything with no more than 10% hatch at best. Most of the time I got 5%. My best hatches were when I stopped putting any water in the reservoirs, until the last 3 days of the hatch. And that's how I've done this test hatch with this incubator & so far, out of 12 eggs, none died, 4 have hatched & two more are pipped. None have had to be helped out of the eggs either. Even if the last 6 don't hatch, that's still 100% better than what I was getting with my fancier incubators. So I'd say if mother hens don't have fans & egg turners under them, then why should an incubator? As far as getting this incubator set up...I'll admit, when I first took it out of the box, I was planning to send it back, cuz all it has is a knob you turn, with no indication of what temperature you're turning it to. But I went ahead & tried it. I turned it all the way up, then slowly turned it down, til I got it to 99 & once it got there, it didn't move! Once I found the perfect spot, I marked it with a marker, to give me an indication of where to turn it next time. The mercury thermometer that comes with it said it needed to be calibrated, but mine already was. I used another digital thermometer with a hygrometer on it too, cuz the one on the top of the incubator is literally just for looks, lol. It absolutely does not work. I have no idea why they put it there, cuz it says right on it that it's just for reference, lol. Weird. Anyway, I'm happy with how well this incubator keeps a stable temp, which is the most crucial thing when hatching.
D**.
I only gave 4 star because the view window corners buckled a little...I just caulked the edge of the window...
OK, so here is my Hatching Experience. First off this was my first time trying to hatch baby chicks. I did all the research and read everything and watched U-tube videos till I thought my eyes would bug out. The fact is, no amount of input can count against just plain old experience. That having been said: I started with 41 eggs in the incubator on March 24th. Prior to stating my first clutch I tested the equipment by running it for about a week and everything worked fine. The temp was right at 99.5 degrees and the humidity showed 60%. I used two thermometers placed on both insides of the unit and they seemed to show the same temp as the digital read out. I have Americana chickens so it only took about a week to collect enough eggs for this first clutch. Before placing the eggs in the incubator we used a terrycloth towel barely damped with anti-bacterial cleaner and wiped them again with a clean dry towel. We placed all the eggs in the auto egg turner (a must have item) and off we went. For the first 5 days after setting the eggs the humidity seemed to be out of control. It was as high as 88% but would also hover at 80%. We had the incubator in a spare bedroom with very little sun light and the room temp and humidity reading on an external unit stayed constant. Once the humidity finally leveled off at 60% we found we didn't have to add water as the instruction say but about every 3rd day. We also removed both red caps and that seemed to stabilize the humidity issue. After the first week we candled several eggs but found it difficult to identify if embryos were developing or not. Maybe due to inexperience. On the 14th day we candled 21 eggs and found all showed little peeps moving around inside. It was a wonderful experience for my daughter and myself. On the 18th day I removed the eggs for the auto turner and added paper towels around the edges of the wire grid so as to wet them to increase the humidity level to 80%. All went well. On the 20th day the first chick hatched but I noticed the plastic viewing window had started to buckle at all four corners. Droplets of water soon started to accumulate around the corners below the digital read out unit. We quickly covered both ends of the viewing window with towels and from the night of the 20th day and during the 21st day we hatched 16 chicks. We were elated but concerned because we could see 5 eggs with pip holes and little tiny beaks sticking out. We had read several different articles urging you to no interfere with the hatching process so we didn't. To our dismay all five of those eggs didn't fully hatch. It was not pretty seeing the little beaks sticking out of the egg and the little chick dead inside. We now, in retrospect, feel we could have aided the hatchings in some manner. The 16 were all that hatched. After the 22nd day with no ongoing activity, we opened the leftover eggs that didn't hatch and found all but 3 had fully developed chicks inside. To us that means we could have hatched 38 of 41 eggs. Upon reflection we have come up with the root of our problem... PLEASE TAKE NOTE...the heating unit on this model is located basically at the top of the viewing window. When we added water or candled the eggs we always returned the lit to the same position, i.e. heating unit up. This unit being a still air unit, we surmise, that was our mistake. We feel if we had replaced the lid in variable positions, say North, South, East, West several times a day we would have had a much better hatch rate than 39%. We observed the eggs at the bottom of the viewing window never hatched. It seems to us the eggs at the top closest to the heating element mostly all hatched. By rotating the lid of this unit during the 21 days we feel the heat would have been more evenly distributed and we would have had much better success. We also feel maybe this next clutch we will adjust the temp to 101 degrees and will use some silicone caulk to seal the corners that buckled. This unit is a very inexpensive item but we found it to be satisfactory especially for the price. It cleaned up easily and we are just about ready to run our second clutch. Do go back and reread "PLEASE TAKE NOTE" above. We feel this is a very important aspect to a successful hatch. Good Luck!!!
Trustpilot
1 month ago
1 day ago