🔋 Master your power. Disconnect with confidence.
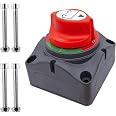
The Ampper Battery Disconnect Switch is a robust, easy-to-install power isolator designed for 12V to 48V DC systems. Featuring a heavy-duty ABS plastic housing, copper terminals, and a high current rating of 275A continuous (up to 1250A momentary), it safely cuts off battery power to prevent drain and electrical shorts in cars, RVs, boats, and other vehicles.


| Operation Mode | Off |
| Current Rating | 275 Amps |
| Operating Voltage | 48 Volts |
| Connector Type | Screw |
| Brand | Ampper |
| Terminal | Screw |
| Item Dimensions LxWxH | 2.76 x 3.74 x 2.95 inches |
| Circuit Type | 1-way |
| Mounting Type | Surface Mount |
| Actuator Type | Rotary |
| Contact Material | Copper |
| International Protection Rating | IP65 |
| Number of Positions | 2 |
| Connectivity Protocol | X-10 |
| Color | On-Off |
| Unit Count | 1 Count |
| Manufacturer | Ampper |
| Item Weight | 9.3 ounces |
| Product Dimensions | 2.76 x 3.74 x 2.95 inches |
| Item model number | Am-CBS01 |
| Is Discontinued By Manufacturer | No |
| Manufacturer Part Number | Am-CBS01 |
| Special Features | eliminate any power draw from the battery when vehicle or boat is not in use, electrical equipment's switch, Used for DC 12 - 48V systems, disconnects the battery safely, isolate and secure the electrical system |
| Voltage | 12 Volts |
G**Y
Eliminate pesky power vampires with this sturdy switch.
You can spend hours or lots of money trying to find every power vampire in your RV. I spent two seasons with my battery always being completely dead when I came back to my RV despite all my attempts to get them all shut off. Then after the second season, my battery would no longer take a charge.My RV dealer suggested a cutoff switch and after some investigation, I went with this one. There are other cheaper and simpler options out there but I wanted something convenient, safe, and durable. This switch really fits the bill nicely. It's very well made and uses high-grade plastics. The switch has a very solid feel, it's easy to know if you are switch on or off.First, there aren't any instructions with this switch, they're mostly here on this page. What you will need to install it is an extra battery cable. There is no polarity with this switch but the manufacturer does suggest installing this switch on the ground (negative) side of the battery as it is safer. This makes sense as any owner's manual or mechanic will tell you to hook up positive first and then negative when installing a battery. When removing one you remove the negative first and then positive, that's in effect what you're doing when you install this switch on the negative side.It took a while but I managed to find a black, 2 gauge battery cable that worked for me: https://amzn.to/2VGcEJg. This switch requires a 3/8" lug and if you are installing this on an RV or boat your battery probably requires a 3/8" lug as well. Keep this in mind as there are also cables with 5/16" lugs (used with motorcycles and other smaller vehicles), either on both or one end. 18" of length was the perfect size for me as it allowed enough slack to go around the box lid easily.The kit comes with four hex head bolts, nuts, and a bottom cover. What's not clearly shown is each of the four side panels is removable so you can pick the best one to remove for your application. Using some trial and error I figured out the proper drill bit size to drill my holes for mounting.I opted to install this switch on the top of my battery box. I started by placing the bare switch (bottom plate removed) on the lid and marking each hole to drill. With what I believe ended up being a 5/16" drill bit I drilled each hole. I then removed the panel opposite the "on" indicator as I wanted the "on" side in front and the cables out the back. I hooked up my extra cable and headed out to the RV.I then made sure the switch was set to "off" and hooked it up to my RVs ground (negative) cable. In the case of my RV this cable is white and you can clearly see it attached to the frame to ground it. With all that done and making sure my switch is still set to "off", I attached the other end of my extra cable to the battery's negative terminal. With the switch off you won't see any sparks when you do this.At this point, I replaced the bottom cover to have some extra weatherproofing as the bolts easily extend well beyond it. I tightened down the bolts to the lid using the standard hex "star" bit that came with my drill/driver set and holding the nut inside the lid with a ratchet. With that done you're ready to re-attach your lid to your battery box and give it a try.Some photos from the manufacturer show a way of installing the switch INSIDE your battery box. There's no template provided for this so you would have to figure out the size of the hole to make for the switch. This probably is more weatherproof and while I do have a Rotozip (you could also use a hole saw drill bit if you figure out the right size) I wasn't sure I had enough room with my battery and thought this was overkill.You could also attach this to the side of the top of the lid with the cables coming out the bottom. With this method though I figured water would be more likely to get in being kicked up from the road or off my truck's tires. So I decided on top with the cables coming out the back was the best option. You could probably use silicone to seal it if you wanted to, I may do that, but that's probably overkill as well.IN USEIn use this switch is simple, turn the switch on and there's power to your RV, you also need it on to charge your battery if your RV is hooked up to power or your tow vehicle. I flip it on when I come back to my RV.Once you are going to put your RV in short or long-term storage, switch it off and your days of searching for power vampires or coming back to a dead battery are over. Hopefully, my new battery will last more than two seasons now.
D**D
Reliable and Easy-to-Use Battery Switch
This switch has proven to be an excellent addition to my DIY projects for my custom power bank. This 12-48 V battery power cut master switch is incredibly reliable and ensures a secure disconnect when needed. The on/off functionality is straightforward and easy to operate, providing peace of mind when isolating the battery for maintenance or safety reasons.One of the standout features is its robust construction. The switch feels solid and durable, capable of withstanding harsh conditions whether installed in a vehicle, RV, or boat. The installation process was simple and intuitive, with clear instructions that made it easy to get everything set up quickly.The only minor downside is that it could benefit from slightly larger terminal posts for easier connection with heavier gauge wires. However, this is a small issue compared to the overall effectiveness and reliability of the switch.I believe this switch is a highly recommended product for any DIYer looking to safely manage their vehicle or RV's battery connections. Its ease of use, solid build, and dependable performance make it a must-have for ensuring battery safety and maintenance.
C**Y
Shuts the power down
I’m beyond pleased with how well it works. The switch itself is well-designed with a clear "ON" and "OFF" indication, and it rotates smoothly with little effort. The switch has a compact size, so it doesn’t take up too much space, which is perfect for installations in tight areas. It’s designed to handle a wide voltage range of 12V to 48V, which makes it versatile for use in many different applications. The wiring process was straightforward, and the switch fit perfectly where I needed it in my vehicle. For anyone familiar with basic electrical work, this is an easy DIY installation. If not, get someone who knows what they are doing. A simple turn of the knob is all it takes for preventing battery drain when my RV is not in use. When the switch is in the "OFF" position, it completely disconnects the battery, which helps preserve battery life and prevent potential electrical issues. This battery switch is an excellent investment. Considering its affordability, ease of installation, and reliability, it offers great value. By helping me preserve my battery life and offering the convenience of easily disconnecting the power, it has saved me from purchasing new batteries.
N**R
careful! not rated for high current
Good switch, but it was not rated for the load I put on it, 200 amp DC for battery to inverter disconnect. The switch lasted a year, but luckily, it didn't burn up. Eventually, the contacts became burnt, carbonized, and failed. Good design; a lesser switch could have caused a fire. I replaced it with a 600 amp version. Be mindful of the load you are putting this under; better over-rated than even close to maximum rating, much safer
K**M
Solid feeling powerful kill switch.
Power kill switch. I have one on my battery to kill power totally for my solar setup, and a second one for killing power to the 12v system that runs non-inverter 12v fans, lights, etc.I did make labels to make the On/Off more visible from the side as they are mounted in a way you can only see the side of the switch.Easy to install, the side plates are customizable for poking wires into the switch to bolt in place. Extra side plates would be nice for when you mess up and need to now glue the blank back together.
A**R
Good Electrical Equipment.
Works great, no issues.
R**T
Great for heavy gauge wires.
Easy to install. Great for the price point. It feels durable and will last a long time. I use it for a DIY solar panel and battery backup for the house. Size is great for handling heavy gauge wires.
J**J
provides a safe environment for working on an electrical power source; ruggedly built; easy to use
The compact design allows this power cut off switch to be mounted virtually anywhere. Simple, easy to use on/off rotating knob shuts power off quickly. The components are ruggedly built; knob markings indicate at a quick glance whether the power is on or off. Mounting hardware is included.
Trustpilot
2 weeks ago
4 days ago