🌠Discover the Universe, One Star at a Time!
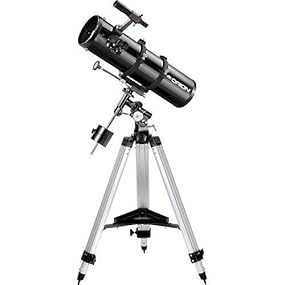
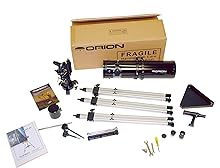
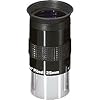
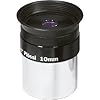
The Orion SpaceProbe 130ST is a portable equatorial reflector telescope designed for serious adult astronomy beginners. With a 5.1" aperture and 650mm focal length, it provides excellent light-gathering capabilities for observing planets, the Moon, and deep-sky objects. Weighing just 28 lbs, it’s easy to transport, making it ideal for family outings. The telescope comes fully assembled with essential accessories, including two Plossl eyepieces and a smartphone camera adapter, ensuring a comprehensive stargazing experience.
Coating | Lens coating |
Focal Length Description | 650 millimeters |
Zoom Ratio | 24 |
Finderscope | Reflex |
Compatible Devices | Smartphone |
Eye Piece Lens Description | Plossl |
Mount | Equatorial Mount |
Focus Type | Manual Focus |
Item Weight | 24.2 Pounds |
Exit Pupil Diameter | 0.2 Millimeters |
Objective Lens Diameter | 1.3E+2 Millimeters |
Item Dimensions D x W x H | 24"D x 24"W x 51"H |
Optical-Tube Length | 24 Inches |
K**S
Wonderful scope with options to grow into for beginner
After much debate on purchasing this scope ( a Newtonian Reflector on a Equatorial Mount with 130mm aperture ) or a Orion SkyQuest XT8 Classic Dobsonian Telescope, I went with this scope for a couple of reasons.1. This scope is supposedly ( more on this later ) more portable then the 8" tube and base that I would have received. I have small two door car and would not have been able to fit the tub in the trunk and only in the passenger seat.2. This scope is on a Equatorial Mount which would be needed if you wished to take long exposure AstroPhotography or wanted to have a the telescope track objects in the sky without having to continually adjust.3. It provided a very bright telescope ( f/5 ) with a wide field of view which was recommend to me to be better for a beginner.4. The mount could later be upgraded to attach a motor to automatically track objects. Again a plus for taking photos or if you have people over and would like it to stay centered on the object. I was amazed at how quickly objects will move out of view, even a few minutes and your object will disappear.5. This scope does a little bit of everything well enough and can let me grow or dabble into different areas without having to purchase another scope or added features. At most, you would need two accessories. A Orion Shorty 1.25" 2x Barlow Lens to help with magnification ( The long tube version of this scope Orion SpaceProbe 130 EQ Reflector has a longer focal point as well as the Dobsonian reflectors which gets your more magnification for the same eyepeice) and a camera mount/accessories for taking photos.This is my very first telescope and I will give you my opinion in each area of the product as well as issues I ran into as a beginner.PACKAGING:The scope arrived very well packed with many empty boxes inside the package to serve as cushion for the telescope and parts. It is a single box that is about four feet long and about 50 lbs. Unpacking may take a bit to carefully set up the parts for assembly.INCLUDED ITEMS:It comes with a manual, Orion's starry night software which I found helpful as beginner ( also notifies you of any upcoming events that you may want to watch) , tools for assembly of the telescope ( no hex wrench for collimation i.e. adjusting the mirrors ), collmination cap, and two eye pieces. A 10mm for 65x and a 25mm for 26x magnification.ASSEMBLY:The instructions list that this should take 30 minutes. I agree if I had to do this a second time and I could probably do it in 15 by the second or third time. However, as a beginner with no prior experience, expect an hour to 1 1/2 hour to assemble. The instructions are good but a bit hazy and unclear during certain steps for a beginner. This is due to the large area of controls, gears, and levers on the mount itself that can seem a bit over bearing at first before you are familiarized with the controls. It would be helpful to have smaller diagrams between steps showing exact controls or parts to move. You may have to re-read the steps a few time and continue to consult the single diagram for reference.Order of Assembly:1. Mount tripods to Mount ( Mount is heavy! )2. Add and assembly accessory tray3. Thread and add counterweight to mount ( Be very careful )4. Add ring mounts ( will hold the telescope tube or OTA ) to mount. Remember to add the correct one to the correct side5. Carefully set tube in ring mounts and tighten.6. Adjust balance of telescope in both axis7. Add slow control knobs to worm gearsNotes about assembly:I ran into issues at first after installing the counter weight. I was under the impression that the locking bolts to secure the mount at a particular angle would hold the mount in place with the counterweight. No matter how tight you press the weight will force the mount down. I assumed something was broken but luckily I figured out that the latitude adjustment bolt needed to be set first. This bolt limits how low the mount will go. In my case, with the bolt not set the counterweight would flop down and hit the tripod legs. Setting this bolt to 30-40 degrees stops it from BENDING lower and the counterweight stays still now.Second issue I had was mounting the tube rings on the wrong side. There is one right with a small metal wheel on top to be used for taking photos with a camera. That ring should be toward the FRONT of the telescope WHICH IS where the SLOW MOTION CONTROL for Declination is! This means the control knob ALSO points towards the front of the telescope.COLLIMATION:I used the included cap ( place over the focuser or eyepiece tube on the telescope ) to check if the mirrors were aligned. I looked through and it looked pretty close to me at first and I wanted to get out and test it. You should check it after receiving it as some of it may be off. Mine was as I realized later however it was close enough to still see brilliant images the first night. I corrected it today and after over an hour of the learning process I have mine aligned well and it did seem that the moon was sharper then the day before. This is a maintenance process that you have to do on these types of scopes. The first time, it's tough. If I had to do it again now I could do it in about 5-10 minutes or less.Here are some of the mistakes a beginner like me made that caused confusion:When you use the collimation cap, you are supposed to see all these "rings" and reflections of the mirrors. There are only two things you are going to adjust, the secondary mirror and the primary mirror ( the big one at the back of the tube). The secondary mirror is the tricky one. Basically, you look down the focuser and with the telescope parallel to the horizon ( in case you drop a screw or tool and don't' want it falling onto the mirror and breaking it! ) you look through and see if the dark black ring around the center is , well centered. If not you start by using a Philips screw to adjust on the front of the scope. There is a cross at the front and only one Phillips head screw in the center to modify. This Moves the mirror toward the back of the tube or toward the front. This just aligns it so that when you look through you are seeing the whole image of the secondary mirror through the focuser. You may rotate it if it's at an angle but only touch the stub, not the mirror itself. Then, you can use a 2mm Allen wrench to adjust the three screws to adjust the tilt to make that dark black ring in the center. There will be a ring shaped mark that you will see. don't worry about getting that centered yet, only the dark ring around it. Once that is done, you unscrew three screws at the back to take off a cover and then find 6 screws to adjust the back mirror. This is trial and error as well but you just have to move either of the screws a little bit and it will cause the ring mark to move and center with the dark dot directly in the center. This "dot" is the hole that you are looking through that you will see in the mirror reflection.USING THE TELESCOPEFinally, actually using the telescope is not so bad but you will have to get used to moving it around a equatorial mount. It does not move left to right and up and down. It moves in "arcs" that match the movement of the Earth. For the first night, I just moved the telescope around and moved it into position of the moon without polar aligning the mount. Since this was a quick test, I didn't care about that just yet. All the controls moved well and smoothly. I did have to tighten the RA and Dec knobs well to make sure no movement happened, though if you give it a hard nudge or rested your hand on the tube you could accidentally move it slightly. The scope is a bit sensitive to movement. The tripod base was sturdy but once you got to the tube you could tap it and it would bounce slightly and then stabilize. I feel this is normal for any mount in this price range of this type as I tested from tripod off tapping everywhere to see where I could make adjustments to make it more sturdy. All the pieces are heavy and solid, and I think once it gets to the tube itself there is some play in movement just because the telescope is a rolled metal tube.Adding and taking off eyepieces is fairly easy. Simply loosen two screws pop into place. The focuser worked well. Some people complain that it is plastic, but it does not make it work poorly because of it. It was very smooth focusing and also held my DSLR camera with the Orion 1.25" Universal Camera Adapter in place fine.IMAGE QUALITYFantastic. I had my neighbors over and we were all very impressed with shots of the moon. Pictures would not do it justice to how sharp and clear the images were. I also later that night pointed the telescope at Jupiter and with the 2x barlow lens and 10mm eyepiece could see Jupiter and all four moons. I was very impressed. The image was tiny in the eyepiece but you could see them clearly. I have purchased a 5mm eyepiece for higher magnification ( 130x base and 260x with a 2x barlow ).OVERALL QUALITYEverything is packaged well, seems of decent heft and weight, and is relatively good quality. I only found maybe a few parts that felt "cheap" but really, everything worked well and didn't degrade it from performing properly. I think for the price that this sells for I got good product.SUMMARYThis telescope is wonderful and is versatile. It is a bright scope with a wide field of view. It is on a equatorial mount which if you plan on growing into the hobby will want to learn how to use. If you want to try AstroPhotography you have everything basically ready to start other than a mount for your camera. You can adjust the magnification to get very high power with a simple eyepiece upgrade to match other longer focal length scopes. It IS portable, if you take the tube and tripod/mount/counterweight apart before traveling. For me I will be able to fit each piece into my tight spaces and still have someone in the passenger seat. For those with larger vehicles, the Dobsonian telescopes might be more portable. Overall this is a well made scope with options to grow into and can give you some flexibility. My number one reason for buying this over a Orion xt8 is that I could learn and work with a little bit of everything in this new hobby.
M**C
great scope for beginners
This is my first telescope. I've read a lot of reviews before buying. My choices were the orion 4.5, 6 dobsonian and the celestron astromaster 130 eq. I was on a budget of 500 USD and with that budget includes shipping here in the Philippines via sea freight.With that budget the dobsonians are out, I've really like the 6 inch built a telescope from orion but the shipping cost was really over the budget. Now the celestron astromaster 130 and this telescope.Well I've read from the users that the celestron astromaster 130;Cons1. the tripod of the celestron can easily break2. the dot finder was a challenge to use3. plus there is no included collimation cap (you can easily make one)4. Mirror has no center guide (though you can mark it yourself)5. the included 20 mm plossl is not of good qualityPros1. Optics is really good with the astromaster 1302. Parabolic mirror3. Cost about 187 USD (sometimes it changes to 210 USD)With this I chose the orion spaceprobe 130ST since I don't want to deal with the cons of the Celestron Astromaster 130.After waiting about 50 days the telescope finally arrived.Packaging:It is well packed and it is double boxed to protect the items inside and there's a lot of small empty boxes to prevent the items from moving. The OTA is separated by a divider and tightly packed.All items are complete, The finder scope, 2 eyepiece, dvd's and tools are in a separate box and the EQ mount is already pre-assembled. Assembling the telescope is easy and it took me about 45 minutes (watch the video in youtube on how to assemble the scope, it will really help)Equatorial mount:As for an equatorial mount you'll get the hang of it after several use and is actually convenient to use when tracking objects (its just a turn of a knob.) You can also use the scope like a dobsonian and an alt-azimuth (release the Dec and RA lock and you're free to move it around)Advantaged of an EQ mount is that I tracks objects by a single turn of a knob and it can also be used for astro-photography when you want that on a later time.Performance:Overall the performance of the telescope is great. It is properly collimated, mount is stable and durable. The 2 eyepiece included is of good quality. Focuser is smooth and the finder scope is easy to use (opening your other eye will help you target objects while using the finder.)260x is the rated useful magnification of this scope but I've tried 325x with the moon and jupiter (using a 6mm plossl and a 3x barlow) The view is not as crisp sharp for jupiter and but I can still see the major bands. I'll purchase the celestron 2.3mm soon and see how it goes.Cons for the Orion spaceprobe 130ST1. At high magnification the scope will become shaky when focusing. (I guess this is to be expected on the EQ2 mount. Let it settle for a few seconds and the view will steady)2. My 25 mm siruis plossl has a big lint between the lens (Orion replaced it)3. Some scratches on the tripod4. Some dirt on the mirror5. EQ mount is for latitude 16 and above only. Although you can remedy this by turning the scope so the front leg of the tripod is facing south and the counterweight will not hit the tripod leg.11/3/2012On a clear night just recently I spend the whole night looking at jupiter. I got a glimpse of the great spot! (And occasional eye floaters!! Damn)Things I saw on our backyard with limited viewPleiades - easy to spot and magnificent with the 25 mm PlosslOrion nebula - by far easiest nebula to spotAndromeda galaxy - Its just like a gray blur cloud in the skyJupiter - see aboveMoon - great as always (don't expect to see the american flag)Sun - Try to view at sunrise and sunset and use a baader filer or mylarI'll update this review when I can.
Trustpilot
1 day ago
3 weeks ago