


🌟 Elevate Playtime: The Ultimate Climbing Dome for Future Trailblazers!
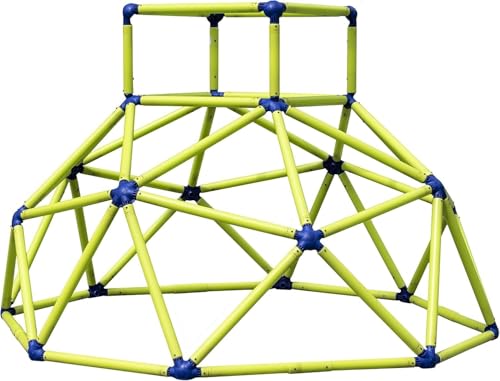
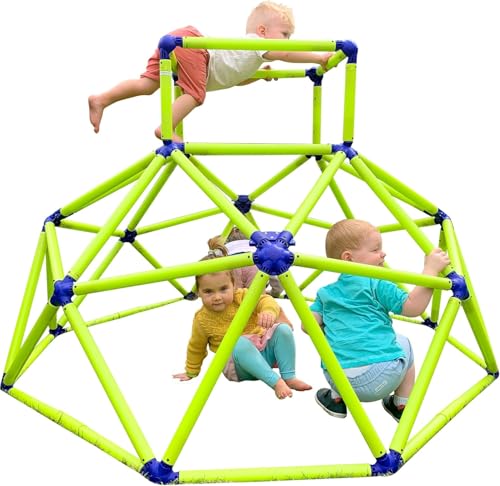
The Eezy Peezy Climber with Top is a robust, UV-protected plastic climbing dome designed for kids aged 3 to 8. Weighing 27 lbs and measuring 70x65x47 inches, it supports up to 150 lbs and features double self-locking springs for secure assembly. Lightweight and portable, it’s perfect for indoor and outdoor active play, combining durability with convenience to keep your child engaged and moving.


| ASIN | B007GQ0YKC |
| Best Sellers Rank | #23,168 in Toys & Games ( See Top 100 in Toys & Games ) #2 in Playground Climbers |
| Customer Reviews | 4.2 4.2 out of 5 stars (6,475) |
| Department | unisex-child |
| Is Discontinued By Manufacturer | No |
| Item Weight | 27 pounds |
| Item model number | TM200 |
| Manufacturer | Toymonster Ltd |
| Manufacturer recommended age | 36 months - 10 years |
| Product Dimensions | 70.1 x 46.65 x 65.53 inches |
| Release date | March 5, 2019 |
S**Y
FINALLY A POST WITH SOME REAL ASSEMBLY TIPS... and yes it's worth buying!
This is a really great toy. I'm using is in my living room for my 3 yr old grandson. He loves it to climb and make forts. It was frustrating to try and find any tips and tricks on assembly. I read about a lot of people mentioning that it hurt their thumbs....RULE #1 for assembling this: DO NOT USE YOUR THUMBS TO PRESS DOWN THE PINS !!!!!! That being said, you can use your hands to pop in the bottom rim. For some reason the metal spring in these are much "softer" which was surprising. However, the springs in the rest of them are VERY tight hence the reason for the difficult getting these in the tubes. My solution was to use a tool I had called iSesamo genuine Spudger Opening Pry Tool which is used for assisting in computer repair. It's a very slim piece of metal. Was it perfect, no; the tool could have been a little narrower for the job but ultimately, it worked well and helped so much for a quick assembly. What I did was slide the tube into the joiner almost up to the point of the pin and then slide the point of the spudger in between the tube and the pin then flatten the spudger against the pin to depress the pin as you slide the tube onto the joiner. Be careful not to catch your finger as you slide the tube in unless you like blood blisters :( Once you have this trick down, the assembly will go smoothly. I did make a few mistakes by installing a tube on the wrong part of the joiner. I used the disassembly tool which definitely does the job by pushing the pins back down so you can pull the tube back off. It is a little tricky to like it up right. There is a slot/groove which lines up one pin but you have to peek under the cover to make sure it is lined up correctly...that's the whole trick. Once it's lined up, the pins will easily depress and the tube will release from the joiner. I had to look at the picture of it listed on Amazon a few times to make sure i was using the right colored tubes (as I got the 2-tone set) when you first put together the 5 tubes on the joiner, put 2 dark green tubes on the bottom. You will know which is the bottom based upon the faint writing on the joiner which has an arrow showing which side is up. I'm half blind so I needed a flashlight and my readers. Not a big deal really. Lastly, at the very end of finishing the dome, it does get very tight and almost impossible to get the tubes on the joiner. I had to actually put my foot against the structure to push it away enough to get the tube on it. I'm not a strong muscley person, so maybe a man would be able to do this part without such strain. A little nuance is required through the whole assembly but once you have your strategy down pat, it will go smoothly. Make sure to really be sure about what tube goes where because taking them back out does waste some time. Also pay attention to the letters on the joiner 'stubs' which are helpful for making sure you get the right tubes on them. Again I needed a flashlight and my glasses to see them. It did take me some time; but I was watching a show as I was doing which is probably why I made the few mistakes mentioned. But it was totally worth it. It's light enough to be able to move it when needed and strong enough for a child to climb all over it.
B**L
Strong and durable, tough assembly, but good value
Not easy to assemble but worth it. Find a tool to help you press in the metal part of the connectors. Plus side is that it is very durable and sturdy once assembled and looks like will last a long time. I had seen it at a friend’s house and the kids loved it, and although after they’ve had it for many years outside and it was still very strong, the green and blue colors did fade in the sun. I am impressed at the quality for the price.
N**P
Fun outdoor toy; install is more involved than you expect
My daughter had one of these at her daycare and she loved playing on it so we decided to get it for our home. Installation: The process was a bit more difficult that you would expect but the directions were clear and materials were provided to help install. HOWEVER, there's a mechanism inside the tubes that can come loose and it is such a pain to get them back in their proper spot. My fingers were extremely sore after finishing the install and it took about 2+ hours altogether to get it up and running. After it was put together, our daughter has enjoyed playing on this thing since she was 1.5 yo. It seems to be pretty durable but will fade a bit in the sun. It's easy to clean, sturdy, and I feel safe with my daughter hanging on it and standing on it. Overall, it's a fun toy to have for our daughter. It's a bit on the pricey side and the install is quite a pain, but for us, it's been worth having and our daughter hasn't gotten bored of it.
K**G
Sturdy with great instructions!
This item comes fully disassembled so make sure you're handy enough to put this thing together. If you are comfortable putting together Ikea (flat pack) furniture, you will be just fine. No tools required but you might want to use a piece of wood or something to push down the black retention buttons. After a while, your finger will start to hurt and you will likely pinch your finger a few times as you slide the ends into the connectors. I just used the thicker end of a wooden door shim -- I could have used anything but I just happened to have a bag of shims laying around. The tool that comes with it to take it apart is fairly unusable. After fiddling with it for 2 minutes, I was able to disconnect one just to test it out. If you don't follow the instructions carefully, you'll have to take it apart and you might not have a pleasant time with that. If/when I need to take more pieces apart to move it, I plan to improvise and use something else like a wood clamp with a small dowel pressed into it (the dowel would stick out the same amount as the thickness of the tube). It would be wise to take some extra time and double check all the pieces. They are all labeled very well so there's no reason why you would mess up if you can follow basic instructions (e.g. pipe A goes into the connector that is labeled A). This is like a geodesic dome in that the rigidity and structural integrity comes from the dome shape. Consequently, towards the end of construction, you will need make sure you don't push in all the connectors fully because you will need the extra slack to get the ends of the final pieces in the connectors. Or, maybe you can just muscle it in. If this makes sense, you'll have no issues putting this thing together, especially as the ends get progressively harder as you finish the structure. If this doesn't make sense, you will probably spend an extra 30min towards the end but you'll eventually figure it out. The finished product is very sturdy. I'm a 170lbs grown man. As long as I distribute my weight evenly over multiple bars, I can put my full weight on it while hanging from the inside. I'm not sure about standing on it because one pipe probably won't support my weight. Again, this has to do with the inherent structural integrity of domes.
J**E
Fácil de armar y muy resistente para niños pequeños
C**N
Mio marito l'ha montata di sera e ha messo i blocchi alle giunture al mattino quindi non è difficoltoso il montaggio. C'è anche un gancio che serve se si monta un pezzo errato in quanto ci sono due sicure da far fare click.
B**T
The climbing frame is really good for the little kids to build their confidence and skills. It was a little bit tricky to set up, and don't make a mistake because the tool to help you undo the poles from the joiners is not very good. It would have been great if they made bigger sizes and other shapes.
ほ**ん
説明書が英語だが、わかりやすいので説明通りにやれば女性一人でもサクサク組み立てられる。 ただ間違えた時に取り外すのが固くて大変。 子供が遊ぶ遊具だから固くて当たり前なのだが、繋げるパーツひとつひとつがとても硬い。 なので間違えないために説明書通りにやるのが大切。
J**E
Was a pain to setup. Make sure to read the instructions and get it right from the start otherwise you’ll be spending some frustrating times trying to fix a mistake. Very sturdy and good size. Worth the setup pains, the 4 year old has a blast on it!
Trustpilot
2 days ago
2 months ago


