
Desert Online General Trading LLC
Dubai, United Arab Emirates
Desert Online General Trading LLC
Dubai, United Arab Emirates


⏳ Take control of your time—automate like a pro!
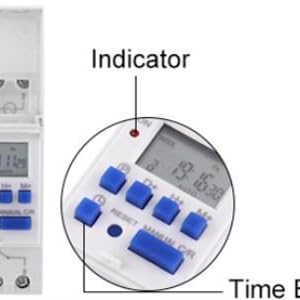
This 15A programmable digital timer relay offers up to 16 daily on/off settings, supports heavy-duty 1800W electrical loads, and features a backup battery to preserve your schedule during power outages. Its compact design with an easy-to-read LCD and push-button interface makes it ideal for automating household lighting and appliances with professional precision.


| Number of settings | 24 |
| Material Type | Material |
| Color | White |
| Item Weight | 4.41 Ounces |
| Item Dimensions D x W x H | 1.42"D x 3.39"W x 2.56"H |
H**T
This is how I made it work..
Works great.. need better instructions.. #1 for 120v model.. I used an old extension cord.. black in 1 white in 2.. plugged it in and charged it overnight.. #2.....TURN INCOMING POWER OFF AT BREAKER!!! hook it up.. hot or black in 1.. black jumper wire from 1 to 4.. common or white wire in 2.. I would recommend at this point to turn breaker on.. push reset and program it.. use a voltage meter and make sure 120v is coming out of 3 when program is on.. then finish hooking it up.. 5 seems to have no purpose.. hopefully someone else can enlighten me on 5.. directions are terrible.. I am using it (3) on a separate relay of 240v.. works perfect..
B**K
Made my own switch for solar
Works great. Make sure the switch is correct for your purpose
S**.
Amazing little timer.
Bought it for a front fence so far its great. 10 plus stars.
A**S
Sorry.. bogus stuff
I bought this in December, got it connected and set today. Once connected all buttons stop working.. manual not switching to auto, program buttons not working.. only when i RESET it then buttons work momentarily.. then stop again..
C**N
Buen producto
Llego a tiempo y funcional muchas gracias
E**A
Mal equipo
Producto se daño muy poco uso
M**E
Great Timer - Programming Instructions SUCK!!!
My added Instruction:NOTE: Manual - C/R Switch(es) - Located in lower right. This is actually 2 switches:The MANUAL switch is activated by pressing on the LEFT side of the switch.The C/R (LOCK) is activated by pressing on the RIGHT side of the switch.C/R: This is used to LOCK the device to prevent changes.- when LOCKED, a "reverse 6" is displayed in lower left corner- when UNLOCKED, nothing is displayed in lower left corner- to LOCK or UNLOCK: Press the C/R side of the switch 4 times in a row.Once UNLOCKED, the other switches can be pressed for different functions.Pressing on the LEFT side of the Manual - C/R switch will change MODES:Modes are: ON; ON-AUTO; OFF-AUTO; OFFON mode is ALWAYS ON.OFF mode is ALWAYS OFFON-AUTO mode is ON until a START TIME IS REACHED- When a START TIME is reached, the device changes the state of the dry contacts- (from ON to OFF in ON-AUTO mode)OFF-AUTO mode is Off until a START TIME IS REACHED- When a START TIME is reached, the device changes the state of the dry contacts- (from OFF to ON in OFF-AUTO mode.)
B**.
Working on it.
Program could be easier.
Trustpilot
1 week ago
1 month ago