Desert Online General Trading LLC
Dubai, United Arab Emirates
Desert Online General Trading LLC
Dubai, United Arab Emirates


🖼️ Elevate your viewing game—mount it right, live bright!
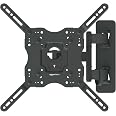
The USX Mount Full Motion TV Wall Mount supports large 42-85 inch TVs up to 132 lbs with versatile VESA compatibility. Featuring dual articulating arms, it offers ±45° swivel, +5°/-15° tilt, and ±4° leveling for optimal viewing comfort. Its space-saving design retracts close to the wall or extends out to 16.6 inches, while included installation tools and US-based customer support make setup seamless and reliable.


| Brand Name | USX MOUNT |
| Item Weight | 12.5 pounds |
| Product Dimensions | 16.93 x 2.76 x 11.81 inches |
| Item model number | XML019 |
| Color Name | Black |
C**S
High quality; Low cost!
Absolutely thrilled with this TV mount! I was honestly skeptical that something so affordable could securely support our hefty 75” TV, but it has completely exceeded expectations. The mount feels rock-solid, with zero sag or wobble, even when fully extended or tilted.Installation was straightforward, and all the necessary hardware was included—no last-minute trips to the store. The range of motion is fantastic: it tilts and angles smoothly, making it easy to get the perfect viewing angle from anywhere in the room. The flexibility to angle the TV is a game-changer for reducing glare and optimizing our setup, especially in a bright living room.Pros:- Sturdy support for large TVs (up to 75” and beyond)- Smooth tilt and swivel functions for perfect viewing- Easy installation with clear instructions and all hardware included- Surprisingly affordable for the quality and features
R**H
Solid Mount. Smooth Install. Great Value.
This mount did exactly what it promised. Came well-packaged, instructions were straightforward, and installing our 65" TV was honestly a breeze. It’s sturdy, well-built, and moves smoothly side-to-side with just the right amount of tension—no wobble or sag. The tilt and swivel adjustments are easy to fine-tune, and the level feature was a nice bonus.It pulls out far enough for angled viewing but tucks back close to the wall for a clean look. Hardware was clearly labeled, and I appreciated the extra touches like cable velcro straps. For the price, this is hard to beat. Solid mount, rock-steady hold, no surprises. Would definitely recommend.
K**N
USX Mount Full Motion TV Wall Mount - Your Ultimate TV Viewing Experience!
Attention all TV enthusiasts, home theater lovers, and entertainment seekers - prepare for the ultimate TV viewing experience with the USX Mount Full Motion TV Wall Mount! This TV mount is not just any ordinary accessory; it's a versatile and sturdy companion that will elevate your TV to new heights of comfort and immersion!Firstly, the "USX Mount" brand is like a symbol of reliability. It's like this TV wall mount has been engineered with precision and durability, ensuring it securely holds your TV with utmost confidence!The "Full Motion" feature is more than just flexibility; it's like you've got a magician's wand, allowing you to swivel and tilt your TV for the perfect viewing angle, whether it's for movie nights or catching up on your favorite shows!But here's the real magic - the "Dual Articulating Arms" are like a symphony of movement. It's like this TV mount knows how to bring your TV to life, providing smooth adjustments that effortlessly match your desired position!The "Up to 132lbs" weight capacity is more than just impressive; it's like this TV mount can support TVs of various sizes with ease, promising worry-free installation and peace of mind!The "VESA 600x400mm" compatibility is like a universal charm. It's like this TV mount can accommodate a wide range of TV models, ensuring your TV fits snugly and securely!In conclusion, the USX Mount Full Motion TV Wall Mount is your ultimate TV viewing experience that deserves a glowing review! If you're a TV enthusiast seeking versatility, sturdiness, and an immersive viewing experience, this TV wall mount is a must-have addition to your entertainment setup! USX Mount, you've created a TV mount masterpiece! Bravo for adding a touch of flexibility and sturdiness to our TV viewing adventures! May this full motion TV wall mount continue to elevate our TV watching experience to new heights of comfort and joy!
J**E
Good mount
This mount is amazing I love how I can move our tv around the room it’s holding up my husbands 75’ (that he was adamant would never be mounting but he’s on deployment haha) it fits in the room and the tv nicely without the cords being in the way it’s super sturdy. My brother said it was super easy to install and the hardware was of good quality. Definitely worth every penny!
M**
USX Mount UL Listed Full Motion TV Wall Mount Review: Sturdy but Challenging to Install
I recently installed the USX Mount Full Motion TV Wall Mount for my 75-inch TV, and while the result is excellent, the process was far from smooth.Design & Build QualityThe mount is robust and well-made, designed to support large TVs up to 86 inches and 132 pounds. The dual articulating arms are strong and provide stable support, making it easy to adjust the TV’s angle once installed.FunctionalityOnce the mount was up, it worked perfectly. The full motion feature allows for easy swiveling and tilting, which is great for finding the ideal viewing angle. It’s especially useful for a large TV like mine, making it easy to reposition the screen as needed.InstallationHere’s where things got tricky. The assembly process was challenging and frustrating. I ended up hiring someone from TaskRabbit to help with the installation. It’s crucial to ensure that the screws are tightened properly; otherwise, the TV can end up looking lopsided.AestheticThe low-profile design keeps the mount close to the wall, offering a sleek look. When properly installed, it’s unobtrusive and enhances the overall setup.OverallThe USX Mount UL Listed Full Motion TV Wall Mount is a great choice if you want a sturdy and adjustable mount for a large TV. Just be prepared for a potentially difficult installation process—consider professional help if needed. Once it’s up, it’s worth the effort for the ease of adjustment and stability it provides.Rating: 4/5
J**A
Solid, Smooth, and Easy to Install
Holds even the biggest TVs with no wobble. Swivels, tilts, and extends easily. Instructions are clear and install took under 30 minutes. Perfect for living rooms or gaming setups. Holds up my 65” tv with no problem. STURDY
Trustpilot
2 weeks ago
2 days ago