
DOWNLOAD THE APP


Customer Services
Copyright © 2025 Desertcart Holdings Limited
DOWNLOAD THE APP

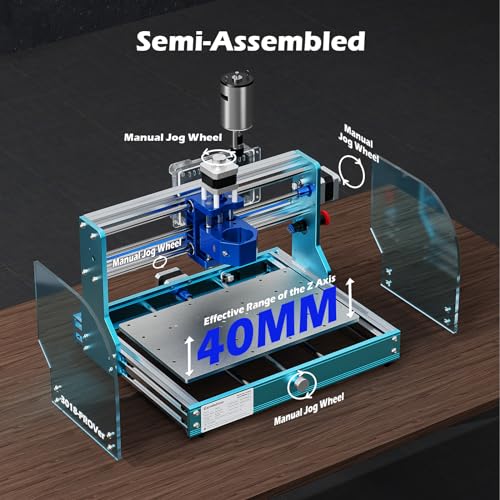


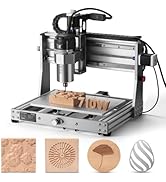
⚡ Unlock your maker potential with the Genmitsu 3018-PROVer V2 — CNC power in a compact frame!
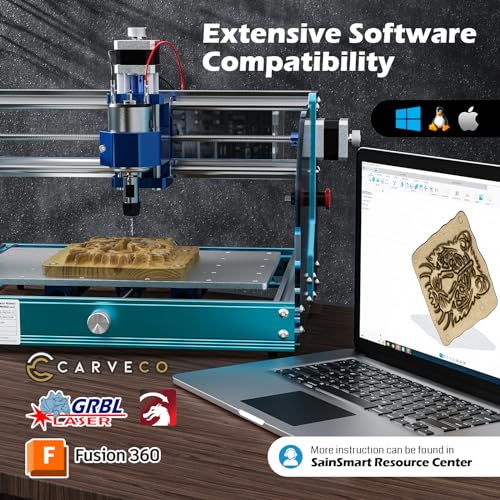
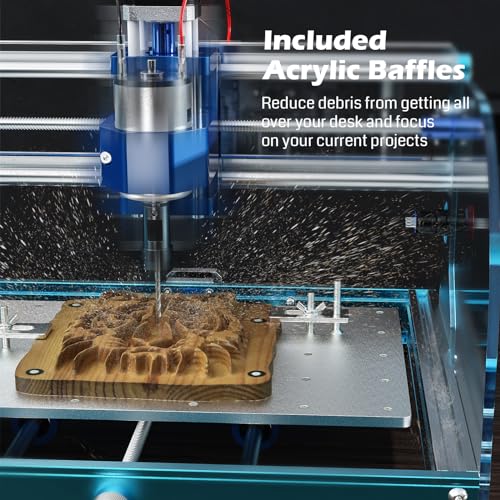
The Genmitsu 3018-PROVer V2 is a beginner-friendly CNC router featuring a sturdy full aluminum structure, 10000 RPM spindle speed, and a compact design. It supports a wide range of materials including wood, acrylic, PVC, and soft metals, and offers easy assembly with pre-assembled parts and clear cable management. Expandable with laser modules and offline controls, it includes safety features like Z probe, limit switches, and emergency stop, backed by strong customer support and CAD/CAM software compatibility.


| ASIN | B07ZFD6SKP |
| Are Batteries Included | No |
| Brand | SainSmart |
| Customer Reviews | 4.2 4.2 out of 5 stars (1,218) |
| Date First Available | December 10, 2019 |
| Item Weight | 9.23 Kilograms |
| Material | Aluminum |
| Maximum Rotational Speed | 10000 RPM |
| Model Number | 3018-PROVer V2 |
| Power Source | Corded Electric |
| Product Dimensions | 42 x 42 x 29 cm; 9.23 kg |
| Voltage | 24 Volts |
P**A
21年4月購入。殆どプリアッセンブリされた状態で、部品もコンパクトにしっかりまとまった梱包となっている。メカ組立は容易で、電気配線もリミット他モジュール盤を指定の場所に取り付け配線するだけで、線の長さもピッタリになっておりつけられた線番タグ通り接続するのみ。ビギナーとして始めるにあたり馴染みやすい。まだcandleを使って多少の彫刻加工しかしておらず、まだそれほど使ってないですが、木材で簡単な加工がすぐに始められました。装置ガントリ部固定ナットのうち1個に不良がありましたが、サポート(日本語)により、追加のナットを送付してもらえました。欲を言うならば、Z軸ストロークがあと10~20mmあれば、使える工具幅も増えて使い勝手が向上するかと。同様に付属のプローブ厚みがもう5mmほど薄いほうがよいかもしれない。そしてアンチバックラッシュのバネは、もっと強いほうがいいと思います。 2022.6追記) 突然、Z軸動作不良でワークにエンドミルが喰い込み干渉のトラブル。調べた結果、z軸モーターケーブルの断線と判明。本件、製造&販売者のカスタマー・サービスへ連絡したら、素晴らしいサポート(日本語)対応で問題が解決。その他にも問合わせに丁寧な対応があり、購入後のフォローもなかなかしっかりしていると思います。
か**い
Good Machine
I was skeptical at first because of some reviews, but it actually works! And it works really well. I’m having some issues with the homing of the machine, but I think I know what the issue is. Either way, it’s well worth the money.
や**~
Amazonのタイムセールに出ていたので衝動買いしてしまいました。 ほとんどの主要な部分が完成しているので、簡単に組み立てられました。配線は少し面倒でしたが日本語の説明書もダウンロードすれば見られるのであまり迷うこともありませんでした(http://s3.amazonaws.com/s3.image.smart/download/101-60-280PRO/3018-PRO-User_Manual-JP.pdf)(日本語説明書URL) ただ、説明書には組立のことばかりで、起動させたり調整させたりする部分の日本語の記述が無かったので、それが残念です。 XYZ軸はコントローラーで動くのにルーター(モーター)が回らないので焦りましたが、マイクロSDカードをコントローラーに差し込めば回るということが後で説明書に載っているURLをクリックして動画を見てわかってホッとしました。 テストのためのサンプルプログラムも順調に文字を彫ってくれました。 あとはソフト(アプリ)をPCで使って時の出来映えが、どうなるかがまだやっていないのでわかりません。 上手くいったら今後は別売りのコレットセットを買っていろいろなビットも揃えたいなと思っています。 3Dプリンターやレーザープリンタでは出来ないモノが作れそうで楽しみです。
フ**秀
思い通りに作れるようになりました。PCBの製作を主にしています。 PCBEーgerbvーFlatCAMーCandleという流れで加工しています。 木工はJw_cadーNCVCーCandleです。 使い始めて11ヶ月に突然動かなくなりましたがサポートにて復旧しました。コントロールボードを交換しました。サポートは英語でしたが翻訳機能で何とかなりました。 購入にあたりアクリルCNCエンクロージャーとMDFスポイルボードは 必須ですね。 PCB加工する際にZ軸にあるバックラッシュやたわみがあるのかheightmapとあわせてもさらに加工深度の調整が必要になります。Z軸のねじロッドにつまみが有れば良いと思います。Z軸の0点をマイナスにシフトして対応しています。 今後、ダストシューとスポイルボードの平面化するビット及びコレットを購入し、末長く使っていこうと思います。とても満足しています。
S**U
3週間ほど使った感想です。当初Z-Probeが動作しなくなったが、カスタマーサポートに連絡し、解決できました。こちらの設定ミスのようでした。設定をきちんとし、材料にあったツール使えばきれいにカットできます。写真は日進工具さんの樹脂用エンドミルで市販のプラスチックケースを加工したものです。ご参考まで。
K**I
同梱されているボルトやナットの山が潰れていて使えないのは序の口。 スピンドルモーターに固定されてるはずの部品(ER11 コレットチャックホルダー)のイモネジが2箇所ともネジバカになっており、チャックとモーター軸がボンドロックで無理やり固定されてました。 動作中に弾け飛んで怪我をする危険があるため、安心して使えません。
A**ー
値段が値段なので使いながら改造していくつもりではあったけど、ステージとボールネジの接続箇所とZ軸稼働部が樹脂なのは残念。まぁまだこれは許容できるけど、ボールネジのナット?の固定方法が溝に押し込んでるだけなのは有り得んですわ。 軽い衝撃で吹っ飛ぶから危なっかしい。 固定用のネジ穴空いてるけど樹脂の方がネジ穴空けられるほど肉厚ない。 なぜ他の人はこの点触れてないんだろう? 操作性は概ね問題なさそう… 騒音はある程度お金かけて作った防音ボックス使っても切削負荷によっては気になるレベル。 まだステージ調整段階だから☆3で
T**3
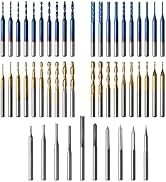
部品を買い集めてCNCを自作しようかと思っていたところ、先日のセールで安くなっていて、部品代と部品加工、組立の手間、このモデルの作りを考えて購入してしまいました。少し高いような気がしましたがエンクロージャーも一緒に購入しました。 組み立ては30分では終わりませんが、問題なく終了し稼働できました。ER11用のコレットの取り付けだけ少し悩みましたが、SDカードの動画の通りしたら簡単にできました。XYの移動距離は入力値と実測値がぴったり一致していて、特に補正は不要でした エンクロージャーの中に入れたので、エマージェンシーボタンは、エンクロージャーのアクリル固定のところを使って外から操作できるようにしました。電源ボタンも外に出そうと思いますが制御ボードのDC入力端子が5.5/2.5mmで部品待ちです。エマージェンシーボタンの取り付け穴が開いたので、ここにZ軸ゼロ点調整用プローブの配線が抜き差しできるように、3Dプリンターで端子固定用の部品を作りました。写真にあるようにステージ上に合板を切って載せています。(厚すぎるので、薄い板に交換予定です) 付属のソフトを試して、最初からとってもきれいに加工できたので感動しました。加工領域を事前に確認できたり、加工条件を細かく設定できるLaserWebも試してみました。事前にInkscapeで文字を"Object to Path"で変換して保存し、LaserWebに読み込んで”Mill Pocket”モードで加工すると表札くらいは簡単にできそうです。(LaserWebで使用するには、どういうわけかGrblの設定で $10=3 を $10=0 にして $20=0 のまま使用する必要がありました)これから、Fusion360なんかも試していきたいと思います。 エンクロージャーもあると安全ですし、静音にも効果が大きく、粉じんも飛び散らないので、少し高いような気もしますがおすすめです。 (私は、場所がリビングしか確保できなかったのでとっても助かりました) ということで、かなり楽しめる道具が入手できてとっても満足です。 追記: 練習がてら100均で購入したMDF材でコースターを作ってみました。データはFusion360で作成してLaserWebから出力しています。z-probe機能もマクロにコマンドを登録すると1クリックで使えますので便利です。
M**.
Cutting to the chase, this machine is great. It's built like a tank, assembly instructions were fine, and there are a ton of resourced available online. I got my machine on Sunday, and on the following Saturday was able to cut the piece in my attached picture with no issues. In fact, the only issues that any of my cuts have had were of my own making. The machine works very well. That said, prepare to do some learning, some troubleshooting, and some problem solving. This is my first CNC, but I have extensive experience with 3D printers, and they're the same way. This machine isn't there to hold your hand while carving out intricate masterpieces. It's a tool that you need to learn to use. Another reviewer said something like "8 hours of failure was too much." (I had the same problem that he did. It was solved by changing the "Safe Retracts" setting in Fusion360.) If 8 hours of failure is too much for you, then this isn't the machine you want. To make this (or really any CNC machine) "work", you will need some basic understanding of G Code, 3D modelling, woodworking, and electronics. You don't need to be a master at any of this stuff, but you're going to touch all of it. It will take time. You will screw things up. You will get sawdust in your hair. That's what makes these things fun. Now, more specific to this machine itself, I was very, very impressed. There are many very similar units on Amazon, and I selected this one because of the included upgrades, and the known brand name. I found the machine to be extremely well built, and straightforward to assemble. The inclusion of limit switches is important. While limit switches can be a bit frustrating, they are there to make sure you don't accidentally send the machine a command that will damage it, and the work perfectly for that. I find the offline controller to be wonderful. There seems to be a lot of hate for this part, but I like that I can run he machine "headless" and not have to leave a laptop in my dust shop. I actually had a much smoother experience using the offline controller than I did using the PC-based Candle, but they both do the same job. My motor doesn't wobble, isn't loud, and hasn't had any issue cutting through various woods at 300mm/min. I did several calibration tests on the machine as soon as I got it built, and didn't have to adjust anything. The only bad things about the machine are the hold-down clamps that are included (they work, but are the definition of "fiddly"), the included Vee bits (again, they work as they should, but why give me a bunch of Vee bits and no end mill?) and the size of the workspace. The 3018 is actually a great size for a small workspace like mine, where it will need to be moved and worked around, but just like everyone else, I'd love to be able to make bigger stuff. I've probably said enough glowing stuff about this device, but I'll sum it up, here. When I spend ~$350 on a piece of Chinese technology that's based on open source designs, I expect to get a pretty low-end product that I can usually upgrade to make it useful. In this case, I got a solid, well-deigned, functioning piece of gear. I haven't been this amazed at how well a cheap gadget works since the Elegoo Mars Pro. If you're looking for a cool tool with a steep, but fun learning curve, look no further. If you want to easily and quickly cut wood (or metal) parts with the push of a button, maybe wait a few years. Software That I Used: -Candle (included) for machine control -Easel (very limited free use) for design and GCode Creation -F Engrave (free) for GCode creation -Carbide Create (free) for design and GCode Creation -Fusion360* (free) for design and GCode creation -Inkscape (free) for image design *Fusion360 is the real workhorse, here. It has by far the most features, but also the steepest learning curve. If you're familiar with Fusion360, you'll have no trouble. Otherwise start with Carbide Create.
M**L
Ik ben zeer tevreden met de 3018-PROVer V2. Het product was goed verpakt en de handleiding is gemakkelijk te begrijpen. De meegeleverde software is eenvoudig te installeren en gemakkelijk in het gebruik.
T**O
Il pacco è arrivato con qualche giorno di anticipo, che mi ha lasciato molto contento. Il prodotto è ben impacchettato, tutto è tenuto ben fermo da spessi strati di polistirolo. Unico difetto, nella mia scatola dei bulloni ne mancavano 2 M6, ho contattato il supporto SainSmart che me li ha recapitati in meno di 4 giorni. Il montaggio è semplificato rispetto ad altri prodotti ma richiede comunque un certo tempo, io ci ho messo circa 1 ora e mezza a completare tutto, e non ho messo il proteggi cavo in nylon perché mi riusciva male. Sono comunque molto soddisfatto perché le risorse fornite (sul sito sono presenti anche video tutorial) aiutano moltissimo e non c'è nulla da fare di veramente complicato. Una volta montata la CNC si presenta esteticamente molto bene, solida e con un colore azzurro che mi piace molto. Io la vorrei utilizzare principlamente per produrre circuiti stampati di progetti DIY, le prime prove mi hanno dato molta soddisfazione anche se ho ancora molto da imparare! Nel complesso la consiglio a chi ha tempo e voglia di imparare e studiare le varie tecniche/tecnologie per la fresatura con la CNC, lo sconsiglio a chi invece preferisce avere una soluzione "plug&play" che faccia subito tutto bene senza bisogno di metterci le mani. Allego qualche foto, scusate per la mia scrivania super disordinata :) ==== Automactic tranlsation in English ==== The package arrived a few days in advance, which left me very happy. The product is well packed, everything is held firmly by thick layers of foam. One defect, in my bolt box there were 2 M6 missing, I contacted SainSmart support which delivered them to me in less than 4 days. The assembly is simplified compared to other products but still requires some time, it took me about 1 and a half hours to complete everything, and I did not put the nylon cable protector because it was bad for me. I am however very satisfied because the resources provided (there are also video tutorials on the site) help a lot and there is nothing really complicated to do. Once mounted, the CNC looks aesthetically very well, solid and with a blue color that I really like. I would like to use it mainly to produce printed circuit boards for DIY projects, the first tests have given me a lot of satisfaction even though I still have a lot to learn! Overall, I recommend it to those who have the time and desire to learn and study the various techniques / technologies for CNC milling, I do not recommend it to those who prefer to have a "plug & play" solution that does everything right away without having to get their hands on it. I attach some photos, sorry for my super messy desk :)
T**R
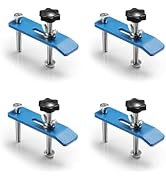
Ich habe mir diese Fräse vor allem für die Herstellung von PCB-Prototypen für meine Elektronik-Projekte zugelegt. Der Aufbau ist gut beschrieben und in ca. einer Stunde erledigt. Das Einfädeln der Kabel in die Kunststoff-Netze ist etwas fummelig, mit Geduld und einem Feuerzeug aber auch sauber machbar. Die Spindel ist relativ laut, läuft aber sauber zentriert und bisher sehr zuverlässig. Der Motor lässt sich auch günstig nachkaufen, falls etwas wäre. Der Bewegungsapparat hat viel Kraft und ist sehr präzise, die Steuerplatine ist sauber verarbeitet und bereits mit einer vorkonfigurierten GRBL-Version geflasht. Nach dem Aufbau kann es also direkt losgehen. Als Software wird eine ältere Version von Candle mitgeliefert, ich habe mir gleich die aktuelle Version von Github geladen. Damit lässt sich die Fräse sehr gut steuern, auch eine 3D-Vorschau und eine Heightmap kann erstellt werden. Ich habe mir noch eine zweite Krokodilklemme an das Kabel gemacht, um PCBs sauber ausmessen zu können. Für die Planung verwende ich meist Sprint Layout, als Präprozessor dann FlatCAM. Für das Isolation-Routing benutze ich ein 30° V-Bit mit 0.1mm Eintauch-Tiefe, dann einen 0.5mm Fräser für die Löcher und einen 2mm Fräser zum Herausschneiden. Bisher habe ich ca. 20 PCBs erstellt, die Genauigkeit ist auch für SMD absolut ausreichend. Fertige PCBs sprühe ich dann noch mit PCB-Lack ein, um sie vor Korrosion zu schützen. Auch Holz lässt sichgut bearbeiten, am besten geht natürlich weiches Material, aber bei entsprechend langsamerem Vorschub konnte ich auch mit Eiche gute Ergebnisse erzielen. Die Planung und das Erzeugen des Maschinen-Codes habe ich dafür komplett in Autodesk Fusion 360 durchgeführt, aber auch andere Software, die GRBL kompatiblen GCode erzeugt, kann benutzt werden. Die Reinigung ist aufgrund der schlanken Bauweise unproblematisch, und die mitgelieferten Verschraubungen halten das Werkstück sicher auf dem Tisch fixiert. Ich habe mir noch kleine Gummifüße gebastelt, damit die Schrauben beim Einspannen das Aluminium nicht verkratzen. Die maximale Breite des Werkstücks wird durch den Rahmen seitlich auf ca. 30cm beschränkt, nach vorne und hinten ist die Maschine offen und hat in der Tiefe einen Arbeitsbereich von ca. 18cm. Die maximale Höhe liegt bei etwa 5cm, höher kann die Spindel nicht angehoben werden. Für Namensschilder, kleine Formteile und natürlich PCBs ist das meist mehr als ausreichend. Für den Betrieb empfehle ich ein dauerhaft verbundenes Notebook, da man damit die beste Kontrolle und eine Vorschau hat. Mit dem mitgelieferten Controller kann man die Maschine zwar auch bewegen und GCode senden, durch das fehlende Feedback sind die Möglichkeiten dann aber eingeschränkt. Die Endstopps halten die Maschine bei Betätigung sofort an, dadurch wird verhindert dass man eine der Achsen zu weit bewegt und damit möglicherweise die Mechanik beschädigt. Auch ein Homing ist dadurch möglich, wobei man gerade bei dickeren Werkstücken aufpassen muss, dass der Fräser nicht an den Halterungen hängen bleibt. Auch der Not-Aus-Schalter ist ein praktisches Feature, weil man damit die Maschine vor einer Kollision oder bei einem abgerissenen Fräser sofort anhalten kann und Schäden vermeidet. Insgesamt eine sehr vielseitige kleine CNC-Fräse, auch gut für Einsteiger geeignet, für gute Ergebnisse muss man sich allerdings vertiefend mit CAM-Software auseinandersetzen und braucht in der Regel mehrere Versuche.
R**T
My First CNC machine. It seems very well built and went together easily. A few of the pre assembled parts had loose screws which were easy to fix. Still a learning curve with software choices etc. Probably can't say which software here. But the one that's commonly recommended works well. Learned a lot from on line forums in regard to setting up and first cuts. I had purchased a selection of bits and cutters at time of purchase. So no delays in trying things. I also upgraded to the 20000 RPM spindle from day one. Seems smooth and not too noisy, although first use was only at 12000 RPM. Looking forward to more projects.
Trustpilot
2 months ago
3 days ago